소개
After years of flirting with flagship prices, OnePlus gets back to their flagship-killer roots with the new OnePlus Nord—a mid-range device with a spec sheet that punches well above its price point. But how does it fare on the repairability scales, and what other secrets lay inside? OnePlus wouldn’t say, so we’ll let a teardown do the talking.
Can't get enough teardown? Here's where to get more: Subscribe to our newsletter or follow us on Facebook, Instagram, or Twitter for the latest teardown news.
필요한 것
동영상 개요
-
-
The primary spec that's meant to "wow" you is the €399 (£379) starting price (roughly $490ish equivalent in the USA, where it's not for sale, yet). But these other specs deserve a look as well:
-
6.44" Fluid AMOLED with 2400x1080 pixels and a 90 Hz refresh rate
-
Qualcomm Snapdragon 765G with Adreno 620 GPU
-
8 GB of LPDDR4X RAM and 128 GB of storage
-
4,115 mAh worth of battery
-
Four rear cameras and two front-facing cameras
-
Under-display fingerprint sensor
-
Are you ready for a teardown expedition? Let’s get goin’.
-
-
-
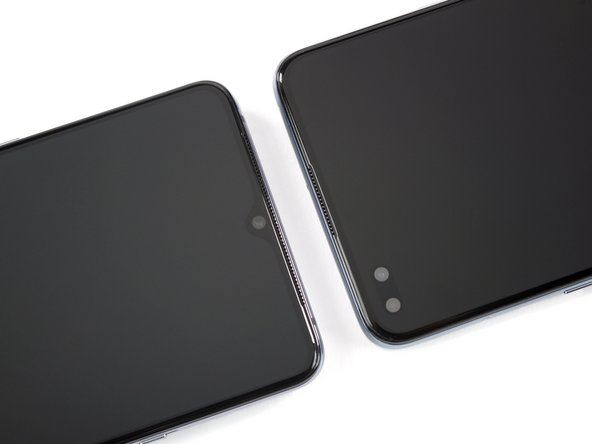
To get your teardown's worth, you need a baseline for comparison. Consider last year's OnePlus 7T (left), which looks so superficially similar we're gonna have to make sure we remember to tear down the correct phone. What's different?
-
First to stick out at you is that camera bump—not only is the underlying hardware different, but it's all migrated to a straight-line configuration on the Nord's left edge.
-
The earpiece speaker grille also shrunk, and the Nord peers at you with dual hole-punch selfie cams, rather than a teardrop notch.
-
The bottom edge looks similar (minus some antenna lines) and features a USB-C port, a redesigned speaker port, the SIM tray, and a
headphone jackmicrophone hole. -
With the 7T safely set aside, this teardown officially gets underway.
-
-
-
Good news—this opening procedure doesn't require heat! Our pick/suction handle combo performs with gusto, so we skip the bonfire for now.
-
There are also no booby trap cables or hidden components—our journey is off to a good start.
-
Wireless charging does have its benefits—namely, reducing wear on the charge port—but it's so dreadfully inefficient that we're having a hard time warming up to it, other than as a backup feature. Still, the iPhone SE (2020) did manage to pack in wireless, and at a lower price.
-
-
-
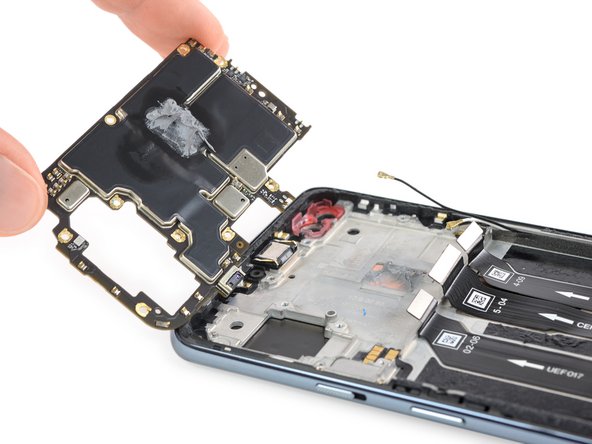
We don’t need a map to guess that the battery connector hides behind this motherboard cover. (But for less experienced fixers, a map would sure be nice.)
-
After removing eleven standard Phillips screws, the motherboard cover—with an NFC antenna and flash attached to it—comes off.
-
This is one advantage that Android phones routinely flex over their Apple counterparts, which use a sometimes bewildering mix of proprietary and exotic screws in every size and length you can shake your fist at.
-
-
-
Easy peasy removable battereezy—Like other OnePlus models before, the Nord comes with a handy pull tab for convenient battery removal.
-
This can still stress the battery a fair bit, so for safety reasons you probably shouldn't re-use it after removal—only yank it out if you have a replacement ready.
-
Labeled BLP785, this source of fresh energy provides the Nord with 15.92 Wh (4,115 mAh @ 3.87 V).
-
Now our curiosity is all charged up. What else have you got, Nord?
-
-
-
-
The rear cameras pop out in a gaggle:
-
48 MP ƒ/1.75 optically stabilized main camera using a Sony IMX586 sensor—reportedly the same as in the OnePlus 8
-
8 MP ƒ/2.25 ultra-wide camera with a 119° field of view
-
5 MP ƒ/2.4 depth camera
-
2 MP ƒ/2.4 macro camera
-
The front cameras make their exit together:
-
32 MP ƒ/2.45 main camera using a Sony IMX616 sensor with only EIS (Electronic Image Stabilization).
-
8 MP ƒ/2.45 ultra-wide camera with a 105° field of view
-
-
-
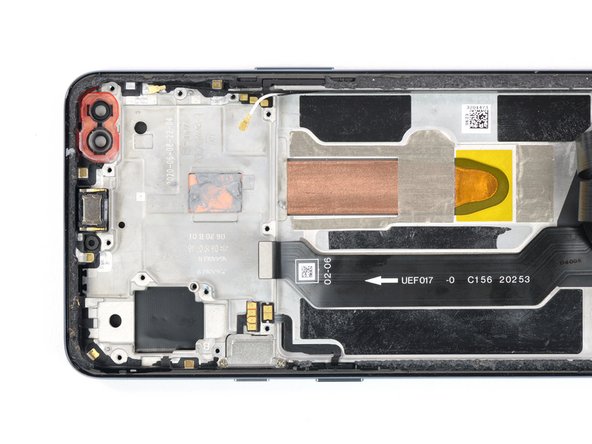
Although the OnePlus Nord carries no official IP rating, it does use rubber connector gaskets found in the IP68-certified OnePlus 8 Pro—so it may have inherited some water and dust resistance.
-
Remove two Phillips screws and the motherboard lifts out next, revealing some thermal paste on the back.
-
-
-
Finally some precious
stoneschips: -
Skyworks SKY58094-11 Multimode Multiband Tx-Rx Front- End Module (FEM)
-
Qualcomm PM7250 power management chip
-
Qualcomm PM7150A power management chip
-
Qualcomm PM7250B power management IC
-
Qualcomm QET5100 Envelope Tracker
-
-
-
But the real gems are on this side:
-
Qualcomm SDM765 Snapdragon 765G
-
Samsung MCP storage / memory combination chip, home to 128 GB of UFS 2.1 storage and 8 GB of LPDDR4X DRAM
-
Snapdragon 865 5G Mobile Platform
-
Qualcomm WCD9385 Aqstic audio codec
-
Skyworks SKY5 3735-11 diversity receive module
-
Qualcomm Atheros WCN3998 Wi-Fi 6-ready Chipset with Bluetooth 5, WPA3 Security, and Digital FM
-
-
-
The display is quite a challenge to remove, glued tightly inside the plastic bezel. But with some heat and thin-tooled slicing, we eventually succeed.
-
No more treasures under this lid—just a (somewhat oddly tilted) rectangular cutout for the fingerprint sensor. We assemble our belongings—leave no trace!—and head back to camp.
-
-
-
This is the complete selection of treasures gathered during our journey.
-
We have seen one rather accessible battery, lots of rubber gaskets, some interesting thermal solutions, and many replaceable components.
-
OnePlus has definitely put itself back on the mid-range map. Let's wrap up and see where it landed on the repairability scale.
-
- You only need one Phillips driver for any repair.
- Almost all components are modular and can be individually replaced.
- The battery can be replaced once you removed the motherboard shield. It’s only lightly adhered and comes with a pull tab for easy removal.
- The primary access point for all repairs, the rear panel, is glued in place—but can be removed without heat.
- Display replacements, which are the most common repairs, are not prioritized.


최종 결론
수리 용이성 점수


(10은 가장 쉬운 수리를 뜻합니다)

팀

댓글 17개
I wish more phones had resealable rubber gaskets so they would still be ingress-resistant even if one needed to service the display or battery, and you wouldn’t have to change the adhesive every time.
The thing is that rubber gaskets only work if you have some other mechanism that holds two parts together very tightly, for screws, with display and back cover glass this is definitely not feasible at all, and the adhesive isn’t there just for waterproofing but also to hold them in place.
Nice work! I have a question. I inserted the SIM ejector tool in the bottom mic mistaking it with the SIM one. Does this cause any kind of damage to the mic or the mesh?
No worries. Inside the phone the microphone is oriented upwards at a 90° angle so you can’t reach it with the sim opening tool. Your Nord is fine.
One of my SIM isn't readymade nano SIM, it's a truncated sim cut from regular one. While inserting SIM I've applied a bit of pressure it went inside but now I couldn't eject SIM tray outside, what to do? Any suggestions?