주요 콘텐츠로 건너뛰기

필요한 것

해당 분해도는 수리 안내서가 아닙니다. Philips Pressurised Steam Generator GC8220 수리는 저희 서비스 설명서를 사용하십시오.

  1. Philips Pressurised Steam Generator GC8220 Teardown, Philips Pressurised Steam Generator GC8220 Teardown: 1 단계, 이미지 1/1
    • first remove the first screw of the side panel.

  2. Philips Pressurised Steam Generator GC8220 Teardown: 2 단계, 이미지 1/2 Philips Pressurised Steam Generator GC8220 Teardown: 2 단계, 이미지 2/2
    • note : keep a plan of the screws. or a magnetic platform.

    • now remove the upper screw in the white plastic plate.

  3. Philips Pressurised Steam Generator GC8220 Teardown: 3 단계, 이미지 1/1
    • remove the 2 srews and the metal plate.

    • remind where all the cables run to.

  4. Philips Pressurised Steam Generator GC8220 Teardown: 4 단계, 이미지 1/1
    • remove the srews from the lower panel.

  5. Philips Pressurised Steam Generator GC8220 Teardown: 5 단계, 이미지 1/2 Philips Pressurised Steam Generator GC8220 Teardown: 5 단계, 이미지 2/2
    • now remove the upper blue plastic from the iron itself.

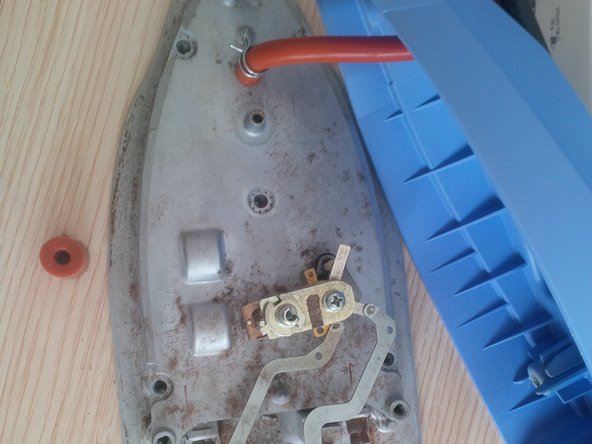
    • click the wires loose. ( you can click it loose at the metal part of the wire,there is a little metal clip you have to push and then pull the wire out.)

    • if you put it togheter again , notice that the steam button is in his place.

    • note: again, see where the wires run at.

  6. Philips Pressurised Steam Generator GC8220 Teardown: 6 단계, 이미지 1/1
    • remove the screw at the pointed side of the iron.

  7. Philips Pressurised Steam Generator GC8220 Teardown: 7 단계, 이미지 1/1
    • remove the bottom plate screws.

  8. Philips Pressurised Steam Generator GC8220 Teardown: 8 단계, 이미지 1/1
    • remove the blue bottom plate and the cables

  9. Philips Pressurised Steam Generator GC8220 Teardown: 9 단계, 이미지 1/2 Philips Pressurised Steam Generator GC8220 Teardown: 9 단계, 이미지 2/2
    • remove al the wires from the sockets.

    • remove the white and blue plastic case around the iron.

    • remove the red dot (rubber)

    • and remove the 2 black dot rubbers.

  10. Philips Pressurised Steam Generator GC8220 Teardown: 10 단계, 이미지 1/1
    • remove the rubber wire (red/orange color) and the metal pin arround it.

    • tip : if you heat it up , it come loose easy

    • tip : If the iron bottom plate is full of calc , you can put it in a bucket full of hot water with a lot of vinegar. (and i mean a lot!)

  11. Philips Pressurised Steam Generator GC8220 Teardown: 11 단계, 이미지 1/2 Philips Pressurised Steam Generator GC8220 Teardown: 11 단계, 이미지 2/2
    • Now we start with the biggest part of the iron. the boiler and the water reservoir unit.

    • remove the 3 torx srews at the iron plate. they are under the rubber footclips.

  12. Philips Pressurised Steam Generator GC8220 Teardown: 12 단계, 이미지 1/3 Philips Pressurised Steam Generator GC8220 Teardown: 12 단계, 이미지 2/3 Philips Pressurised Steam Generator GC8220 Teardown: 12 단계, 이미지 3/3
    • after removing the metal plate, you see two tubes.

    • remove the plastic holder with the two tubes.

    • remove the plastic from the tubes.

    • tip : remind where the black tube is put in and where the red tube is in.

  13. Philips Pressurised Steam Generator GC8220 Teardown: 13 단계, 이미지 1/1
    • remove the torx screws inside the plastic holes, you'll need a longer torx screwdriver.

    • remove the other two torx screws in front of the machine ,where the waterreservoir normaly is. (i don't have a picture of this.) but the screws are visible

  14. Philips Pressurised Steam Generator GC8220 Teardown: 14 단계, 이미지 1/2 Philips Pressurised Steam Generator GC8220 Teardown: 14 단계, 이미지 2/2
    • remove the body of the machine and you'll see the boiler and the electronics, pump...

  15. Philips Pressurised Steam Generator GC8220 Teardown: 15 단계, 이미지 1/2 Philips Pressurised Steam Generator GC8220 Teardown: 15 단계, 이미지 2/2
    • remove the screws of the control panel.

    • pull the control panel out.

    • remove the connectors from the board.

  16. Philips Pressurised Steam Generator GC8220 Teardown: 16 단계, 이미지 1/1
    • remove head electrical wire ( power )

    • reminder : keep a plan from where to where to wires go. I made a electrical plan only for the boards, so i knew where to plug the wires in again.

  17. Philips Pressurised Steam Generator GC8220 Teardown: 17 단계, 이미지 1/3 Philips Pressurised Steam Generator GC8220 Teardown: 17 단계, 이미지 2/3 Philips Pressurised Steam Generator GC8220 Teardown: 17 단계, 이미지 3/3
    • remove second board ( pull), be carefull and attentively. here are a lot of wires. ,again keep in mind where the wires go.

    • tip: the colors of the wires are also on the board.

  18. Philips Pressurised Steam Generator GC8220 Teardown: 18 단계, 이미지 1/1
    • remove white plastic safety valve. (pull)

  19. Philips Pressurised Steam Generator GC8220 Teardown: 19 단계, 이미지 1/1
    • remove the thick grey and white kabel, that runs from the boiler unit to the iron by removing the two torx screws and the metal plate.

  20. Philips Pressurised Steam Generator GC8220 Teardown: 20 단계, 이미지 1/3 Philips Pressurised Steam Generator GC8220 Teardown: 20 단계, 이미지 2/3 Philips Pressurised Steam Generator GC8220 Teardown: 20 단계, 이미지 3/3
    • now we will remove the pump.

    • remove the small and the thicker wire. remaind witch one goes where.

    • note : if the pump in your iron is broke you should remove the tubes and wires. ( see third picture) I did'nt do it cause i only opened mine for removing calc from boiler and iron.

  21. Philips Pressurised Steam Generator GC8220 Teardown: 21 단계, 이미지 1/1
    • now we will remove the rest of the wires and cables.

    • and at the same time we will remove the blue part ( steam valve.) Use a wrench.

    • tip : be carefull for the black tube.

  22. Philips Pressurised Steam Generator GC8220 Teardown: 22 단계, 이미지 1/2 Philips Pressurised Steam Generator GC8220 Teardown: 22 단계, 이미지 2/2
    • now , the last part : the boilerunit.( the most expensive part of the hole machine too!! Here in Belgium you will pay arround 115 USD$ ( 83 euro)

    • be carefull with the last wires. some of them ( and also the thick black tube) are realy hard to remove.

    • tip: to uncalc the boiler, fill it up to 1/3 with realy hot water and the rest with vinegar. let it rest for an hour or 4.

    • tip 2 : if you unclac the boiler , be carefull with some wires, you can't remove them all if you only going to uncalc the machine.

Kevin D

회원 가입일: 05/02/14

7,249 평판

안내서 21개 작성하였습니다

댓글 42개

Thanks for all your effort in doing this. I found it helpful !

Colin - 답글

Thanks a lot for this, I used it as a guide to replace the soleplate and hose lead - I think I would have struggled without this very handy and well written document.

Proost!

Sean

Sean O'Neil - 답글

no problem guys, thnaks for liking this :).

kind regards,

kevin

Kevin D - 답글

Thanks for these instructions and clear pictures. Very helpful and excellent English.

trevorboardman - 답글

A lot of Philips GC83xx boiler steam iron devices seem to have 'switch off' issues after about 2 years of usage. If you notice that the light around the on/off button is fading, especially when pushing the steam button, your problem might be caused by the capacitors in the power supply. Verify this by checking the power voltage (blue wire on the power board connector): it should be 24Volt dc. If this is significantly less, try replacing the big capacitor on the power board. But be carefull: the whole board carries 240Vac, and the capacitor should only be replaced by a certified safety capacitor (X2 type) with the same operating voltage and capacity.

Paul Turelinckx - 답글

댓글 쓰기

조회 통계:

24 시간 전: 1

7일 전: 20

30일 전: 94

전체 시간: 31,941