주요 콘텐츠로 건너뛰기

해당 분해도는 작업 중 입니다 – 최신 변경 사항을 보려면 주기적으로 다시 로드 하십시오!

필요한 것

  1. iMac G3 Model M5521 Teardown, Before You Begin...: 1 단계, 이미지 1/1
    • Before you begin, position the computer face down, resting the computer on an ESD mat or other soft surface.

  2. iMac G3 Model M5521 Teardown: 2 단계, 이미지 1/1
    • Using a spudger or flathead screwdriver, remove the VGA vented cover.

    • Remove the two screws near the flip foot.

  3. iMac G3 Model M5521 Teardown: 3 단계, 이미지 1/1
    • Using a spudger or flathead screwdriver, remove the VGA vented cover.

    • Remove the two screws near the flip foot.

    • Remove the video out access door from the bottom housing.

  4. iMac G3 Model M5521 Teardown: 4 단계, 이미지 1/1
    • Remove the two outer screws located near the video out port.

    • The bottom housing uses two sizes of screws. The two shorter screws attach near the flip foot.

  5. iMac G3 Model M5521 Teardown: 5 단계, 이미지 1/1
    • Pull the bottom housing off the computer.

  6. iMac G3 Model M5521 Teardown: 6 단계, 이미지 1/1
    • Align the three tabs on the bottom housing with the tab slots on the front outer bezel. Ensure that the center tab is properly aligned or CDs and DVD discs may not eject from the slot.

    • Lower the bottom housing into place and replace the screws.

  7. iMac G3 Model M5521 Teardown: 7 단계, 이미지 1/3 iMac G3 Model M5521 Teardown: 7 단계, 이미지 2/3 iMac G3 Model M5521 Teardown: 7 단계, 이미지 3/3
    • Position the computer upside down, resting the computer on an ESD mat or other soft surface.

    • Remove the bottom housing.

    • Remove the six screws on the EMI cover.

    • Lift the EMI cover off the computer.

    • Be careful of the VGA output port.

    • Position the rear of the EMI cover into place first, positioning the EMI cover over the video port (if present). Continue lowering the cover into place by gently squeezing in on both sides, as you lower the cover into position.

  8. iMac G3 Model M5521 Teardown: 9 단계, 이미지 1/3 iMac G3 Model M5521 Teardown: 9 단계, 이미지 2/3 iMac G3 Model M5521 Teardown: 9 단계, 이미지 3/3
    • Position the computer face down, resting the CRT on an ESD mat or other soft surface.

    • With a flathead screwdriver or coin, turn the colored latch counterclockwise on the access door.

    • Pull the access door down to open.

    • Push down on the plastic tabs to release the SDRAM module(s).

    • Carefully lift the SDRAM from the slot.

    • Remove installed SDRAM from the logic board before returning the logic board to Apple.

  9. iMac G3 Model M5521 Teardown: 10 단계, 이미지 1/3 iMac G3 Model M5521 Teardown: 10 단계, 이미지 2/3 iMac G3 Model M5521 Teardown: 10 단계, 이미지 3/3
    • Position the computer face down, resting the CRT on an ESD mat or other soft surface.

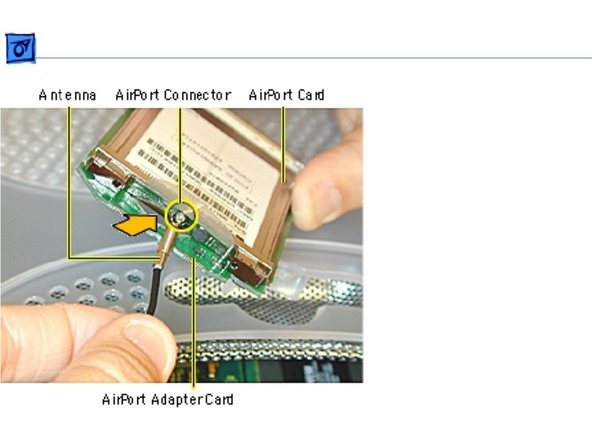
    • With a flathead screwdriver or coin, turn the colored latch to open the access door. The antenna and AirPortCard will be visible when you open the access door.

    • If the AirPort card is not installed, a clear protective antenna cap will be attached to the antenna.

    • Remove the AirPort Card by lifting the card straight up and out of the card guides and connector.

    • Disconnect the antenna from the small hole AirPort Card.

  10. iMac G3 Model M5521 Teardown: 11 단계, 이미지 1/3 iMac G3 Model M5521 Teardown: 11 단계, 이미지 2/3 iMac G3 Model M5521 Teardown: 11 단계, 이미지 3/3
    • Position the computer upside down, resting the computer on an ESD mat or other soft surface and remove the bottom housing, EMI cover, and SDRAM.

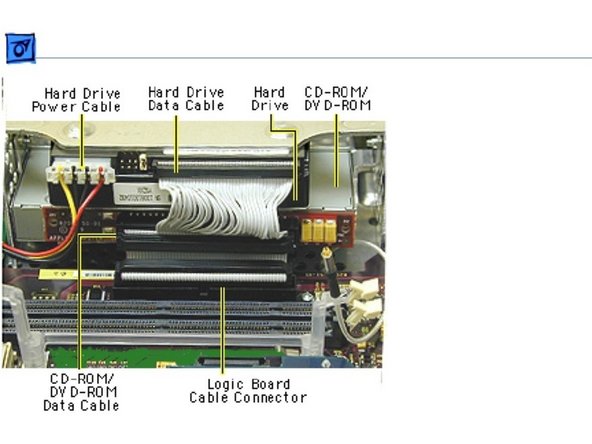
    • Remove the four screws connecting the CD/HD drive carrier to the the metal chassis (also known as the divider panel).

    • Disconnect the following cables from the back of the CD/HD carrier: hard drive power cable, hard drive data cable, CD-ROM/DVD-ROM data cable, logic board cable connector.

  11. iMac G3 Model M5521 Teardown: 12 단계, 이미지 1/1
    • Tilt the CD/HD carrier forward and lift the carrier out of the computer.

    • Continue with the disassembly procedures if you are replacing the CD-ROM, DVD-ROM, or the hard drive.

  12. iMac G3 Model M5521 Teardown: 13 단계, 이미지 1/3 iMac G3 Model M5521 Teardown: 13 단계, 이미지 2/3 iMac G3 Model M5521 Teardown: 13 단계, 이미지 3/3
    • Remove the six screws on the logic board and five screws on the downconverter board.

    • The two screws located at the top of the down converter board(near the speaker) are larger screws than the other screws (with washers).

    • Gently lift the downconverter board and logic board out of the computer.

    • Using a flathead screwdriver, pry the plastic rivet off the board. Put the top half of the rivet back into the bottom half so it doesn’t get lost.

  13. iMac G3 Model M5521 Teardown: 14 단계, 이미지 1/1
    • Holding onto the downconverter, press down on the black connector to separate the downconverter board from the logic board.

    • If you are returning the logic board to Apple refer to the parts database and remove the SDRAM, any cables, the modem, theAirPort Card, and I/O panel.

    • When reinstalling the logic board, make sure the antenna wire is not underneath the board.

  14. iMac G3 Model M5521 Teardown: 15 단계, 이미지 1/2 iMac G3 Model M5521 Teardown: 15 단계, 이미지 2/2
    • Position the computer upside down, resting the computer on an ESD mat or other soft surface and remove the bottom housing, EMI cover, logic board.

    • Disconnect the cable at J12, going from the logic board to the I/O panel.

    • Remove the two screws on the I/O panel.

Dutch Apple Collector

회원 가입일: 11/29/15

66 평판

안내서 1개 작성함

댓글 한 개

Thank you so much for having this page. I just got this family model (free). This page helped me get to the hard drive to reinstall the OS on a G3. Then back to this model. The CD does not read disks. So I had to move drives around just to install for the Blueberry. Again THANK YOU SO MUCH :)

P.S.

I hate making an account just to comment. &&^&^$^ ass holes.

unc_red - 답글

댓글 쓰기

조회 통계:

24 시간 전: 5

7일 전: 41

30일 전: 239

전체 시간: 17,973