주요 콘텐츠로 건너뛰기

Samsung Galaxy TabPro S, model SM-W700NZKAXAR, was released on March 18, 2016 is designed to be used as a tablet and a laptop.

19 질문 전체 보기

Can I upgrade the SSD on the Tabpro S?

The Samsung Tabpro S is a (near) perfect windows 2-in-1 tablet.

I bought the 128GB ssd version.

My question : Can I (without breaking the tablet) upgrade the SSD (M.2 liteon CV1-8b128) with a higher capacity ?

Thanks !

LM

이 질문에 답하기 저도 같은 문제를 겪고 있습니다

좋은 질문 입니까?

점수 12
댓글 달기

답변 4개

가장 유용한 답변

I bought a tabpro with damaged keyboard connector, look pictures below. If you will try to open yours, then you need take care on the two cables that are pasted to the cover, see markings in the below pictures.

The cover itself is fixed on clips, they get released, if you slide with a proper tool between cover and case. But besides of this the cover is fixed with adhesive. On my tablet someone tried to open the cover and damaged the mentioned connectors. Be carefully if you will try to open yours!

Block Image

Block Image

해당 답변은 도움이 되었습니까?

점수 5

댓글 6개:

Looked at that wrong. Yes, you are correct. I didn't see you had the AMOLED off already. That's not "glue" though, and using your nails to pry is also not a good method. Watch other videos and walk-throughs on how to help remove covers in 2016 and you'll likely find the solution.

You are right about nails and "glue".

Only plastic back cover is off, display is still in place in my case. I bought the tablet in this condition. It looks like it is necessary to detach the display in order to replace damaged keyboard connector, but it looks too risky for me, since I have no experience in that and don't have the proper tools.

I think it is possible to detach the plastic cover and replace the SSD, if you take care when releasing the mentioned two cables in order not to do same wrong like in my case.

Hi Steve, Laurent & Good Tech.

Sorry for joining the party a full 6 months after the last post. Wondered if you'd had any success with either upgrading the SSD or finding a way to remove the back cover without damaging the connections?

I tried a demo removal and everything was fine until it came to the connectors. In my case there are actually 3 (2 where you've mentioned above and then one in the top right (in your picture 1) which is a secondary wifi connection.

Appreciate any help you can give. It's a brilliant piece of kit yet the SSD capacity is the only downside.

Cheers

Tom

Hi, was it attached with glue, or did it use snaps to attach both covers?

With glue and clips on back cover.

댓글 1개 더보기

댓글 달기

I am happy to report that I managed to upgrade the SSD on the TabPro S.

I used a heavy duty suction cup to grip the top left corner, then used a metal spudger to slowly work my way around the tablet. The cover is secured by tabs and glue.

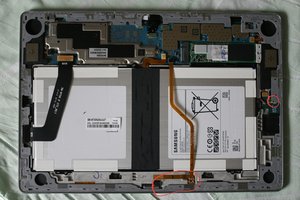
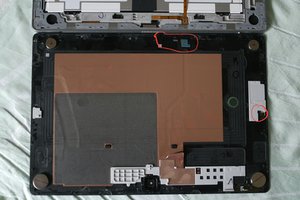
Once the back cover is separated, do NOT lift it off completely -- heed @virtue's warnings above about the cables that are stuck to the cover at the bottom middle and right middle sections. You should first use a nylon pry tool to gently peel off the keyboard cable which is taped to the inside surface of the cover (at the bottom section of the tablet). The flex cable is very delicate so be very careful.

After removing this cable, gently pry the cover open (I think there are some snaps in the middle) by gently lifting the cover out towards the right (like you would flip open a book) -- there is another cable that is stuck to the cover on the right side of the tablet and I can't figure out how this can be removed. If someone can tell me how that would be much appreciated.

Lay the back cover to the right of the tablet, and you can now access the SSD, which is at the left of the top section of the tablet. The SSD is held down by a small screw. Once unscrewed, remove the white plastic guiding plate (it is stuck to the SSD with some double-sided adhesive tape). Tape this plate to your replacement SSD at the same location. After slotting the new SSD in, screw it down to the motherboard together with the plate. You should use a M2 2280 form factor SSD, which is pretty commonplace -- I used a Samsung EVO 850 one.

Before reassembling the back cover, you may want to tape the keyboard cable separated from the back cover directly over the connecting pins on the tablet, after aligning it to the correct position of course (I found that upon reassembly, the back cover did not fit as snugly as it did originally and so did not press the cable down sufficiently on these pins -- your keyboard will then not work. I fixed the problem with some tape as above). You can now put the cover back on again and press down to secure it.

If you did not clone the old SSD image onto the new one, you will need to do a fresh install. For this I suggest you use a USB-C hub which accepts a USB-C charging connection and with preferably at least 2 free USB ports. If it has an ethernet connection as well that would be useful as wifi was not working during the installation process.

Insert a thumbdrive with a Windows installation image and boot up. The touchscreen and keyboard did not work during installation, hence I used a USB keyboard connected to the remaining USB port to get the installation going.

Windows may not install the drivers you will need for the TabPro S, so once you have a basic installation of Windows, head to the Samsung website to download "Samsung Update" from the TabPro S support page. This will install the necessary drivers to get the tablet working optimally. Once done you have a tablet with a lot more space and utility!

해당 답변은 도움이 되었습니까?

점수 5

댓글 1개:

How do you remove the keyboard cable? I think I've damaged mine, thankfully I have two tablets that I need to merge together. Which side of the keyboard cable needs to be losened? Should the cable remain with the tablet itself or with the cover?

This seems a needlessly complicated design. The keyboard ribbon connects something coming from the tablet portion of the device to the frame, which is also part of the tablet portion of the device. Why does it go over the cover?

댓글 달기

Yes, but good luck on the teardown. Sorry to be pessimistic --just saying. I am an authorized Samsung repair agent, and I can tell you even at our level, this device isn't easy (nor can i disclose how --sorry).

해당 답변은 도움이 되었습니까?

점수 0

댓글 6개:

Oh, %#*@. That's unfortunate. As an authorized repair tech, I'd personally suggest throwing some strong double sided tape along all the corners and place a couple books along the backside for a few minutes --essentially the same thing we use but not "official" OEM adhesive. You are correct, though, and the screen does need to come off to most safely remove -everything- as the back is actually intended to be the very last piece, laugh.

did they use glue to attach the display, or snaps?

can samsung upgrade the memory from 4gb to 8gb?

I'd like to know if the BIOS supervisor password is kept on hdd or is this kept seperate.

How come no repair guide on this thing (of which there are very few) starts with the screen though?

I wonder how to remove the screen first (that seems to make the most sense to me too… unfortunately). The OLED screen is incredibly fragile. The slightest of shocks can crack it, where the glass pane covering it is still in good shape. So I'm very reluctant to try that side...

댓글 1개 더보기

댓글 달기

Hello,

I guess you should use either the Samsung 850 Evo or the 970 Evo Plus NVMe PCIe M.2 for this.

If you would like to connect it to your PC, you might need a Galaxy TabPro S Multiport Adapter: Samsung Galaxy Tab Pro S M3-6Y30 Windows 10 how to connect your device to external drives or monitors english paper example

Randy

해당 답변은 도움이 되었습니까?

점수 0
댓글 달기

귀하의 답변을 추가하세요

Laurent Miko 님은 대단히 고마워 할 것입니다.
조회 통계:

24 시간 전: 6

7일 전: 18

30일 전: 65

전체 시간: 14,916