소개
Change the spark plugs in your '99 to '02 SV650 to improve engine performance. Suzuki recommends that the plugs are inspected (and replaced if necessary) every 4,000 miles or 6 months and recommends that they are replaced every 7,500 miles or 12 months, regardless of condition
NOTE: The SV650 factory manual and several forums indicate that removing the radiator is not necessary for this repair and that the radiator can simply be rotated forward. However, we found this method difficult due to space constraints and risky because the radiator and radiator hoses could be damaged or even accidentally disconnected.
필요한 것
-
-
Remove the radiator cap security screw with a Phillips #1 screw driver by turning it counter-clockwise.
-
Remove the radiator cap by pressing down on it and turning it counter-clockwise until it can be lifted off the radiator.
-
-
-
Locate the 10 mm hex coolant drain plug. It is on the right engine cover, just below the coolant outlet.
-
Turn the coolant drain plug counter-clockwise with a 10 mm socket wrench or box end wrench until it can be turned freely by hand.
-
Place a container under the drain plug to catch the coolant when it streams out of the coolant drain hole.
-
-
-
If you have frame covers below your seat, remove them by removing the 4 mm allen bolts holding them on. Use a 4 mm allen wrench to turn the screws counter-clockwise until they come off.
-
Once the frame covers are off, remove the 4 mm allen seat bolts on both sides of the seat. Use the 4 mm allen wrench to turn the screws counter-clockwise until they come off.
-
Lift the front of the seat, then pull it off the frame.
-
-
-
-
Remove the 10 mm hex radiator mounting bolts, on the top left side of the radiator, the top right side of the radiator and the bottom right side of the radiator.
-
-
-
Loosen the hose clamp attached to the right side radiator oulet by turning the bolt counter-clockwise with a Phillips #1 screwdriver, a 6 mm socket wrench or a 6 mm box end wrench.
-
Slide the hose clamp down the radiator hose, away from the radiator outlet.
-
Carefully pull the radiator hose off the radiator outlet. Slightly twisting the hose left and right to "walk" the hose off the outlet may help if it is stuck.
-
-
-
Loosen the hose clamp attached to the left side radiator inlet by turning the bolt counter-clockwise with a Phillips #1 screwdriver, a 6 mm socket wrench or a 6 mm box end wrench.
-
Carefully pull the radiator hose off the radiator inlet. Slightly twisting the hose left and right to "walk" the hose off the inlet may help if it is stuck.
-
-
-
Remove the spark plug cap from cylinder 1 by grabbing the plug cap boot and pulling straight out.
-
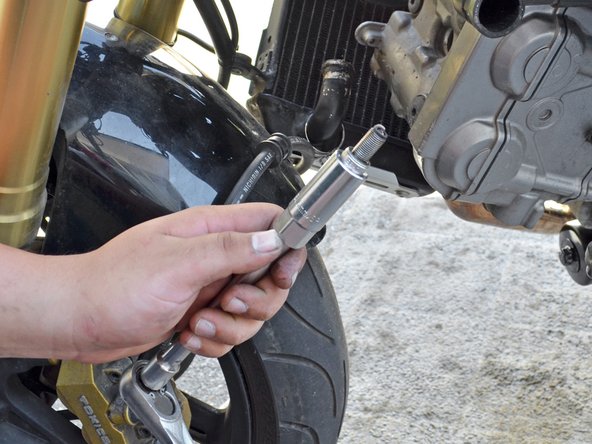
Use a 5/8" spark plug driver, a socket extension and a socket wrench to remove the spark plug. Press the spark plug driver firmly onto the spark plug until you feel it "grab" the plug and turn it counter-clockwise until you can pull it out of the cylinder head.
-
-
-
Insert the new spark plug into the spark plug driver. Press it in firmly so that the rubber insert grips the plug and doesn't allow it to fall out when turned upside down.
-
Place the spark plug into the spark plug hole and turn it clockwise until you feel the gasket seat. Give the wrench approximately 1/4 to 1/2 a turn clockwise from the seated position to snug up the spark plug.
-
Place the spark plug cap on the new spark plug. Press the cap on firmly until you feel it fully seat.
-
-
-
Move the radiator back to its original position.
-
Wipe dirt and debris off the radiator inlet and outlet with a clean rag.
-
Insert the 10 mm hex radiator mounting bolts into the two top mounting points. Screw these bolts in a few turns by hand, but leave them loose enough to allow the radiator to rotate back and forth.
-
-
-
Insert the bottom right radiator mounting bolt and turn it clockwise by hand a few turns.
-
Tighten the three radiator mounting bolts by turning them clockwise with a 10mm socket wrench or box end wrench until they are snug.
-
Re-wrap the wires in the wire holder to prevent them from shifting while riding.
-
-
-
Remove the spark plug cap from cylinder 2. Remember to not pull it by its wire!
-
Use a 5/8" spark plug driver, a socket extension and a socket wrench to remove the spark plug. Press the spark plug driver firmly onto the spark plug until you feel it "grab" the plug and turn it counter-clockwise until you can pull it out of the cylinder head.
-
-
-
Check and adjust the new spark plug's gap as described in step 15.
-
Put the new spark plug in the spark plug driver and insert it into the spark plug hole.
-
Turn the spark plug clockwise until the spark plug gasket seats. Turn the spark plug 1/4 to 1/2 a turn clockwise from the seated position.
-
Firmly press the spark plug cap onto the new spark plug until you feel it fully seat.
-
-
-
Gently set the tank back into place.
-
Rotate the tank forward and re-attach the tank breather hose.
-
Route the fuel level sensor wire between the frame and underneath the tank hinge, being sure that it is not tangling or interfering with any other wires or hoses. Reconnect the fuel level sensor.
-
-
-
Align the bolt holes of the tank hinge base.
-
Place the hinge base bolts into their holes and turn them clockwise by hand a few turns. Do not tighten them yet.
-
Align the the front mounting bolt holes and place the front mounting bolts into their respective holes. Turn the bolts clockwise by hand a few turns.
-
Tighten the four tank mounting bolts with a 10mm socket wrench or box end wrench until snug.
-
-
-
Slide the seat into place, back end first. Make sure the plastic hooks on the back of the seat slide under the metal bar in the sub-frame.
-
Insert the seat bolts and turn them clockwise until they are snug.
-
If you have frame covers, reposition them into their appropriate spots, insert their bolts and turn the bolts clockwise until they are snug.
-
-
-
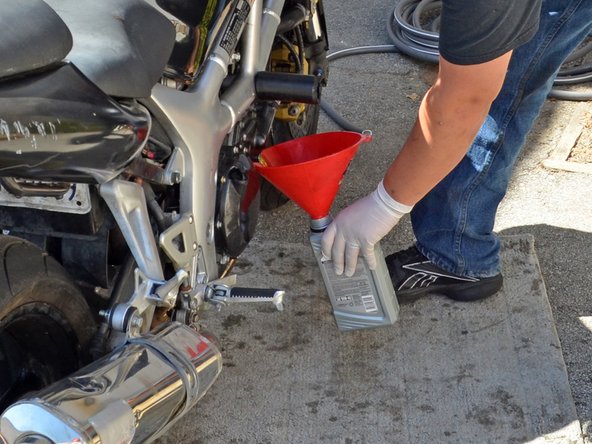
Remove the radiator cap again and insert a funnel into the radiator filler hole.
-
Pour approximately 1.7 quarts of coolant into the radiator or fill until you can see coolant near the filler neck. Use one hand to stabilize the funnel to prevent spills.
-
-
-
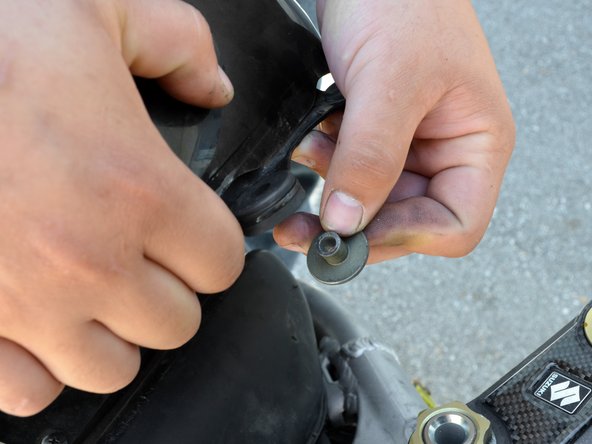
Remove the funnel and place the radiator cap back over the radiator filler hole. Press down on the cap and turn it clockwise until it is snug.
-
Insert and turn the radiator cap security screw clockwise until it is snug.
-
Start the bike, look for excessive vibration and listen for any irregular noises such as ticking or knocking that were not previously present. If something is not right, shut the bike off quickly to prevent potential damage.
-


다른 12명이 해당 안내서를 완성하였습니다.

댓글 5개
Need to change plug
Awesome guide. Very helpful. Thanx a
Which ways are the arrows supposed to face on the rubber end of the coil that connects to the plug
Excellent instructions , thank you very much!!!
Gary Evans - 답글
Thanks, Phil, happy trails.
Pat Kittle - 답글