주요 콘텐츠로 건너뛰기

ACER Aspire 7750G-6645 Fan Replacement

필요한 것

  1. ACER Aspire 7750G-6645 Fan Replacement, Keyboard: 1 단계, 이미지 1/2 ACER Aspire 7750G-6645 Fan Replacement, Keyboard: 1 단계, 이미지 2/2
    • Turn off the laptop, and open the lid.

    • Separate the first two layers by prying them apart, using a spudger.

  2. ACER Aspire 7750G-6645 Fan Replacement: 2 단계, 이미지 1/3 ACER Aspire 7750G-6645 Fan Replacement: 2 단계, 이미지 2/3 ACER Aspire 7750G-6645 Fan Replacement: 2 단계, 이미지 3/3
    • Lift the keyboard, so that its ribbon is visible.

    • Remove the ribbon from the board by using a small metal spudger or flathead screwdriver. (if needed)

  3. ACER Aspire 7750G-6645 Fan Replacement, Fan: 3 단계, 이미지 1/2 ACER Aspire 7750G-6645 Fan Replacement, Fan: 3 단계, 이미지 2/2
    • Remove the two 3mm screws using the Phillips #00 screwdriver.

    • Remove the two 6mm screws using the same screwdriver.

    • Remove the fan cover to gain access to the fan.

  4. ACER Aspire 7750G-6645 Fan Replacement: 4 단계, 이미지 1/2 ACER Aspire 7750G-6645 Fan Replacement: 4 단계, 이미지 2/2
    이 단계에 사용된 도구:
    Desoldering Pump
    $3.99
    구매
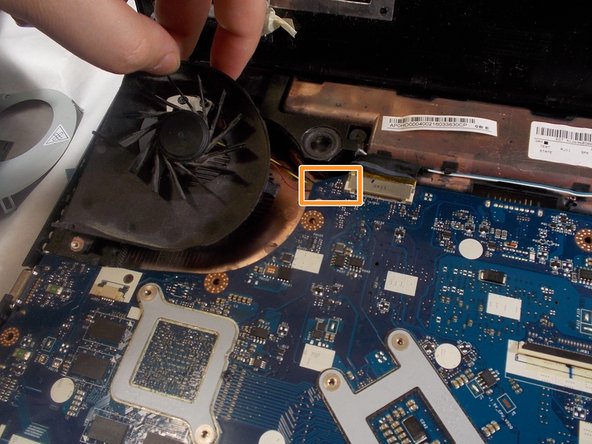
    • Lift the fan up and away from the device. Do not remove the fan from the device.

    • Desolder the attached part using a Soldering Iron to heat it up and remove the leftover heated lead by using a Desoldering Pump.

    • If you aren't familiar with soldering, read our How to Solder and Desolder Connections guide for more information.

결론

To reassemble your device, follow these instructions in reverse order.

taylan ergil

회원 가입일: 03/08/19

85 평판

안내서 1개 작성함

UMass Dartmouth, Team S1-G2, Botvin Spring 2019 UMass Dartmouth, Team S1-G2, Botvin Spring 2019 회원

UMASSD-BOTVIN-S19S1G2

4 회원들

안내서 6개 작성하였습니다

댓글 0개

댓글 쓰기

조회 통계:

24 시간 전: 0

7일 전: 1

30일 전: 6

전체 시간: 611