주요 콘텐츠로 건너뛰기

Acer Aspire V5-572, V5-572G HDD Replacement

필요한 것

동영상 개요

  1. Acer Aspire V5-572, V5-572G HDD Replacement, Bottom Cover: 1 단계, 이미지 1개 중 1개
    • Switch-off the Laptop.

    • Remove the seventeen Philips #0 screws.

  2. Acer Aspire V5-572, V5-572G HDD Replacement: 2 단계, 이미지 1개 중 1개
    • If there is a plastic storage tray in the laptop, remove it.

  3. Acer Aspire V5-572, V5-572G HDD Replacement: 3 단계, 이미지 3개 중 1개 Acer Aspire V5-572, V5-572G HDD Replacement: 3 단계, 이미지 3개 중 2개 Acer Aspire V5-572, V5-572G HDD Replacement: 3 단계, 이미지 3개 중 3개
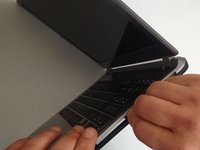
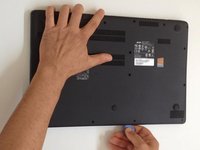
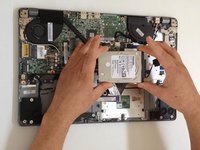
    • Starting from the SD Memory Card hole, start prying between the top and bottom cases.

    • Use plastic tools to avoid damaging the cover.

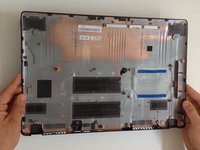
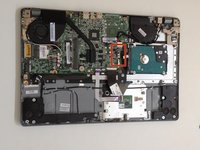
    • Remove the bottom case.

    Love the tutorial man...but this is the most moronic thing I've ever seen...you can take batery out of laptop 15 years old in a flash, while here you have to disassemble the whole %#*@ laptop...only idiots can come up with something like that

    razbojnikkuro - 답글

    I have to agree that this is extremely complicated and intense.

    There is no way your average user should be doing this and the average user should be able to replace the battery!!

    Like everything in the computer world, hardware or software, ease of use is no longer even a consideration!!

    Technical Support Bots are the rule and they rarely are up to date with the pages on the website!!

    Sucks!!

    andy.cox - 답글

  4. Acer Aspire V5-572, V5-572G HDD Replacement: 4 단계, 이미지 1개 중 1개
    • Disconnect the battery immediately for a safer repair.

    • Pull the battery connector away from the hard drive to disconnect it.

  5. Acer Aspire V5-572, V5-572G HDD Replacement, HDD: 5 단계, 이미지 3개 중 1개 Acer Aspire V5-572, V5-572G HDD Replacement, HDD: 5 단계, 이미지 3개 중 2개 Acer Aspire V5-572, V5-572G HDD Replacement, HDD: 5 단계, 이미지 3개 중 3개
    • Disconnect the SATA Cable from the Mother Board.

    • Take out the HDD and remove the SATA cable from it.

    • Now you can change / upgrade your HDD.

결론

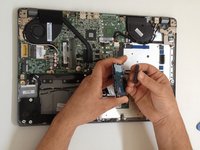
To reassemble your device, follow these instructions in reverse order.

다른 3명이 해당 안내서를 완성하였습니다.

작성자

3다른 기여자 명과 함께

ZFix

회원 가입일: 12/09/13

194,093 평판

안내서 330개를 작성함

Master Techs Master Techs 회원

Community

327 회원들

안내서 1,699개를 작성함

댓글 7개

Thank you very much for the tutorial, it was a 12 minute job ☺️And extremely pleased with the new ssd its incredible

Best Regards

Luckystyx - 답글

Thank you so much for the extremely easy tutorial and it definitely only took 2 minutes longer (12 minutes)

Your site is invaluable, Keep up the great work and all that you do,

5 star rating for you guys..

Kindest Regards

@Styx

Luckystyx - 답글

So the original hdd came in with the win 7 and it was later upgraded to win 10 for free. If i change it to ssd would i be able to get on it my original copy of win 7 and will it upgrade to win 10?

ashmir - 답글

ashmir, you just clone your HDD with a free software such as Macrium Reflect and don’t need to worry about installing everything from zero!!!

Miguel Rodríguez - 답글

Thank you for the tutorial.

But need a clarification. If i have a faulty hard disc it starts up but it freezes after 20 minutes.

Is it still possible to clone it.

Also if i change the hard drive do I need to install any software or the bios all over again.

Your inputs will be appreciated.

olatunji.jimoh - 답글

I haven’t had much luck cloning hard drives that already showed signs of failure, but it costs nothing to try. Download something like Macrium Reflect (free version) and plug the new drive into an external enclosure, and see if it will clone successfully.

Jeff Suovanen -

Can i add ssd and keep my hard drive?

Please somebody answer my question!

Saeid Heydari - 답글

댓글 쓰기

조회 통계:

지난 24시간: 5

지난 7일: 38

지난 30일: 95

전체 시간: 18,650