주요 콘텐츠로 건너뛰기

Acer Chromebook 14 CB3-431-C3WS Motherboard Replacement

필요한 것

  1. Acer Chromebook 14 CB3-431-C3WS Motherboard Replacement, Back Cover: 1 단계, 이미지 3개 중 1개 Acer Chromebook 14 CB3-431-C3WS Motherboard Replacement, Back Cover: 1 단계, 이미지 3개 중 2개 Acer Chromebook 14 CB3-431-C3WS Motherboard Replacement, Back Cover: 1 단계, 이미지 3개 중 3개
    • Remove the two 6mm JIS #0 screws from either side of the hinges.

  2. Acer Chromebook 14 CB3-431-C3WS Motherboard Replacement: 2 단계, 이미지 1개 중 1개
    • Remove the eight 4mm JIS #0 screws from the back cover.

  3. Acer Chromebook 14 CB3-431-C3WS Motherboard Replacement: 3 단계, 이미지 2개 중 1개 Acer Chromebook 14 CB3-431-C3WS Motherboard Replacement: 3 단계, 이미지 2개 중 2개
    • Insert an opening pick between the back panel and the sides of the computer to begin lifting the back off.

    • There are several clips holding the cover in place.

    • After the sides have been lifted, use the opening tool to finish opening the back cover.

  4. Acer Chromebook 14 CB3-431-C3WS Motherboard Replacement: 4 단계, 이미지 1개 중 1개
    • Lift off the back cover.

  5. Acer Chromebook 14 CB3-431-C3WS Motherboard Replacement, Battery: 5 단계, 이미지 3개 중 1개 Acer Chromebook 14 CB3-431-C3WS Motherboard Replacement, Battery: 5 단계, 이미지 3개 중 2개 Acer Chromebook 14 CB3-431-C3WS Motherboard Replacement, Battery: 5 단계, 이미지 3개 중 3개
    • Remove the two JIS #0 screws that connect the battery to the rest of the laptop.

  6. Acer Chromebook 14 CB3-431-C3WS Motherboard Replacement: 6 단계, 이미지 2개 중 1개 Acer Chromebook 14 CB3-431-C3WS Motherboard Replacement: 6 단계, 이미지 2개 중 2개
    • Pull the white tab connected to the battery out of the black tab that connects to the motherboard.

    • It is extremely important that this is done carefully and slowly to avoid causing damage to the motherboard.

  7. Acer Chromebook 14 CB3-431-C3WS Motherboard Replacement: 7 단계, 이미지 1개 중 1개
    • Lift the battery out gently.

  8. Acer Chromebook 14 CB3-431-C3WS Motherboard Replacement, Motherboard: 8 단계, 이미지 1개 중 1개
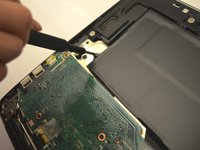
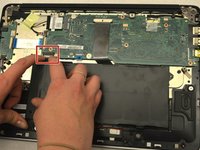
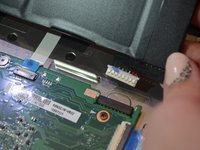
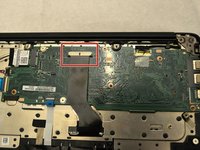
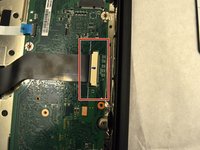
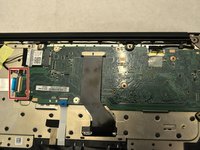
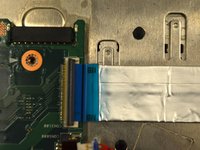
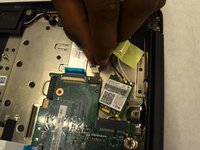
    • Disconnect the LCD cable from the motherboard by removing the tape on the LCD connector, then gently pulling out the ribbon cable.

  9. Acer Chromebook 14 CB3-431-C3WS Motherboard Replacement: 9 단계, 이미지 3개 중 1개 Acer Chromebook 14 CB3-431-C3WS Motherboard Replacement: 9 단계, 이미지 3개 중 2개 Acer Chromebook 14 CB3-431-C3WS Motherboard Replacement: 9 단계, 이미지 3개 중 3개
    • Disconnect the LCD cable from the motherboard by gently pulling on the cable.

  10. Acer Chromebook 14 CB3-431-C3WS Motherboard Replacement: 10 단계, 이미지 1개 중 1개
    • Disconnect the trackpad by pulling on the trackpad connector cable.

  11. Acer Chromebook 14 CB3-431-C3WS Motherboard Replacement: 11 단계, 이미지 2개 중 1개 Acer Chromebook 14 CB3-431-C3WS Motherboard Replacement: 11 단계, 이미지 2개 중 2개
    • Disconnect the daughterboard from the motherboard by gently removing the daughterboard cable from the motherboard connector.

  12. Acer Chromebook 14 CB3-431-C3WS Motherboard Replacement: 12 단계, 이미지 2개 중 1개 Acer Chromebook 14 CB3-431-C3WS Motherboard Replacement: 12 단계, 이미지 2개 중 2개
    • Remove the electrical tape covering the screw that holds the Wi-Fi card in place.

    • Remove the single 4mm JIS #0 screw that holds the Wi-Fi card in place.

  13. Acer Chromebook 14 CB3-431-C3WS Motherboard Replacement: 13 단계, 이미지 1개 중 1개
    • Remove the seven 4mm JIS #0 screws that hold the motherboard in place.

  14. Acer Chromebook 14 CB3-431-C3WS Motherboard Replacement: 14 단계, 이미지 1개 중 1개
    • Gently remove the motherboard.

결론

To reassemble your device, follow these instructions in reverse order.

다른 3명이 해당 안내서를 완성하였습니다.

작성자

2다른 기여자 명과 함께

Samantha Postma

회원 가입일: 10/15/19

1,238 평판

안내서 6개를 작성함

댓글 0개

댓글 쓰기

조회 통계:

지난 24시간: 0

지난 7일: 8

지난 30일: 25

전체 시간: 1,882