주요 콘텐츠로 건너뛰기

Acer Chromebook CB3-532-C47C Touchpad Replacement

필요한 것

  1. Acer Chromebook CB3-532-C47C Touchpad Replacement, Back Panel: 1 단계, 이미지 1/2 Acer Chromebook CB3-532-C47C Touchpad Replacement, Back Panel: 1 단계, 이미지 2/2
    • Power off the laptop before beginning the replacement.

    • Using the Phillips #1 screwdriver, remove eighteen 7 mm screws from the back panel of the device.

  2. Acer Chromebook CB3-532-C47C Touchpad Replacement: 2 단계, 이미지 1/2 Acer Chromebook CB3-532-C47C Touchpad Replacement: 2 단계, 이미지 2/2
    • Use a plastic opening tool around the edges of the laptop and remove the back panel from the device.

  3. Acer Chromebook CB3-532-C47C Touchpad Replacement, Remove the battery cable: 3 단계, 이미지 1/1
    • Push on the sides of the connector with a plastic spudger to separate the cable from the motherboard.

  4. Acer Chromebook CB3-532-C47C Touchpad Replacement, Battery: 4 단계, 이미지 1/2 Acer Chromebook CB3-532-C47C Touchpad Replacement, Battery: 4 단계, 이미지 2/2
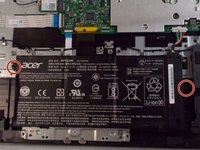
    • Using the Phillips #1 screwdriver, remove the two black 5.5 mm screws securing the battery.

  5. Acer Chromebook CB3-532-C47C Touchpad Replacement: 5 단계, 이미지 1/1
    • Remove the battery from the laptop.

  6. Acer Chromebook CB3-532-C47C Touchpad Replacement, Touchpad: 6 단계, 이미지 1/2 Acer Chromebook CB3-532-C47C Touchpad Replacement, Touchpad: 6 단계, 이미지 2/2
    • Flip up the retaining latch securing the touchpad cable to the motherboard.

  7. Acer Chromebook CB3-532-C47C Touchpad Replacement: 7 단계, 이미지 1/1
    • Pull the ribbon from the motherboard laterally off the touchpad.

  8. Acer Chromebook CB3-532-C47C Touchpad Replacement: 8 단계, 이미지 1/1
    • Using the Phillips #1 screwdriver, remove the three 3.2 mm screws holding the touchpad to the laptop.

  9. Acer Chromebook CB3-532-C47C Touchpad Replacement: 9 단계, 이미지 1/3 Acer Chromebook CB3-532-C47C Touchpad Replacement: 9 단계, 이미지 2/3 Acer Chromebook CB3-532-C47C Touchpad Replacement: 9 단계, 이미지 3/3
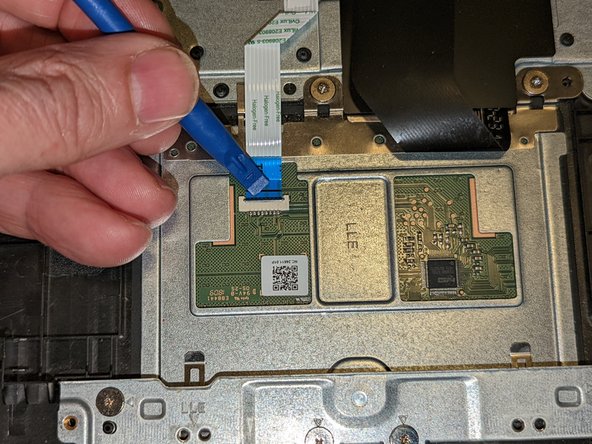
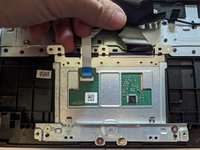
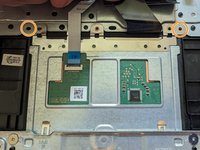
    • Carefully lift up on the keyboard ribbon cable and the insulating sheet immediately below it so the touchpad can clear them.

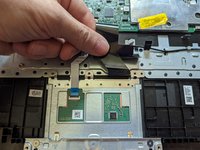
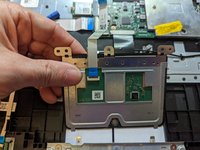
    • Lift the touchpad slightly from the top.

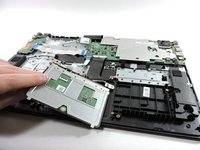
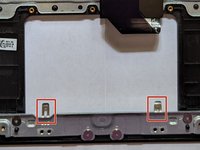
    • Pull the touchpad toward the motherboard as you continue to lift it, sliding it out from under the retaining fingers at the bottom.

  10. Acer Chromebook CB3-532-C47C Touchpad Replacement: 10 단계, 이미지 1/3 Acer Chromebook CB3-532-C47C Touchpad Replacement: 10 단계, 이미지 2/3 Acer Chromebook CB3-532-C47C Touchpad Replacement: 10 단계, 이미지 3/3
    • Remove the touchpad.

    • When reinstalling:

    • Make sure the touchpad goes underneath the two retaining fingers when reinstalling it.

    • The touchpad is correctly aligned when the guide pins next to the left and right screws are inserted in the holes.

결론

To reassemble your device, follow these instructions in reverse order.

Sadie Brown

회원 가입일: 10/25/21

967 평판

안내서 7개 작성하였습니다

UMass Dartmouth, Team 3-2, Sinclaire Fall 2021 UMass Dartmouth, Team 3-2, Sinclaire Fall 2021 회원

UMASSD-SINCLAIRE-F21S3G2

3 회원들

안내서 7개 작성하였습니다

댓글 0개

댓글 쓰기

조회 통계:

24 시간 전: 0

7일 전: 4

30일 전: 7

전체 시간: 223