주요 콘텐츠로 건너뛰기

Air Hog Smash Bots Motherboard Replacement

필요한 것

  1. Air Hog Smash Bots Motherboard Replacement, Batteries: 1 단계, 이미지 1/1
    • Using the Phillips #0 screwdriver to remove the 8 mm screw.

  2. Air Hog Smash Bots Motherboard Replacement: 2 단계, 이미지 1/1
    • Lift and slide the batter cover away from the tab holding it in place at the bottom.

  3. Air Hog Smash Bots Motherboard Replacement: 3 단계, 이미지 1/1
    • Remove the 3 AAA batteries.

  4. Air Hog Smash Bots Motherboard Replacement, External Casing: 4 단계, 이미지 1/2 Air Hog Smash Bots Motherboard Replacement, External Casing: 4 단계, 이미지 2/2
    • Using a Phillip #0 screwdriver to remove the eight 8 mm screws.

  5. Air Hog Smash Bots Motherboard Replacement: 5 단계, 이미지 1/2 Air Hog Smash Bots Motherboard Replacement: 5 단계, 이미지 2/2
    • Remove the upper armor of the Smash Bot.

  6. Air Hog Smash Bots Motherboard Replacement: 6 단계, 이미지 1/1
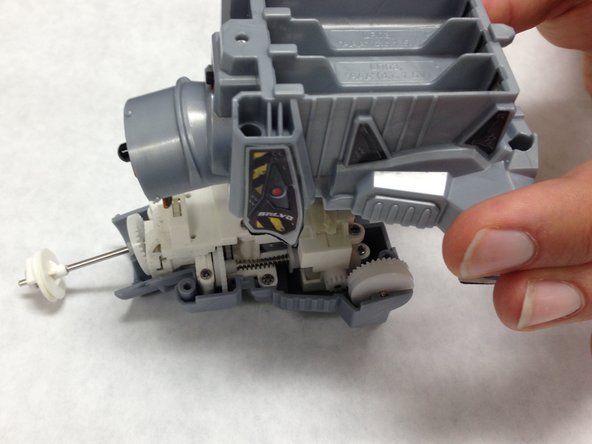
    • Hold the upper body and slide out the bottom half of the Smash Bot.

    • The motor extends from the lower-body into the upper-body. Be careful to not damage the motor.

  7. Air Hog Smash Bots Motherboard Replacement: 7 단계, 이미지 1/1
    • Peel back the four decal stickers that hold the front and back of the bot together.

  8. Air Hog Smash Bots Motherboard Replacement: 8 단계, 이미지 1/2 Air Hog Smash Bots Motherboard Replacement: 8 단계, 이미지 2/2
    • Use the plastic opening tool to pry the front and back of the lower body apart.

    • Carefully remove the back of the bot from the front.

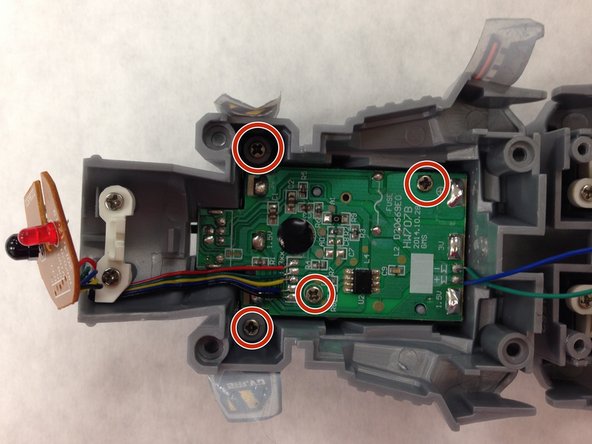
  9. Air Hog Smash Bots Motherboard Replacement, Motherboard: 9 단계, 이미지 1/2 Air Hog Smash Bots Motherboard Replacement, Motherboard: 9 단계, 이미지 2/2
    • Remove four 4.75mm screws from the motherboard.

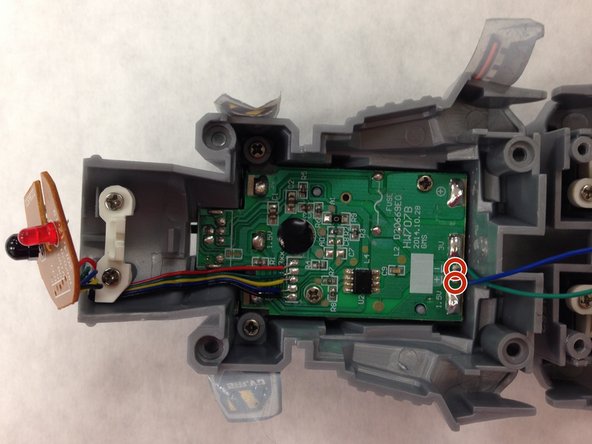
  10. Air Hog Smash Bots Motherboard Replacement: 10 단계, 이미지 1/2 Air Hog Smash Bots Motherboard Replacement: 10 단계, 이미지 2/2
    • Use the soldering iron to remove the two wires from the motherboard. Directions on how to solder can be found here.

  11. Air Hog Smash Bots Motherboard Replacement: 11 단계, 이미지 1/1
    • Use the spudger to pry the motherboard away from the robot.

결론

To reassemble your device, follow these instructions in reverse order.

다른 2명이 해당 안내서를 완성하였습니다.

Brittany Frecker

회원 가입일: 02/08/16

542 평판

안내서 4개 작성하였습니다

IUPUI, Team 1-1, Baechle Spring 2016 IUPUI, Team 1-1, Baechle Spring 2016 회원

IUPUI-BAECHLE-S16S1G1

4 회원들

안내서 14개 작성하였습니다

댓글 0개

댓글 쓰기

조회 통계:

24 시간 전: 0

7일 전: 5

30일 전: 9

전체 시간: 215