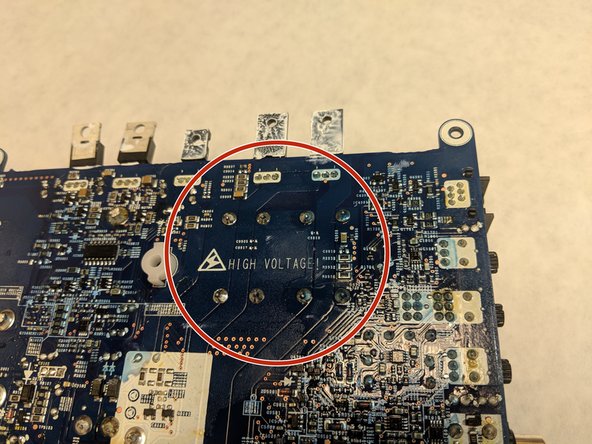
주요 콘텐츠로 건너뛰기

Alpine MRV-M500 Electrolytic Capacitor Replacement

필요한 것

  1. Alpine MRV-M500 Electrolytic Capacitor Replacement, Electrolytic Capacitor: 1 단계, 이미지 1/3 Alpine MRV-M500 Electrolytic Capacitor Replacement, Electrolytic Capacitor: 1 단계, 이미지 2/3 Alpine MRV-M500 Electrolytic Capacitor Replacement, Electrolytic Capacitor: 1 단계, 이미지 3/3
    • Remove all the Phillips 10.0mm and 7.0mm screws on the outside of the case.

    • Make sure the device has been powered off and disconnected from the power source for at least a day before touching the electronic components.

  2. Alpine MRV-M500 Electrolytic Capacitor Replacement: 2 단계, 이미지 1/3 Alpine MRV-M500 Electrolytic Capacitor Replacement: 2 단계, 이미지 2/3 Alpine MRV-M500 Electrolytic Capacitor Replacement: 2 단계, 이미지 3/3
    • Remove all Phillips 7.5mm, 12.5mm, and 10.5mm screws holding the circuit board to the case.

    • Remove the circuit board from the case.

  3. Alpine MRV-M500 Electrolytic Capacitor Replacement: 3 단계, 이미지 1/2 Alpine MRV-M500 Electrolytic Capacitor Replacement: 3 단계, 이미지 2/2
    • Find the faulty capacitor.

    • Flip the board over and locate the corresponding pins.

    • If the faulty capacitor is one of the smaller ones, it may be too difficult to replace and replacing the circuit board itself may be easier.

    • Make sure that the capacitance and voltage rating of the new capacitor match that of the original.

  4. Alpine MRV-M500 Electrolytic Capacitor Replacement: 4 단계, 이미지 1/1
    • Desolder the pins to remove the capacitor.

    • Solder the new capacitor into its place.

    • Make sure the polarity of the new capacitor matches the previous polarity.

결론

To reassemble your device, follow these instructions in reverse order.

다른 3명이 해당 안내서를 완성하였습니다.

Eric Gaulke

회원 가입일: 09/17/18

623 평판

안내서 3개 작성하였습니다

Washington State, Team S2-G6, Hope Fall 2018 Washington State, Team S2-G6, Hope Fall 2018 회원

WSU-HOPE-F18S2G6

4 회원들

안내서 6개 작성하였습니다

댓글 0개

댓글 쓰기

조회 통계:

24 시간 전: 2

7일 전: 3

30일 전: 11

전체 시간: 1,538