주요 콘텐츠로 건너뛰기
Amazon Kindle DX Previous Page Key Replacement

Amazon Kindle DX Previous Page Key Replacement

Lori White

Lori White10 다른 기여자

최종 수정일 May 7, 2024

20 - 35 분
조정
일관성 없는 이미지

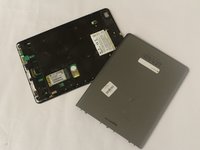
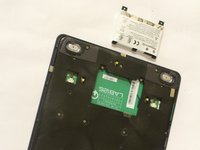
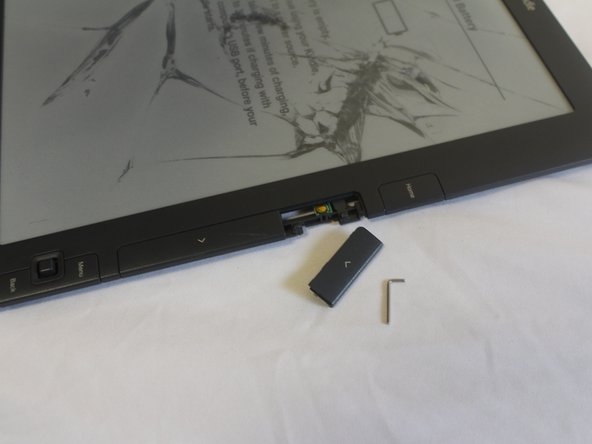
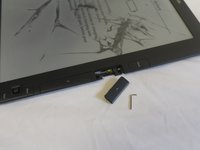
This guide shows you how to replace keyboard keys on an Amazon Kindle DX and uses the “previous page” key as an example. The “previous page” key has the less than symbol (<) on it and is located on the right side of the Amazon Kindle DX.

Prior to using this guide, test the keys to confirm that the keyboard is not working properly. To determine whether a key is faulty, press on the key to see if it performs the correct function. If not, the key is faulty. For example, when you press down on the “previous page” key of your Amazon Kindle DX and it doesn’t bring you to the previous page, the key is faulty.

This guide requires you to use the Phillips screwdriver, sizes PH0, PH00, and PH000, as well as a precision tweezer and opening tool. You must purchase a replacement key for the faulty key you are attempting to replace.

Before you begin, turn the Kindle off and unplug it from any external power source.

필요한 것

부품

도구

더보기...

iFixit은 귀하가 이 링크를 통해 구매할 때 커미션을 받습니다.
  1. Amazon Kindle DX Previous Page Key Replacement, Battery: 1 단계, 이미지 1개 중 1개
    • Flip the Kindle so the back is facing upwards.

  2. Amazon Kindle DX Previous Page Key Replacement: 2 단계, 이미지 1개 중 1개
    • Push an opening tool against the bottom cover edge of the device. Move the tool's edge around the bottom plastic piece to pop it open.

  3. Amazon Kindle DX Previous Page Key Replacement: 3 단계, 이미지 1개 중 1개
    • Remove the plastic piece.

  4. Amazon Kindle DX Previous Page Key Replacement: 4 단계, 이미지 2개 중 1개 Amazon Kindle DX Previous Page Key Replacement: 4 단계, 이미지 2개 중 2개
    • Remove two 40 mm screws (one on each corner) using a Phillips #00 screwdriver.

  5. Amazon Kindle DX Previous Page Key Replacement: 5 단계, 이미지 2개 중 1개 Amazon Kindle DX Previous Page Key Replacement: 5 단계, 이미지 2개 중 2개
    • Use the edges of the opening tool, get in between the seams of the front and back panel, and use the tool to separate the pieces. Once loose, lift back panel off of the device.

  6. Amazon Kindle DX Previous Page Key Replacement: 6 단계, 이미지 2개 중 1개 Amazon Kindle DX Previous Page Key Replacement: 6 단계, 이미지 2개 중 2개
    • Remove two 30 mm screws securing the battery with a Phillips #00 screwdriver.

  7. Amazon Kindle DX Previous Page Key Replacement: 7 단계, 이미지 2개 중 1개 Amazon Kindle DX Previous Page Key Replacement: 7 단계, 이미지 2개 중 2개
    • Remove the battery from the device.

  8. Amazon Kindle DX Previous Page Key Replacement, Previous Page Key: 8 단계, 이미지 3개 중 1개 Amazon Kindle DX Previous Page Key Replacement, Previous Page Key: 8 단계, 이미지 3개 중 2개 Amazon Kindle DX Previous Page Key Replacement, Previous Page Key: 8 단계, 이미지 3개 중 3개
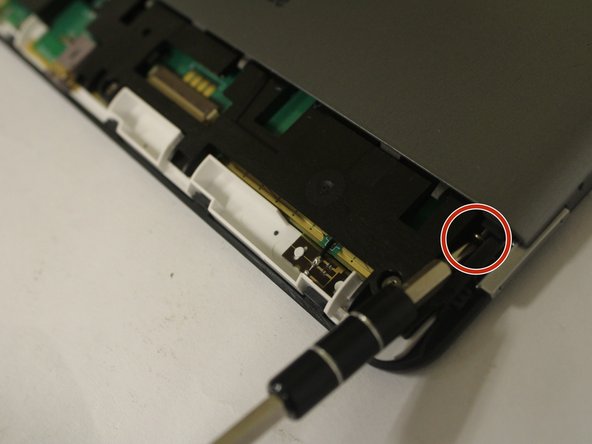
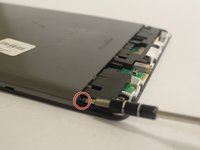
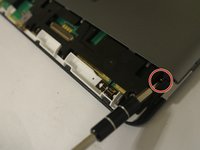
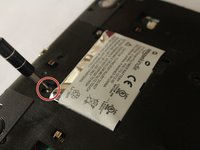
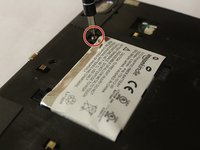
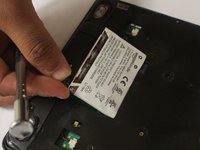
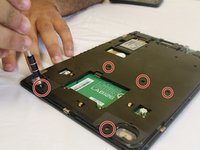
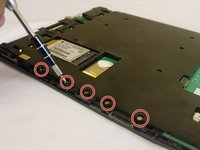
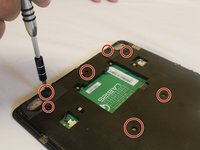
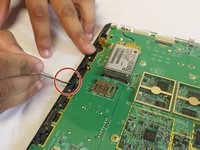
    • Remove five 30 mm screws from the midframe using a Phillips #000 screwdriver.

  9. Amazon Kindle DX Previous Page Key Replacement: 9 단계, 이미지 1개 중 1개
    • Remove the midframe to reveal the motherboard.

  10. Amazon Kindle DX Previous Page Key Replacement: 10 단계, 이미지 2개 중 1개 Amazon Kindle DX Previous Page Key Replacement: 10 단계, 이미지 2개 중 2개
    이 단계에 사용된 도구:
    Tweezers
    $4.99
    • Remove the "previous page" button from the side function keys using a pair of tweezers.

결론

To reassemble your device, follow these instructions in reverse order.

작성자

10다른 기여자 명과 함께

Lori White

회원 가입일: 09/28/16

577 평판

안내서 3개를 작성함

USF Tampa, Team 1-5, Cagle Fall 2016 USF Tampa, Team 1-5, Cagle Fall 2016 회원

USFT-CAGLE-F16S1G5

3 회원들

안내서 10개를 작성함

댓글 2개

The title says “keyboard”, this is button replacement…………….

Robert Clayworth - 답글

The title says “keyboard” replacement. This is button replacement…………….

Robert Clayworth - 답글

댓글 쓰기

조회 통계:

지난 24시간: 0

지난 7일: 0

지난 30일: 0

전체 시간: 1,232