소개
This guide details how to replace the battery in the Astro A50 2014 headset. Because the A50’s battery is a lithium-ion, it will eventually burn out after a couple years of average use. However, there’s nothing to fear as a replacement battery is only $30 and, with a soldering iron and a screwdriver, you can replace it yourself.
필요한 것
-
-
To begin, remove the foam cushions from each earpiece by gently pulling the cushion away from the housing.
-
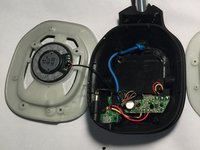
Use a small Phillips-head screwdriver to remove the 4 screws.
-
-
-
-
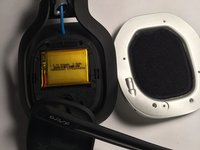
Turn the earpiece over, and expose the battery by folding the microphone and cover plate away from the battery housing.
-
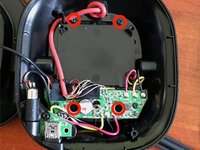
Desolder battery connections to disconnect the three colored wires from the old battery. Make note of corresponding colors/locations for installation of new battery.
-
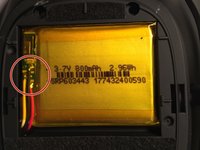
Carefully remove the old battery by wedging a plastic opening tool or spudger underneath the battery to release the adhesive.
-


Be sure to test your new battery to make sure the fix succeeded.
다른 40명이 해당 안내서를 완성하였습니다.
팀

UMass Dartmouth, Team 2-5, Shastany Fall 2015 UMass Dartmouth, Team 2-5, Shastany Fall 2015 회원
UMASSD-SHASTANY-F15S2G5
4 회원들
안내서 10개를 작성함
33가이드 댓글
Could you post the dimensions of the battery itself? Seems like it's hard to find one that may or may not fit. That or could you recommend where to get a battery?
Search for part no: 603443 on Ebay - ~$10 or buy one from Astro for $75
So, which battery is the best replacement for the original? Is it possible to put some bigger batteries inside with some modding?
Battery sizes are mAH, just by a 900 or more and that should do the trick. The actual size of the battery must be identical for a perfect fit and confortable headsets. Just make sure you get the correct voltage and size.
The battery comes with a cable, instead of soldering, can I tie those cables in? Also, what is the best way to remove and reattach foam cushions without damaging them?
cpaalvarez - 답글