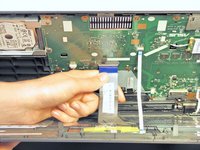
주요 콘텐츠로 건너뛰기

Asus X551CA Hard Drive Replacement

필요한 것

  1. Asus X551CA Hard Drive Replacement, Keyboard Plate Cover: 1 단계, 이미지 1/1
    • Power off and unplug your laptop before you begin.

    • Turn the laptop upside-down and remove the following screws using a Phillips #0 driver:

    • Two 9.5 mm screws in the middle of the back edge, and one 9.5 mm screw in the right edge

    • Two 4.3 mm screws in the back corners

    • One 17.5 mm screw at the left edge near the optical drive

    • Three 4.3 mm screws in the front edge

  2. Asus X551CA Hard Drive Replacement: 2 단계, 이미지 1/1
    • Use the plastic opening tool to separate the keyboard plate cover from the bottom cover. In order to do this, insert the plastic opening tool in between the keyboard plate cover and the bottom cover, then slide along edges to pry open.

  3. Asus X551CA Hard Drive Replacement: 3 단계, 이미지 1/1
    • Locate the three ribbons connecting the keyboard plate cover to the bottom cover.

  4. Asus X551CA Hard Drive Replacement: 4 단계, 이미지 1/3 Asus X551CA Hard Drive Replacement: 4 단계, 이미지 2/3 Asus X551CA Hard Drive Replacement: 4 단계, 이미지 3/3
    • Invert the laptop in order to gain access to the ribbons.

    • Remove each ribbon by flipping the small white plastic flap up and gently pulling on the ribbon.

  5. Asus X551CA Hard Drive Replacement: 5 단계, 이미지 1/1
    • Now that the ribbons have been detached from the bottom cover, carefully remove the keyboard plate cover. Once it has been removed, place it in a safe and moisture free area so it does not get damaged.

  6. Asus X551CA Hard Drive Replacement, Hard Drive: 6 단계, 이미지 1/1
    • Unscrew the three 5.5 mm Phillips #0 screws with the Phillips #0 Screwdriver.

  7. Asus X551CA Hard Drive Replacement: 7 단계, 이미지 1/1
    • Once the screws have been removed, place your fingers on the left corners and push the hard drive towards the right edge of the laptop (relative to the picture).

  8. Asus X551CA Hard Drive Replacement: 8 단계, 이미지 1/1
    • Once it is free, remove the hard drive from its internal cavity.

결론

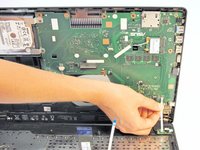
To reassemble your device, follow these instructions in reverse order.

다른 48명이 해당 안내서를 완성하였습니다.

Brandon

회원 가입일: 04/01/14

2,828 평판

안내서 1개 작성함

Cal Poly, Team 7-22, Regan Spring 2014 Cal Poly, Team 7-22, Regan Spring 2014 회원

CPSU-REGAN-S14S7G22

5 회원들

안내서 15개 작성하였습니다

댓글 8개

You mixed up the red and green screws, sizes are wrong.

The red screws are 9.5 not 14.3!

the yellow screws are 4.3 (mixed up with 14.3 ?) not 9.5 !

You do NOT need to remove the ribbons, just use a small screwdriver.

Tony - 답글

Same issue as Tony on 09/03/2014

The screw sizings are mixed up. The red screws are 9.5, not 14.3

The yellow screws are 14.3 not 9.5. Please fix the repair guide text

Mevlan Coma - 답글

It should be fixed now! Thanks to both of you for the tip. By the way, you can always edit the text yourself. ;)

Jeff Suovanen -

Thanks for the info!

Abe Aleman - 답글

댓글 쓰기

조회 통계:

24 시간 전: 1

7일 전: 6

30일 전: 37

전체 시간: 66,519