주요 콘텐츠로 건너뛰기

BLU Studio 7.0 II Microphone Replacement

필요한 것

  1. BLU Studio 7.0 II Microphone Replacement, Back Cover: 1 단계, 이미지 1/1
    • Locate the seam between the black and silver pieces of the phone.

    • Insert a plastic opening tool into the seam and firmly pry the black back piece away from the silver front piece.

    • To create the initial separation for the plastic opening tool, you may need to use either a spudger or metal spudger. If you use a metal spudger, be aware this can damage your phone if you aren't careful.

  2. BLU Studio 7.0 II Microphone Replacement: 2 단계, 이미지 1/1
    • Work your way around the edge of phone, firmly prying the pieces apart.

  3. BLU Studio 7.0 II Microphone Replacement: 3 단계, 이미지 1/2 BLU Studio 7.0 II Microphone Replacement: 3 단계, 이미지 2/2
    • Once the back has been removed, you can snap the new one into place by pressing firmly around the edges with your fingers.

  4. BLU Studio 7.0 II Microphone Replacement, Battery Connection: 4 단계, 이미지 1/2 BLU Studio 7.0 II Microphone Replacement, Battery Connection: 4 단계, 이미지 2/2
    • Using the PH00 screw driver, remove the two 3mm screws.

    • These screws may be covered by small, round black stickers. Remove the stickers to continue.

    • Remove the metal clip that connects the battery ribbon to the motherboard by lifting up. Precision tweezers work best for this part.

    • Be sure to only grab the metal clip with the tweezers, not the connector underneath.

  5. BLU Studio 7.0 II Microphone Replacement: 5 단계, 이미지 1/1
    • Disconnect the battery connector using a plastic opening tool or the flat end of a spudger.

  6. BLU Studio 7.0 II Microphone Replacement, Microphone: 6 단계, 이미지 1/1
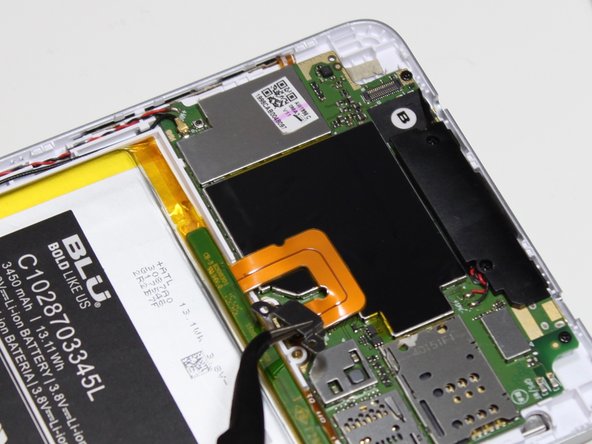
    • Remove two 3mm screws from the bottom black panel.

  7. BLU Studio 7.0 II Microphone Replacement: 7 단계, 이미지 1/2 BLU Studio 7.0 II Microphone Replacement: 7 단계, 이미지 2/2
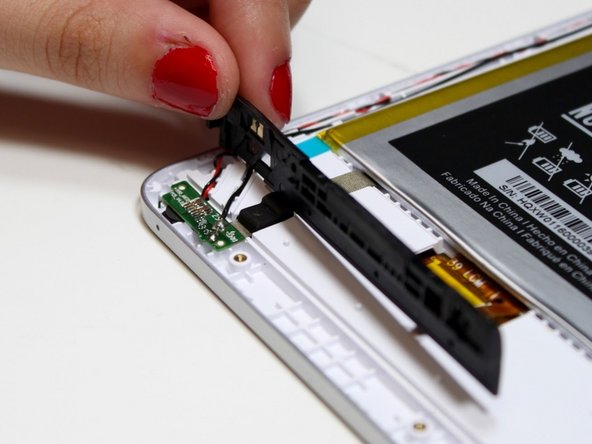
    • Use the flat end of the black spudger to gently lift up the black plastic piece.

    • Rest the plastic piece against the back of the phone.

    • The black plastic piece is connected to the phone by a circuit ribbon. Be careful not to pull too hard or you may break this ribbon.

  8. BLU Studio 7.0 II Microphone Replacement: 8 단계, 이미지 1/2 BLU Studio 7.0 II Microphone Replacement: 8 단계, 이미지 2/2
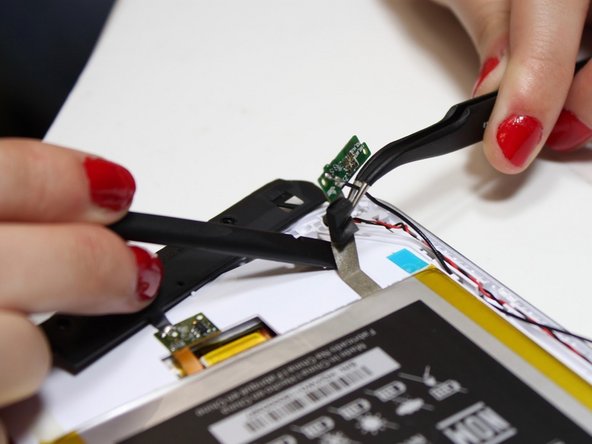
    • Use the precision tweezers to grip the micro-circuit board. Lift straight up.

    • The micro-circuit board is connected to the silver adhesive strip. You'll have to gently peel this strip back to get the micro-circuit board to move far enough to get to the microphone.

  9. BLU Studio 7.0 II Microphone Replacement: 9 단계, 이미지 1/2 BLU Studio 7.0 II Microphone Replacement: 9 단계, 이미지 2/2
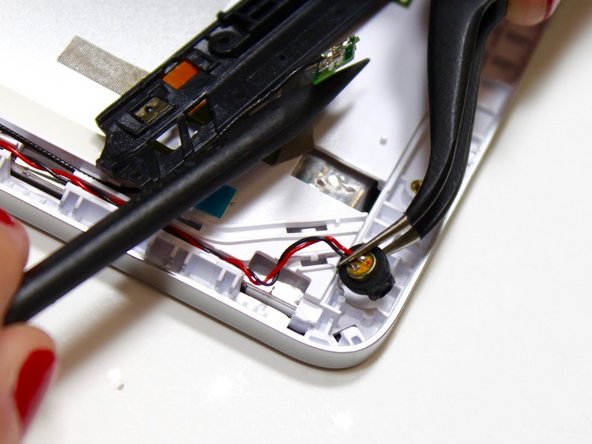
    • Use the precision tweezers to grip the silicone around microphone and pull it from the plastic housing.

  10. BLU Studio 7.0 II Microphone Replacement: 10 단계, 이미지 1/1
    • The silicone around the microphone comes off easily; grip the red and black wires gently with either your fingers or a precision tweezer and use your other hand to pull off the black silicone piece.

    • Desolder the contacts for the red and black wires to disconnect the microphone.

    • For more information on soldering, view the Soldering Wiki page.

결론

To reassemble your device, follow these instructions in reverse order.

Abby

회원 가입일: 05/14/16

852 평판

안내서 5개 작성하였습니다

Metro State, Team 1-2, Carpenter SU 2016 Metro State, Team 1-2, Carpenter SU 2016 회원

MSU-CARPENTER-SU16S1G2

4 회원들

안내서 6개 작성하였습니다

댓글 0개

댓글 쓰기

조회 통계:

24 시간 전: 1

7일 전: 2

30일 전: 2

전체 시간: 407