주요 콘텐츠로 건너뛰기

Braun BT3240 Electric Trimmer Battery Replacement

필요한 것

  1. Braun BT3240 Electric Trimmer Battery Replacement, Battery: 1 단계, 이미지 1/1
    • Ensure that the charger is unplugged from the electrical outlet connected to the trimmer.

  2. Braun BT3240 Electric Trimmer Battery Replacement: 2 단계, 이미지 1/2 Braun BT3240 Electric Trimmer Battery Replacement: 2 단계, 이미지 2/2
    • Hold the trimmer in the opposite direction so that the power button on front is not facing you.

    • Separate the trimmer's top blade from the trimmer by pulling it in outwards direction.

  3. Braun BT3240 Electric Trimmer Battery Replacement: 3 단계, 이미지 1/3 Braun BT3240 Electric Trimmer Battery Replacement: 3 단계, 이미지 2/3 Braun BT3240 Electric Trimmer Battery Replacement: 3 단계, 이미지 3/3
    • Hold the trimmer sideways as this makes the process of prying easier.

    • Insert a Spudger or a sharp-tipped tweezer in between the top panel and middle panel and apply applicable force to unclip the plastic clips attaching the two panels.

    • Pull the top panel outwards and let it slide out of the middle panel. Do not try to force it out as this may break the plastic clips

  4. Braun BT3240 Electric Trimmer Battery Replacement: 4 단계, 이미지 1/3 Braun BT3240 Electric Trimmer Battery Replacement: 4 단계, 이미지 2/3 Braun BT3240 Electric Trimmer Battery Replacement: 4 단계, 이미지 3/3
    • Remove the four screws attaching the middle panel to the bottom panel.

  5. Braun BT3240 Electric Trimmer Battery Replacement: 5 단계, 이미지 1/2 Braun BT3240 Electric Trimmer Battery Replacement: 5 단계, 이미지 2/2
    • Use the Spudger or sharp tipped tweezer to separate the middle panel attached to the bottom panel by lifting it upwards.

  6. Braun BT3240 Electric Trimmer Battery Replacement: 6 단계, 이미지 1/2 Braun BT3240 Electric Trimmer Battery Replacement: 6 단계, 이미지 2/2
    • Gently pull out the battery holder connected to the electrical plug.

  7. Braun BT3240 Electric Trimmer Battery Replacement: 7 단계, 이미지 1/2 Braun BT3240 Electric Trimmer Battery Replacement: 7 단계, 이미지 2/2
    • Use a plier to pry off the battery contact tab which is soldered onto the battery. Repeat the same step for all 4 battery contact tabs (two on each side of the battery holder).

    • Be mindful not to completely destroy the battery contact tabs as you pry them off. You will need them while resoldering new batteries.

  8. Braun BT3240 Electric Trimmer Battery Replacement: 8 단계, 이미지 1/1
    • Caution! The temperature of the soldering iron is 450 degrees Fahrenheit. Do not apply melted soldering alloy for more than 15-20 seconds of time intervals.

    • Do not touch the tip of the Soldering iron directly onto the battery. Only apply melted solder alloy onto the battery contact tab.

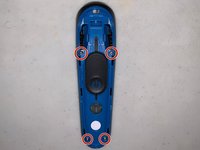
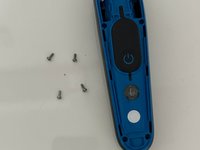
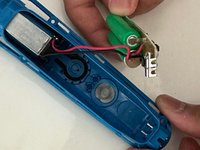
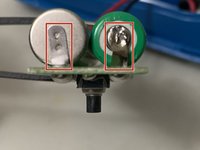
    • Ensure that the positive and negative electrodes are correctly identified and now place the new batteries onto the battery holder.

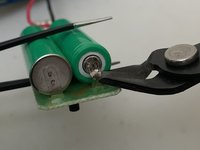
    • Apply Soldering paste on the battery contact tab and then melt solder alloy on to the tip of the soldering iron and touch the tip of the soldering iron to one of the 4 specified battery contact tab. Repeat this same step for the other 3 battery contact tabs. Apply some more soldering iron alloy if the batteries do not feel rigid on the holder.

  9. Braun BT3240 Electric Trimmer Battery Replacement: 9 단계, 이미지 1/2 Braun BT3240 Electric Trimmer Battery Replacement: 9 단계, 이미지 2/2
    • Once the solder on each side has dried out and in cool temperature, you can reassemble the parts and test the trimmer’s functionality.

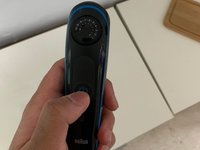
    • To check if the trimmer works perfectly, you need to notice the head of the trimmer. The head of the trimmer should be rotating clockwise when you press the power button.

결론

To reassemble your device, follow these instructions in reverse order.

Harsh Mishra

회원 가입일: 01/17/23

180 평판

안내서 1개 작성함

York University, Team O-8, Woodhouse Winter 2023 York University, Team O-8, Woodhouse Winter 2023 회원

YORK-WOODHOUSE-W23SOG8

1 회원

안내서 1개 작성하였습니다

댓글 0개

댓글 쓰기

조회 통계:

24 시간 전: 2

7일 전: 5

30일 전: 27

전체 시간: 438