주요 콘텐츠로 건너뛰기

CHI Spin N Curl Rotating Curler Temperature Control Switch Replacement

필요한 것

  1. CHI Spin N Curl Rotating Curler Temperature Control Switch Replacement, Power Cord: 1 단계, 이미지 1/1
    • Use a metal spudger to pry off the silver, shiny trim.

  2. CHI Spin N Curl Rotating Curler Temperature Control Switch Replacement: 2 단계, 이미지 1/1
    • Remove inner black housing of the CHI Spin N Curl using the metal spudger to pop it out.

  3. CHI Spin N Curl Rotating Curler Temperature Control Switch Replacement: 3 단계, 이미지 1/2 CHI Spin N Curl Rotating Curler Temperature Control Switch Replacement: 3 단계, 이미지 2/2
    • Use a 2 mm flathead to remove the two screws.

  4. CHI Spin N Curl Rotating Curler Temperature Control Switch Replacement: 4 단계, 이미지 1/2 CHI Spin N Curl Rotating Curler Temperature Control Switch Replacement: 4 단계, 이미지 2/2
    • Use a metal spudger to pry open the seams of the device.

  5. CHI Spin N Curl Rotating Curler Temperature Control Switch Replacement: 5 단계, 이미지 1/3 CHI Spin N Curl Rotating Curler Temperature Control Switch Replacement: 5 단계, 이미지 2/3 CHI Spin N Curl Rotating Curler Temperature Control Switch Replacement: 5 단계, 이미지 3/3
    • Toward the bottom of the device, grab the swivel power cord.

    • Gently pull the power cord to detach it from the CHI Spin N Curl

    • Replace the faulty cord when the original cord has been removed.

  6. CHI Spin N Curl Rotating Curler Temperature Control Switch Replacement, Temperature Control Switch: 6 단계, 이미지 1/1
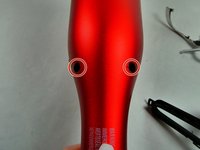
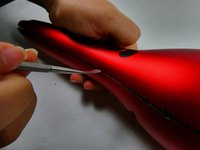
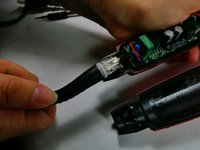
    • Use a Phillips #00 screwdriver to remove the screws on both sides of the temperature control switch.

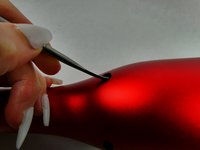
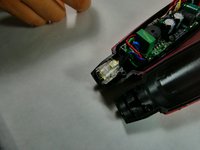
    • Pop out the control switch.

결론

To reassemble your device, follow these instructions in reverse order.

Annalise White

회원 가입일: 10/26/22

530 평판

안내서 5개 작성하였습니다

UMass Dartmouth, Team 2-7, Petersen Fall 2022 UMass Dartmouth, Team 2-7, Petersen Fall 2022 회원

UMASSD-PETERSEN-F22S2G7

3 회원들

안내서 6개 작성하였습니다

댓글 0개

댓글 쓰기

조회 통계:

24 시간 전: 0

7일 전: 0

30일 전: 8

전체 시간: 221