주요 콘텐츠로 건너뛰기

Dell Inspiron 15 5584 CPU Thermal Paste Replacement

필요한 것

  1. Dell Inspiron 15 5584 CPU Thermal Paste Replacement, Bottom Cover: 1 단계, 이미지 1/1
    • Make sure to turn off and unplug your laptop before starting.

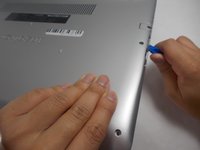
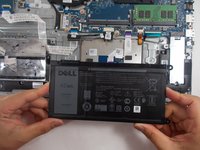
    • Turn over the laptop so that the bottom is facing upwards, and the Inspiron logo is upside-down.

  2. Dell Inspiron 15 5584 CPU Thermal Paste Replacement: 2 단계, 이미지 1/3 Dell Inspiron 15 5584 CPU Thermal Paste Replacement: 2 단계, 이미지 2/3 Dell Inspiron 15 5584 CPU Thermal Paste Replacement: 2 단계, 이미지 3/3
    • Remove the seven 7 mm screws from the bottom using a Phillips #0 screwdriver.

    • Loosen the two captive back corner screws using a Phillips #0 screwdriver.

    • The two corner screws are not removable. A clicking sounds indicates that the screw is fully loosened.

  3. Dell Inspiron 15 5584 CPU Thermal Paste Replacement: 3 단계, 이미지 1/2 Dell Inspiron 15 5584 CPU Thermal Paste Replacement: 3 단계, 이미지 2/2
    • Slide an iFixit opening tool underneath the right side USB port and the keyboard.

    • Gently trace the iFixit opening tool along the entire outer rim of the laptop, carefully applying an upwards pressure.

    • Be careful not to force open the plate or push too much off without loosening the other sides. This can cause the bottom cover to crack.

  4. Dell Inspiron 15 5584 CPU Thermal Paste Replacement: 4 단계, 이미지 1/2 Dell Inspiron 15 5584 CPU Thermal Paste Replacement: 4 단계, 이미지 2/2
    • Gently pry off the bottom cover from the laptop.

    • Use the iFixit opening tool to loosen any spots you may have missed from Step 3.

  5. Dell Inspiron 15 5584 CPU Thermal Paste Replacement, Battery: 5 단계, 이미지 1/2 Dell Inspiron 15 5584 CPU Thermal Paste Replacement, Battery: 5 단계, 이미지 2/2
    • Remove the four 3.5 mm screws holding the battery down with a JIS #0 screwdriver.

  6. Dell Inspiron 15 5584 CPU Thermal Paste Replacement: 6 단계, 이미지 1/3 Dell Inspiron 15 5584 CPU Thermal Paste Replacement: 6 단계, 이미지 2/3 Dell Inspiron 15 5584 CPU Thermal Paste Replacement: 6 단계, 이미지 3/3
    • Detach the motherboard connector tab from the top left of the battery.

    • Remove the battery from the device.

    • Be sure to carefully wiggle the connector out from the battery socket. Ripping it out too forcefully could damage the socket.

  7. Dell Inspiron 15 5584 CPU Thermal Paste Replacement, CPU Thermal Paste: 7 단계, 이미지 1/3 Dell Inspiron 15 5584 CPU Thermal Paste Replacement, CPU Thermal Paste: 7 단계, 이미지 2/3 Dell Inspiron 15 5584 CPU Thermal Paste Replacement, CPU Thermal Paste: 7 단계, 이미지 3/3
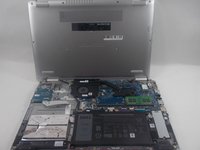
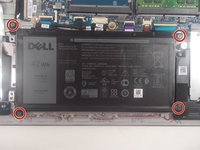
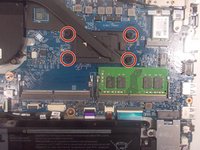
    • Loosen the four captive 3.5 mm screws securing the heat sink to the motherboard using a Phillips #0 screwdriver.

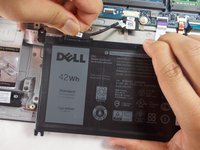
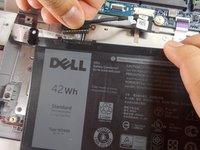
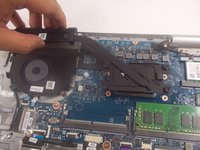
    • Remove the CPU plate cover from the motherboard and safely place it off to the side.

  8. Dell Inspiron 15 5584 CPU Thermal Paste Replacement: 8 단계, 이미지 1/1
    • Place a small amount of rubbing alcohol on either a paper towel or cotton swab.

    • Use the paper towel or cotton swab to completely remove the thermal paste from the CPU.

    • Leave it to dry for around an hour before applying the new thermal paste. You can find thermal paste application instructions here.

결론

To reassemble your device, follow these instructions in reverse order.

다른 한 분이 해당 안내서를 완성하였습니다.

Sam Vorn

회원 가입일: 03/29/22

977 평판

안내서 9개 작성하였습니다

UMass Dartmouth, Team 1-1, Mellen Spring 2022 UMass Dartmouth, Team 1-1, Mellen Spring 2022 회원

UMASSD-MELLEN-S22S1G1

3 회원들

안내서 10개 작성하였습니다

댓글 0개

댓글 쓰기

조회 통계:

24 시간 전: 0

7일 전: 3

30일 전: 48

전체 시간: 578