주요 콘텐츠로 건너뛰기

Dell Inspiron 700m RAM Replacement

필요한 것

  1. Dell Inspiron 700m RAM Replacement, Battery: 1 단계, 이미지 1/1
    • Before you begin, make sure the 700m is powered off.

    • Unplug the power cable.

    • Flip the 700m over and remove the battery.

    • Slide the battery release switch toward the center of the 700m, and then pull the battery free from the back.

  2. Dell Inspiron 700m RAM Replacement, Outer RAM Cover: 2 단계, 이미지 1/1
    • Remove the two Phillips screws securing the RAM cover.

    • Remove the RAM cover and set it aside.

  3. Dell Inspiron 700m RAM Replacement, RAM Module #1: 3 단계, 이미지 1/3 Dell Inspiron 700m RAM Replacement, RAM Module #1: 3 단계, 이미지 2/3 Dell Inspiron 700m RAM Replacement, RAM Module #1: 3 단계, 이미지 3/3
    • Two clips secure the RAM module in place, one on each side. Using your fingers, spread the clips away from the RAM module.

    • When released, the RAM module will pop up at a slight angle.

    • Lift the RAM module to an angle of about 30 degrees and slide it out.

    • When handling the RAM module, touch only the outside edges. Take care not to touch the gold-colored contact points along the bottom edge.

    • To install a new RAM module, slide it in place at about the same angle until it is snug, and then swing it downward until the two clips snap into place.

  4. Dell Inspiron 700m RAM Replacement: 4 단계, 이미지 1/3 Dell Inspiron 700m RAM Replacement: 4 단계, 이미지 2/3 Dell Inspiron 700m RAM Replacement: 4 단계, 이미지 3/3
    • Flip the 700m over and swing the screen all the way open until it lays flat.

    • Beginning from the left side, use the flat end of a spudger to gently pry up the plastic trim that runs along the top edge of the keyboard. Remove the trim.

  5. Dell Inspiron 700m RAM Replacement, Keyboard: 5 단계, 이미지 1/1
    • Remove the two Phillips screws securing the keyboard.

  6. Dell Inspiron 700m RAM Replacement: 6 단계, 이미지 1/1
    • Tilt the top of the keyboard up at an angle, and gently push the keyboard toward the back of the 700m, freeing the tabs along the bottom.

    • Do not push very hard, or you may damage the keyboard ribbon cable.

  7. Dell Inspiron 700m RAM Replacement: 7 단계, 이미지 1/3 Dell Inspiron 700m RAM Replacement: 7 단계, 이미지 2/3 Dell Inspiron 700m RAM Replacement: 7 단계, 이미지 3/3
    • Tilt the bottom of the keyboard up at an angle.

    • Use the pointed end of a spudger to disconnect the keyboard ribbon cable by pushing open the clips on either side.

    • Remove the keyboard and set it aside.

  8. Dell Inspiron 700m RAM Replacement, Inner RAM Cover: 8 단계, 이미지 1/2 Dell Inspiron 700m RAM Replacement, Inner RAM Cover: 8 단계, 이미지 2/2
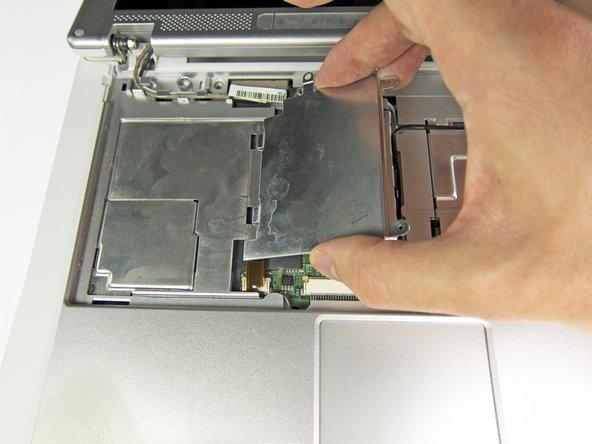
    • Remove the two Phillips screws securing the inner RAM cover.

    • Tilt the right side of the RAM cover up at an angle and pull it free.

  9. Dell Inspiron 700m RAM Replacement, RAM Module #2: 9 단계, 이미지 1/2 Dell Inspiron 700m RAM Replacement, RAM Module #2: 9 단계, 이미지 2/2
    • Two clips secure the RAM module in place, one on each side. Using your fingers, spread the clips away from the RAM module.

    • When released, the RAM module will pop up at a slight angle.

    • Lift the RAM module to an angle of about 30 degrees and slide it out.

    • When handling the RAM module, touch only the outside edges. Take care not to touch the gold-colored contact points along the bottom edge.

    • To install a new RAM module, slide it in place at about the same angle until it is snug, and then swing it downward until the two clips snap into place.

결론

To reassemble your device, follow these instructions in reverse order.

다른 4명이 해당 안내서를 완성하였습니다.

Jeff Suovanen

회원 가입일: 08/06/13

428,116 평판

안내서 259개 작성하였습니다

iFixit iFixit 회원

Staff

135 회원들

안내서 16,817개 작성하였습니다

댓글 0개

댓글 쓰기

조회 통계:

24 시간 전: 1

7일 전: 2

30일 전: 8

전체 시간: 3,569