주요 콘텐츠로 건너뛰기

Fujifilm FinePix S4800 Motherboard Replacement

필요한 것

  1. Fujifilm FinePix S4800 Motherboard Replacement, Battery: 1 단계, 이미지 1/1
    • Make sure that the camera is powered off before continuing.

    • Rotate the camera so that the label on the base of the camera is facing up.

    • On the battery compartment door, there is a slider that says "open". Slide it down and push the door to the right to release the door.

  2. Fujifilm FinePix S4800 Motherboard Replacement: 2 단계, 이미지 1/3 Fujifilm FinePix S4800 Motherboard Replacement: 2 단계, 이미지 2/3 Fujifilm FinePix S4800 Motherboard Replacement: 2 단계, 이미지 3/3
    • Remove all four batteries and set them aside.

    • When replacing the batteries, be sure to note the markings on the face of the battery compartment. These markings let you know which side of the battery ("+" or "-") needs to be facing up in each slot.

  3. Fujifilm FinePix S4800 Motherboard Replacement, Rear Case: 3 단계, 이미지 1/1
    • Remove the three 5.0 mm JIS #000 screws on the bottom of the camera.

  4. Fujifilm FinePix S4800 Motherboard Replacement: 4 단계, 이미지 1/1
    • Rotate the camera so that the HDMI port is facing up.

    • Remove the two 5.0 mm JIS #000 screws.

  5. Fujifilm FinePix S4800 Motherboard Replacement: 5 단계, 이미지 1/1
    • Rotate the camera so that the text "30x superwide 24-720mm" is facing up.

    • Remove the two 5.0 mm JIS #000 screws.

  6. Fujifilm FinePix S4800 Motherboard Replacement: 6 단계, 이미지 1/3 Fujifilm FinePix S4800 Motherboard Replacement: 6 단계, 이미지 2/3 Fujifilm FinePix S4800 Motherboard Replacement: 6 단계, 이미지 3/3
    • Press the pop-up button highlighted in the picture to release the flash mechanism.

    • Remove the two 5.0 mm JIS #000 screws highlighted in the picture.

  7. Fujifilm FinePix S4800 Motherboard Replacement: 7 단계, 이미지 1/3 Fujifilm FinePix S4800 Motherboard Replacement: 7 단계, 이미지 2/3 Fujifilm FinePix S4800 Motherboard Replacement: 7 단계, 이미지 3/3
    • Use a plastic opening tool to separate the rear case from the camera on each of the sides until the panel is completely separated.

    • The plastic case is fragile, so take your time on each side making sure to pry each side evenly as you continue around the camera with the tool.

  8. Fujifilm FinePix S4800 Motherboard Replacement: 8 단계, 이미지 1/2 Fujifilm FinePix S4800 Motherboard Replacement: 8 단계, 이미지 2/2
    • Gently, remove the rear case from the camera and set it aside.

  9. Fujifilm FinePix S4800 Motherboard Replacement, LCD Screen: 9 단계, 이미지 1/3 Fujifilm FinePix S4800 Motherboard Replacement, LCD Screen: 9 단계, 이미지 2/3 Fujifilm FinePix S4800 Motherboard Replacement, LCD Screen: 9 단계, 이미지 3/3
    • At this point, it is highly recommended that you wear an ESD wristband to prevent damage to the internal electronic components.

    • With respect to the camera that was disassembled for this guide, the LCD display easily fell out of its housing after the rear case was removed. If your screen fits more tightly, you can use a plastic removal tool to gently pry up one of the edges of the screen and that will release it from its mount.

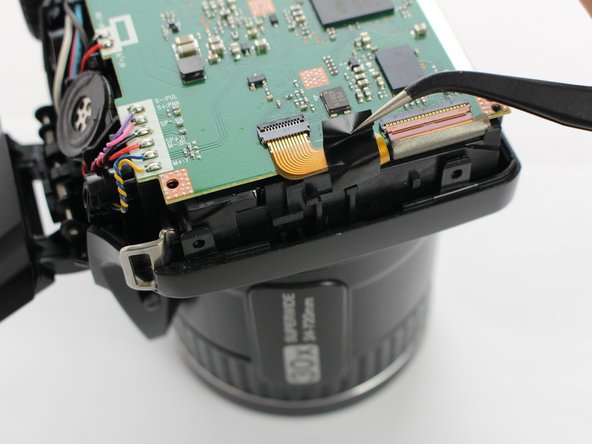
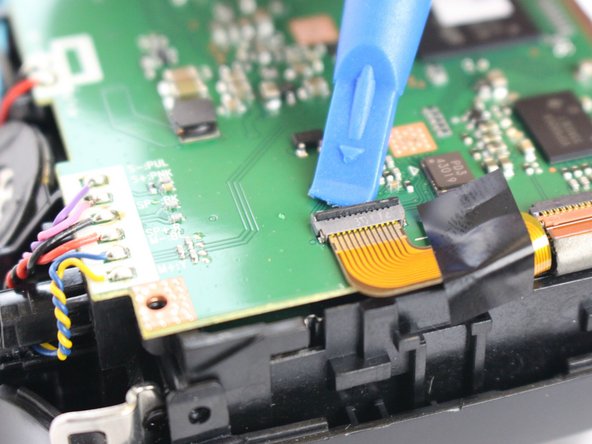
    • Gently tilt the LCD screen toward the bottom of the camera and use a spudger to flip the lock for the ZIF cable attached to the LCD.

  10. Fujifilm FinePix S4800 Motherboard Replacement: 10 단계, 이미지 1/1
    • Lift the screen away from the camera and set it aside.

  11. Fujifilm FinePix S4800 Motherboard Replacement, Electromagnetic Shield: 11 단계, 이미지 1/1
    • Remove the four 4.5 mm JIS #000 screws.

    • The electromagnetic shield is attached onto the motherboard please proceed with caution when removing screws.

  12. Fujifilm FinePix S4800 Motherboard Replacement: 12 단계, 이미지 1/2 Fujifilm FinePix S4800 Motherboard Replacement: 12 단계, 이미지 2/2
    • Gently pull the shield off the motherboard and set it aside.

  13. Fujifilm FinePix S4800 Motherboard Replacement, Motherboard: 13 단계, 이미지 1/2 Fujifilm FinePix S4800 Motherboard Replacement, Motherboard: 13 단계, 이미지 2/2
    • When removing the screw attached to the motherboard, proceed slowly and apply only light pressure.

    • Remove the 4.5 mm JIS #000 screw.

  14. Fujifilm FinePix S4800 Motherboard Replacement: 14 단계, 이미지 1/3 Fujifilm FinePix S4800 Motherboard Replacement: 14 단계, 이미지 2/3 Fujifilm FinePix S4800 Motherboard Replacement: 14 단계, 이미지 3/3
    • Remove the electrical tape off the ZIF cable using tweezers.

    • Gently tilt the the lock for the ZIF cable attached to the motherboard with a plastic removal tool.

    • Pull the ZIF cable from motherboard using tweezers.

  15. Fujifilm FinePix S4800 Motherboard Replacement: 15 단계, 이미지 1/3 Fujifilm FinePix S4800 Motherboard Replacement: 15 단계, 이미지 2/3 Fujifilm FinePix S4800 Motherboard Replacement: 15 단계, 이미지 3/3
    • Gently tilt the the lock for the ZIF cable attached to the motherboard with a plastic removal tool.

    • Pull the ZIF cable from motherboard using tweezers.

  16. Fujifilm FinePix S4800 Motherboard Replacement: 16 단계, 이미지 1/3 Fujifilm FinePix S4800 Motherboard Replacement: 16 단계, 이미지 2/3 Fujifilm FinePix S4800 Motherboard Replacement: 16 단계, 이미지 3/3
    • Gently tilt the the lock for the ZIF cable attached to the motherboard with a plastic removal tool.

    • Pull the ZIF cable from motherboard using tweezers.

  17. Fujifilm FinePix S4800 Motherboard Replacement: 17 단계, 이미지 1/2 Fujifilm FinePix S4800 Motherboard Replacement: 17 단계, 이미지 2/2
    • There are two sections were wires are soldered onto the motherboard. There is also a third section were the motherboard and camera are soldered together. Please follow all safety precautions when desoldering.

    • In order to free the motherboard, detach the wires by desoldering.

    • Detach the soldering between the camera and motherboard by desoldering.

    • For instructions on desoldering see How To Solder and Desolder Connections

  18. Fujifilm FinePix S4800 Motherboard Replacement: 18 단계, 이미지 1/2 Fujifilm FinePix S4800 Motherboard Replacement: 18 단계, 이미지 2/2
    • Gently pull the motherboard off and set it aside.

결론

To reassemble your device, follow these instructions in reverse order.

다른 한 분이 해당 안내서를 완성하였습니다.

Fanessa Jeune

회원 가입일: 02/17/17

303 평판

안내서 2개 작성하였습니다

USF Tampa, Team S19-G4, Hoffman Spring 2017 USF Tampa, Team S19-G4, Hoffman Spring 2017 회원

USFT-HOFFMAN-S17S19G4

4 회원들

안내서 16개 작성하였습니다

댓글 0개

댓글 쓰기

조회 통계:

24 시간 전: 0

7일 전: 1

30일 전: 21

전체 시간: 1,277