주요 콘텐츠로 건너뛰기

HP EliteBook 8470p Optical Drive Replacement

필요한 것

  1. HP EliteBook 8470p Optical Drive Replacement, Battery: 1 단계, 이미지 1개 중 1개
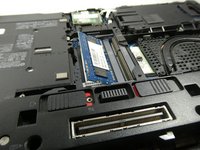
    • Position the computer upside down with the opening latch facing away from you and the battery facing towards you.

    • If the battery is “swollen” or the shape is irregular, stop whatever you are doing and allow the battery to slowly discharge itself before removing it from the laptop casing. Click the link to learn how to replace and dispose of a “swollen” battery, What to do with a swollen battery.

  2. HP EliteBook 8470p Optical Drive Replacement: 2 단계, 이미지 1개 중 1개
    • Slide the battery latch positioned to the right over to the right side. Hold it there.

  3. HP EliteBook 8470p Optical Drive Replacement: 3 단계, 이미지 1개 중 1개
    • With the latch opened, pull the battery out of its socket firmly.

    • There will likely be some resistance. However, if you find it to be excessive, the latch may not be properly opened.

  4. HP EliteBook 8470p Optical Drive Replacement, Case/Service Cover: 4 단계, 이미지 1개 중 1개
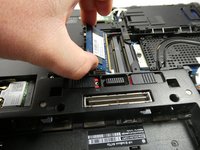
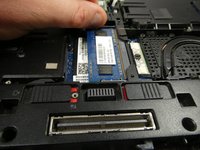
    • With the laptop latch still facing away from you, slide the left release latch to the left.

    • Some models may have a screw installed on this latch, if so, be sure to remove it first to avoid damaging the latch.

  5. HP EliteBook 8470p Optical Drive Replacement: 5 단계, 이미지 2개 중 1개 HP EliteBook 8470p Optical Drive Replacement: 5 단계, 이미지 2개 중 2개
    • Slide the door away from you, toward the opening latch.

    • Lift the door upwards away from the computer.

    • CAUTION: Before removing the memory module, update to the latest BIOS. Failure to do so could result in various system problems.

  6. HP EliteBook 8470p Optical Drive Replacement: 7 단계, 이미지 1개 중 1개
    • Spread the retaining tabs on either side of the memory module to release the module.

  7. HP EliteBook 8470p Optical Drive Replacement: 8 단계, 이미지 2개 중 1개 HP EliteBook 8470p Optical Drive Replacement: 8 단계, 이미지 2개 중 2개
    • Remove the memory module by pulling the module away from the slot at an angle.

  8. HP EliteBook 8470p Optical Drive Replacement: 9 단계, 이미지 3개 중 1개 HP EliteBook 8470p Optical Drive Replacement: 9 단계, 이미지 3개 중 2개 HP EliteBook 8470p Optical Drive Replacement: 9 단계, 이미지 3개 중 3개
    • Note that the device does have two memory slots. The top slot houses the the expansion memory and the bottom slot houses the primary memory.

    • Repeat the previous steps if there is an expansion memory card

  9. HP EliteBook 8470p Optical Drive Replacement, Optical Drive: 10 단계, 이미지 1개 중 1개
    • Position the laptop upside down with the optical drive facing toward you.

  10. HP EliteBook 8470p Optical Drive Replacement: 11 단계, 이미지 1개 중 1개
    • Loosen the one captive Phillips #00 screw securing the optical drive with a Phillips #00 screwdriver.

    • The screw is just above the optical drive.

  11. HP EliteBook 8470p Optical Drive Replacement: 12 단계, 이미지 1개 중 1개
    • Use a spudger to release the bracket tab.

    • The bracket tab is located just next to the screw removed in the previous step.

  12. HP EliteBook 8470p Optical Drive Replacement: 13 단계, 이미지 1개 중 1개
    • Slide the optical drive towards you out of the computer.

결론

To reassemble your device, follow these instructions in reverse order.

작성자

3다른 기여자 명과 함께

Jake Kaulbfliesch

회원 가입일: 10/25/22

195 평판

안내서 1개를 작성함

UMass Dartmouth, Team 5-3, Sinclaire Fall 2022 UMass Dartmouth, Team 5-3, Sinclaire Fall 2022 회원

UMASSD-SINCLAIRE-F22S5G3

5 회원들

안내서 7개를 작성함

1가이드 댓글

How can i flash my bios of hp elitebook 8470p

Barasa Joseph - 답글

댓글 쓰기

조회 통계:

지난 24시간: 2

지난 7일: 8

지난 30일: 27

전체 시간: 893