주요 콘텐츠로 건너뛰기

HP EliteBook 8530w Heatsink Replacement

필요한 것

  1. HP EliteBook 8530w Heatsink Replacement, Battery: 1 단계, 이미지 1/2 HP EliteBook 8530w Heatsink Replacement, Battery: 1 단계, 이미지 2/2
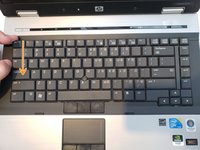
    • Turn the laptop off then place it down so that the back is facing up.

    • Slide the battery release switch to the left and hold it there.

  2. HP EliteBook 8530w Heatsink Replacement: 2 단계, 이미지 1/2 HP EliteBook 8530w Heatsink Replacement: 2 단계, 이미지 2/2
    • Pull the battery away upward and away from the laptop while continuing to hold the release switch.

    • Once the battery is removed from the laptop, you may release the switch.

    • To properly dispose of your battery, look for the closest location that accepts electronic waste in your area and drop it off there.

  3. HP EliteBook 8530w Heatsink Replacement, Fan: 3 단계, 이미지 1/1
    • Unscrew the two screws from the center panel with a Phillips #00 screwdriver.

    • These screws should have a keyboard icon stamped next to them.

  4. HP EliteBook 8530w Heatsink Replacement: 4 단계, 이미지 1/3 HP EliteBook 8530w Heatsink Replacement: 4 단계, 이미지 2/3 HP EliteBook 8530w Heatsink Replacement: 4 단계, 이미지 3/3
    • Flip the laptop over then open the lid.

    • Slide the four tabs at the top of the keyboard towards you with your finger.

    • Wedge a finger or spudger in the top corner of the keyboard and hinge it forward to reveal the backside.

    • Do not try to pull the keyboard out of the laptop. There are still cables connected to it that can easily be damaged.

  5. HP EliteBook 8530w Heatsink Replacement: 5 단계, 이미지 1/3 HP EliteBook 8530w Heatsink Replacement: 5 단계, 이미지 2/3 HP EliteBook 8530w Heatsink Replacement: 5 단계, 이미지 3/3
    • Use a Torx TR7 screwdriver to remove the three screws holding down the fan.

    • Gently remove the fan connector that plugs into the motherboard.

    • Note: It can help to use something like tweezers to remove the connector if you are having trouble.

    • Remove the fan.

  6. HP EliteBook 8530w Heatsink Replacement, Heatsink: 6 단계, 이미지 1/3 HP EliteBook 8530w Heatsink Replacement, Heatsink: 6 단계, 이미지 2/3 HP EliteBook 8530w Heatsink Replacement, Heatsink: 6 단계, 이미지 3/3
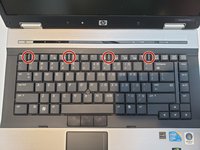
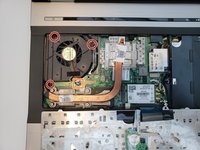
    • Remove the eight screws holding down the heat sink using a Torx TR7 bit.

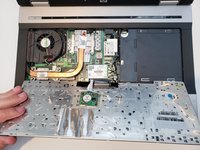
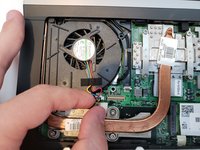
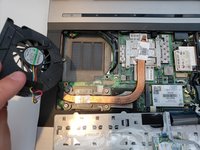
    • Gently remove the heat sink by lifting it up and sliding it away from the side of the laptop.

    • The thermal paste will be situated on the small square portion of the heatsink that sat directly atop the CPU. Clean both the heatsink and CPU of the old thermal paste before application as shown in this guide.

결론

To reassemble your device, follow these instructions in reverse order.

Austin Blakely

회원 가입일: 03/11/19

19,506 평판

안내서 53개 작성하였습니다

iFixit iFixit 회원

Staff

135 회원들

안내서 16,817개 작성하였습니다

댓글 0개

댓글 쓰기

조회 통계:

24 시간 전: 0

7일 전: 3

30일 전: 13

전체 시간: 564