소개
Use this guide to replace the fan in your HP Pavilion 14-bk061st laptop.
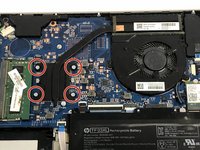
The computer fan as a core component that is used for active cooling inside a computer. It is important because it prevents a computer from overheating, as well as maintains better performance of computer parts by keeping them cool.
Before using this guide, confirm that the issue is that fan itself and not something else like dust buildup. This is a very common issue among computers that do not get cleaned out regularly. To find out more about this as well as other common fan issues visit the Troubleshooting page for more details.
Remember to power off the computer, as well as disconnecting all external components that are plugged into it.
필요한 것
-
-
Remove the three 5.7 JIS #1 screws from the bottom of the laptop.
-
Remove the two 6.7mm JIS #1 screws from underneath the feet of the laptop close to the exhaust vent.
-
-


To reassemble your device, follow these instructions in reverse order.
To reassemble your device, follow these instructions in reverse order.
다른 한 분이 해당 안내서를 완성하였습니다.
팀

York University, Team S8-G3, Turner Winter 2020 York University, Team S8-G3, Turner Winter 2020 회원
YORK-TURNER-W20S8G3
4 회원들
안내서 11개를 작성함