주요 콘텐츠로 건너뛰기

HP Pavilion 17-g192dx Cooling Fan Replacement

필요한 것

  1. HP Pavilion 17-g192dx Cooling Fan Replacement, Battery: 1 단계, 이미지 1/3 HP Pavilion 17-g192dx Cooling Fan Replacement, Battery: 1 단계, 이미지 2/3 HP Pavilion 17-g192dx Cooling Fan Replacement, Battery: 1 단계, 이미지 3/3
    • Turn off the laptop.

    • Slide the battery lock to the right until you see the open lock symbol.

  2. HP Pavilion 17-g192dx Cooling Fan Replacement: 2 단계, 이미지 1/1
    • Slide the battery release to the left until the battery pops up.

    • This may require significant force.

  3. HP Pavilion 17-g192dx Cooling Fan Replacement: 3 단계, 이미지 1/2 HP Pavilion 17-g192dx Cooling Fan Replacement: 3 단계, 이미지 2/2
    • Lift the battery up.

  4. HP Pavilion 17-g192dx Cooling Fan Replacement, laptop: 4 단계, 이미지 1/1
    • Using the metal spudger, pry up the screw covers.

  5. HP Pavilion 17-g192dx Cooling Fan Replacement: 5 단계, 이미지 1/1
    • Remove the fifteen 7mm screws holding the back casing on using the Phillips #00 screwdriver.

  6. HP Pavilion 17-g192dx Cooling Fan Replacement: 6 단계, 이미지 1/2 HP Pavilion 17-g192dx Cooling Fan Replacement: 6 단계, 이미지 2/2
    • Remove the 7mm screw holding the disc drive in place using the Phillips #00 head screwdriver.

  7. HP Pavilion 17-g192dx Cooling Fan Replacement: 7 단계, 이미지 1/3 HP Pavilion 17-g192dx Cooling Fan Replacement: 7 단계, 이미지 2/3 HP Pavilion 17-g192dx Cooling Fan Replacement: 7 단계, 이미지 3/3
    • Using an iFixit opening tool, push the disc drive away from the outer case.

    • Once the disk drive is out far enough, it easily slides out.

  8. HP Pavilion 17-g192dx Cooling Fan Replacement: 8 단계, 이미지 1/3 HP Pavilion 17-g192dx Cooling Fan Replacement: 8 단계, 이미지 2/3 HP Pavilion 17-g192dx Cooling Fan Replacement: 8 단계, 이미지 3/3
    • Remove the four 7mm screws holding the back resting plates on using the Phillips #00 screwdriver.

    • Using a metal spudger, lift up on the back resting plate until it pops off.

  9. HP Pavilion 17-g192dx Cooling Fan Replacement: 9 단계, 이미지 1/2 HP Pavilion 17-g192dx Cooling Fan Replacement: 9 단계, 이미지 2/2
    • Remove the two 7 mm screws behind the plate using a Phillips #00 screwdriver.

  10. HP Pavilion 17-g192dx Cooling Fan Replacement: 10 단계, 이미지 1/3 HP Pavilion 17-g192dx Cooling Fan Replacement: 10 단계, 이미지 2/3 HP Pavilion 17-g192dx Cooling Fan Replacement: 10 단계, 이미지 3/3
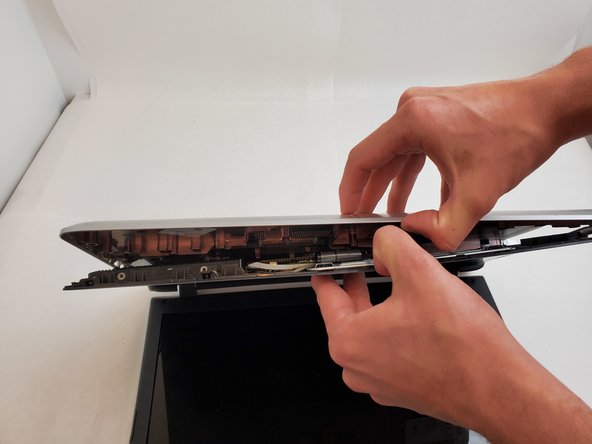
    • Pry up on the case with an iFixit opening tool until you can feel a snap.

    • Pry around the remainder until you can separate the case from the keyboard with your hands.

    • Gently separate the two.

  11. HP Pavilion 17-g192dx Cooling Fan Replacement, Cooling Fan: 11 단계, 이미지 1/3 HP Pavilion 17-g192dx Cooling Fan Replacement, Cooling Fan: 11 단계, 이미지 2/3 HP Pavilion 17-g192dx Cooling Fan Replacement, Cooling Fan: 11 단계, 이미지 3/3
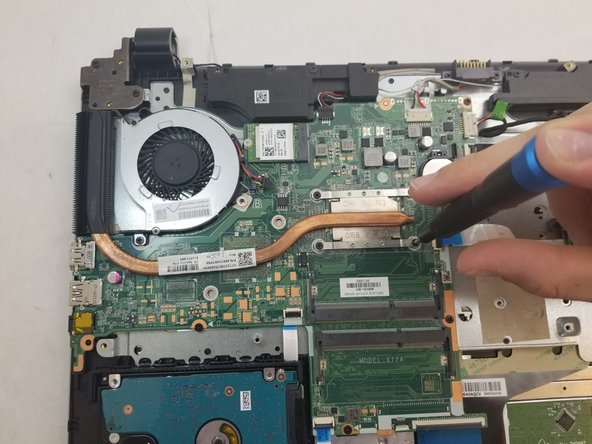
    • Remove the four 2mm screws on the heat sink with a Phillips #00 screwdriver.

    • Remove the heat sink.

    • When setting the heat sink down, set it face down to avoid putting the thermal paste on the work surface.

    • When reinstalling the heat sink, be sure to clean the contact surfaces and reapply fresh thermal paste.

  12. HP Pavilion 17-g192dx Cooling Fan Replacement: 12 단계, 이미지 1/1
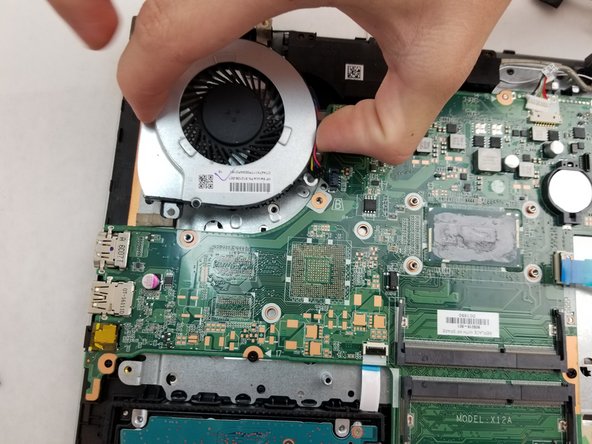
    • Remove the two 5mm screws holding the fan in place using the Phillips #00 screwdriver.

  13. HP Pavilion 17-g192dx Cooling Fan Replacement: 13 단계, 이미지 1/2 HP Pavilion 17-g192dx Cooling Fan Replacement: 13 단계, 이미지 2/2
    • Unplug the cooling fan from the motherboard.

    • Remove the cooling fan.

결론

To reassemble your device, follow these instructions in reverse order.

Dominic Perito

회원 가입일: 09/20/19

598 평판

안내서 5개 작성하였습니다

댓글 0개

댓글 쓰기

조회 통계:

24 시간 전: 1

7일 전: 2

30일 전: 13

전체 시간: 530