주요 콘텐츠로 건너뛰기

HP Pavilion g7-2275dx Fan Replacement

필요한 것

  1. HP Pavilion g7-2275dx Fan Replacement, Battery: 1 단계, 이미지 1/1
    • Working on your device while it is turned on may result in electric shock. Make sure to shut down and unplug your device before you begin.

    • Flip your device over so the bottom panel is facing up.

  2. HP Pavilion g7-2275dx Fan Replacement: 2 단계, 이미지 1/1
    • The battery is held in by a latch in the front and tabs in the back.

    • Slide the lock switch left, towards the center of the computer.

    • Lift up the battery, rotating it up and away from you, then pull it out.

    • To put the battery back in, line it up with the battery bay and the holes for the tabs. Then let the battery rotate towards you and press down until the latch engages and you hear a click.

  3. HP Pavilion g7-2275dx Fan Replacement, Disassembling HP Pavilion g7-2275dx Back Panel: 3 단계, 이미지 1/1
    • Unscrew one Phillips #1 screw from the back panel.

    • The screw is on a spring and attached to the panel. It will pop up, but will not separate from the back panel.

  4. HP Pavilion g7-2275dx Fan Replacement: 4 단계, 이미지 1/2 HP Pavilion g7-2275dx Fan Replacement: 4 단계, 이미지 2/2
    • Slide the back panel down and pull it up.

  5. HP Pavilion g7-2275dx Fan Replacement, Hard Drive: 5 단계, 이미지 1/2 HP Pavilion g7-2275dx Fan Replacement, Hard Drive: 5 단계, 이미지 2/2
    • Static electricity can damage the components of your laptop. Make sure you are wearing an anti-static bracelet before you touch the hard drive.

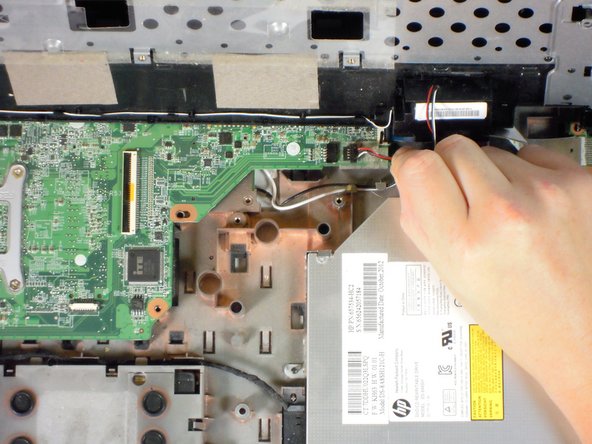
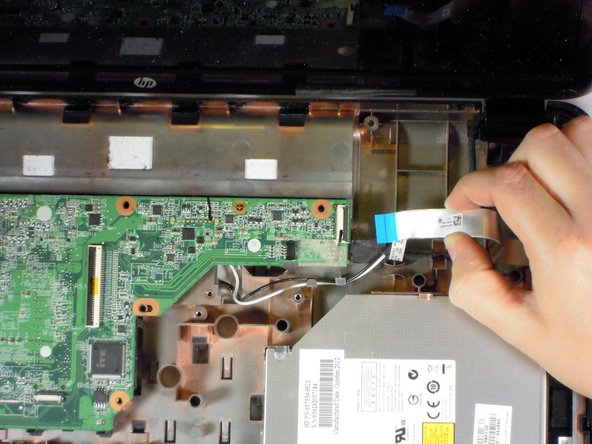
    • Using the black tab on the connect and/or a prying tool, lift up to disconnect the black hard drive cable from the green circuit board.

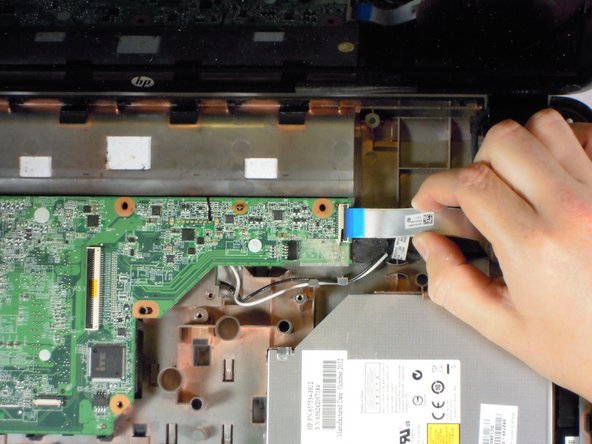
    • Pull the black cable up and out of the back panel. This will make taking the hard drive out much easier.

  6. HP Pavilion g7-2275dx Fan Replacement: 6 단계, 이미지 1/2 HP Pavilion g7-2275dx Fan Replacement: 6 단계, 이미지 2/2
    • Gently pull up on the plastic tab attached to the hard drive.

    • Pull the hard drive up and to the right to remove it completely from the laptop.

  7. HP Pavilion g7-2275dx Fan Replacement, RAM: 7 단계, 이미지 1/2 HP Pavilion g7-2275dx Fan Replacement, RAM: 7 단계, 이미지 2/2
    • Use your fingers, plastic opening tools, or pliers to pull the silver brackets away from the RAM.

    • The RAM should pop up to a 35 degree angle.

  8. HP Pavilion g7-2275dx Fan Replacement: 8 단계, 이미지 1/2 HP Pavilion g7-2275dx Fan Replacement: 8 단계, 이미지 2/2
    • Gently pull the RAM straight out in the direction it currently is orientated.

    • When inserting new RAM, place the RAM in the black housing at a 35 degree angle (it will fit loosely), then push down until it clicks into the silver brackets.

    • This computer supports two sticks of RAM. To add a second stick, repeat the above step with the upper black housing. (Ensure that you have the correct size and type of RAM before trying to add it).

  9. HP Pavilion g7-2275dx Fan Replacement, Wireless Card: 9 단계, 이미지 1/1
    • Use a Phillips #1 screw driver to unscrew the black 4 mm Phillips #1 screw on the wireless card.

  10. HP Pavilion g7-2275dx Fan Replacement: 10 단계, 이미지 1/2 HP Pavilion g7-2275dx Fan Replacement: 10 단계, 이미지 2/2
    • Use a plastic opening tool to lift the wireless card out of its slot.

  11. HP Pavilion g7-2275dx Fan Replacement: 11 단계, 이미지 1/2 HP Pavilion g7-2275dx Fan Replacement: 11 단계, 이미지 2/2
    • Pull the black and white wires up and off of the wireless card.

    • Remove the wireless card.

  12. HP Pavilion g7-2275dx Fan Replacement, Back panel screws: 12 단계, 이미지 1/1
    • Remove sixteen 7 mm Phillips #1 screws.

  13. HP Pavilion g7-2275dx Fan Replacement, Keyboard: 13 단계, 이미지 1/1
    • Unscrew the 7 mm Phillips #1 screw next to the keyboard icon.

  14. HP Pavilion g7-2275dx Fan Replacement: 14 단계, 이미지 1/1
    • Flip the laptop over and open the screen.

  15. HP Pavilion g7-2275dx Fan Replacement: 15 단계, 이미지 1/2 HP Pavilion g7-2275dx Fan Replacement: 15 단계, 이미지 2/2
    • A ribbon cable is attached to the back of the keyboard. Avoid lifting or moving the keyboard more than a couple inches before you disconnect the ribbon cable or you may damage it.

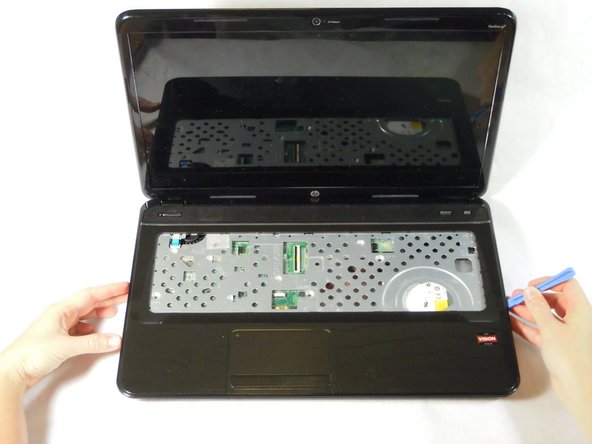
    • Carefully pry up one of the top corners of the keyboard with a prying tool. Slide the tool along the top of the keyboard to release it from the housing. Pull the top of the keyboard towards you an inch or two.

    • The keyboard may make some cracking noises as you pry it from the casing. This is expected.

    • Pull the keyboard up and away from you, as it is held in by clips in the front. It is not yet disconnected.

  16. HP Pavilion g7-2275dx Fan Replacement: 16 단계, 이미지 1/1
    • Gently turn keyboard over, towards you, to reveal the silver cable ribbon.

  17. HP Pavilion g7-2275dx Fan Replacement: 17 단계, 이미지 1/3 HP Pavilion g7-2275dx Fan Replacement: 17 단계, 이미지 2/3 HP Pavilion g7-2275dx Fan Replacement: 17 단계, 이미지 3/3
    • Using a prying tool, flip the black clip up and to the right. Pull the silver cable out and to the left, the keyboard is now detached from the laptop.

  18. HP Pavilion g7-2275dx Fan Replacement, Front Panel: 18 단계, 이미지 1/1
    • Unscrew the four 7 mm Phillips #1 screws on the board.

  19. HP Pavilion g7-2275dx Fan Replacement: 19 단계, 이미지 1/3 HP Pavilion g7-2275dx Fan Replacement: 19 단계, 이미지 2/3 HP Pavilion g7-2275dx Fan Replacement: 19 단계, 이미지 3/3
    • Use a plastic opening tool to lift the white clip up, towards the screen.

    • Pull the white cable with blue head, away from the clip.

  20. HP Pavilion g7-2275dx Fan Replacement: 20 단계, 이미지 1/2 HP Pavilion g7-2275dx Fan Replacement: 20 단계, 이미지 2/2
    • With a plastic opening tool, pry open a side or corner of the top panel. Slide the tool around the rest of the panel to release it from the clips.

    • If you have to use a large amount of force, you may not have removed all the necessary screws. Double check to ensure you have.

    • You should hear clips releasing from the board.

  21. HP Pavilion g7-2275dx Fan Replacement: 21 단계, 이미지 1/1
    • Lifting the top panel too quickly or forcefully may damage the speaker cable, which is still attached underneath.

    • Rotate the top panel away from you, keeping the back near the hinge of the laptop to avoid damaging the speaker cable.

  22. HP Pavilion g7-2275dx Fan Replacement: 22 단계, 이미지 1/2 HP Pavilion g7-2275dx Fan Replacement: 22 단계, 이미지 2/2
    • Using a plastic opening tool, disconnect the black speaker connector from the top right of the motherboard.

    • Set aside the top panel until your are ready to reassemble your laptop.

  23. HP Pavilion g7-2275dx Fan Replacement, Fan: 23 단계, 이미지 1/1
    • Unscrew one 7 mm Phillips #1 screw from the bottom left corner of the motherboard.

  24. HP Pavilion g7-2275dx Fan Replacement: 24 단계, 이미지 1/2 HP Pavilion g7-2275dx Fan Replacement: 24 단계, 이미지 2/2
    • Lift black tab for the CD drive cable in the bottom left of the motherboard.

    • Disconnect it from the motherboard with your fingers or a plastic opening tool.

  25. HP Pavilion g7-2275dx Fan Replacement: 25 단계, 이미지 1/3 HP Pavilion g7-2275dx Fan Replacement: 25 단계, 이미지 2/3 HP Pavilion g7-2275dx Fan Replacement: 25 단계, 이미지 3/3
    • Lift, with your fingers or a plastic opening tool, the large black monitor cable at the top of the left hand corner of the motherboard.

  26. HP Pavilion g7-2275dx Fan Replacement: 26 단계, 이미지 1/3 HP Pavilion g7-2275dx Fan Replacement: 26 단계, 이미지 2/3 HP Pavilion g7-2275dx Fan Replacement: 26 단계, 이미지 3/3
    • Use a plastic opening tool to lift the black clip up from the silver cable that's in the upper right hand corner of the computer.

    • Pull the silver cable away from the motherboard.

  27. HP Pavilion g7-2275dx Fan Replacement: 27 단계, 이미지 1/2 HP Pavilion g7-2275dx Fan Replacement: 27 단계, 이미지 2/2
    • Using a small amount of force pull the black cable, below the silver cable we just removed, to the right and out of the way.

  28. HP Pavilion g7-2275dx Fan Replacement: 28 단계, 이미지 1/1
    • Lift the right side of the motherboard up at roughly a 45 degree angle and pull to the right to remove it.

  29. HP Pavilion g7-2275dx Fan Replacement: 29 단계, 이미지 1/2 HP Pavilion g7-2275dx Fan Replacement: 29 단계, 이미지 2/2
    • Now that the motherboard is out, flip it over and begin working on the back side.

    • Remove the red, blue, and yellow set of wires from the motherboard.

  30. HP Pavilion g7-2275dx Fan Replacement: 30 단계, 이미지 1/2 HP Pavilion g7-2275dx Fan Replacement: 30 단계, 이미지 2/2
    • The screws on the heat sink are held in place by screws and stoppers; they will unscrew, but will not come out of the heat sink. Be careful not to loosen them too much or you may damage the bracket on the back of the CPU.

    • Using a Phillips #1 screw driver unscrew the four screws on the heat sink.

    • When tightening the screws during reassembly, tighten them in a cross pattern (start by tightening the upper left screw, then the bottom right screw, then the top right screw, and finally the bottom left screw)

    • Lift the bracket up from the motherboard.

  31. HP Pavilion g7-2275dx Fan Replacement: 31 단계, 이미지 1/1
    • Since the fan is held on with adhesives, you will likely need a prying tool and a small amount of force to lift the fan up and off of the motherboard.

    • Be sure to apply a light coating of thermal paste to the CPU before you screw the heat sink back on. For help applying thermal paste, you can reference the iFixit Thermal Paste Application guide

결론

To reassemble your device, follow these instructions in reverse order.

다른 45명이 해당 안내서를 완성하였습니다.

John Sutton

회원 가입일: 04/24/14

1,566 평판

안내서 8개 작성하였습니다

Cal Poly, Team 11-51, Amido Spring 2014 Cal Poly, Team 11-51, Amido Spring 2014 회원

CPSU-AMIDO-S14S11G51

4 회원들

안내서 21개 작성하였습니다

댓글 16개

I had to stop at stap 14 because i couldnt open my laptop, lifting the screen took the plastic piece around the keyboard loose. I tried to return my staps ( to still have a computer) but that plastic piece wont fit back. And i,still cant open my screen.

hendrikvandervelden - 답글

This worked well for accessing and cleaning the fan. Thanks.

alisl ahish - 답글

I just wanted to say THANK YOU for posting this instructional page. I know this took a lot of time on your part plus you done this for free to boot. It is because of people like you that make the lives of others PC life much MUCH easier!

Edward Norton - 답글

Thank you so much! It helped me a lot although I had a different g7 model.

Raimund von der Emden - 답글

Thanks!!! I was able to fix my laptop.

mdoming58182 - 답글

댓글 쓰기

조회 통계:

24 시간 전: 4

7일 전: 11

30일 전: 96

전체 시간: 41,838