주요 콘텐츠로 건너뛰기

HP Windows Mixed Reality Controllers TPC-Q044 Joystick Switch Replacement

필요한 것

  1. HP Windows Mixed Reality Controllers TPC-Q044 Joystick Switch Replacement, Batteries: 1 단계, 이미지 1/3 HP Windows Mixed Reality Controllers TPC-Q044 Joystick Switch Replacement, Batteries: 1 단계, 이미지 2/3 HP Windows Mixed Reality Controllers TPC-Q044 Joystick Switch Replacement, Batteries: 1 단계, 이미지 3/3
    • Slide the rear compartment cover in the direction of the arrow.

    • If replacing batteries, ensure the (+) and (-) on the battery match the (+) and (-) labeled in the battery compartment.

  2. HP Windows Mixed Reality Controllers TPC-Q044 Joystick Switch Replacement, Shell: 2 단계, 이미지 1/2 HP Windows Mixed Reality Controllers TPC-Q044 Joystick Switch Replacement, Shell: 2 단계, 이미지 2/2
    • Remove the four 4mm screws using a Phillips #00 screwdriver.

  3. HP Windows Mixed Reality Controllers TPC-Q044 Joystick Switch Replacement: 3 단계, 이미지 1/3 HP Windows Mixed Reality Controllers TPC-Q044 Joystick Switch Replacement: 3 단계, 이미지 2/3 HP Windows Mixed Reality Controllers TPC-Q044 Joystick Switch Replacement: 3 단계, 이미지 3/3
    • Grip the main body and pull the joystick outwards until the entire front panel pops off.

    • Remove the 6mm screw in the corner of the joystick well using a Phillips #00 screwdriver.

  4. HP Windows Mixed Reality Controllers TPC-Q044 Joystick Switch Replacement: 4 단계, 이미지 1/2 HP Windows Mixed Reality Controllers TPC-Q044 Joystick Switch Replacement: 4 단계, 이미지 2/2
    • Use a spudger to pry apart the two halves of the assembly.

    • Work slowly, prying a small section at a time until the halves are completely separated.

  5. HP Windows Mixed Reality Controllers TPC-Q044 Joystick Switch Replacement, Small Circuit Board: 5 단계, 이미지 1/2 HP Windows Mixed Reality Controllers TPC-Q044 Joystick Switch Replacement, Small Circuit Board: 5 단계, 이미지 2/2
    • Using a Phillips #00 screwdriver, remove the four 4mm screws located on the joystick circuit board underneath the top half of the controller.

  6. HP Windows Mixed Reality Controllers TPC-Q044 Joystick Switch Replacement: 6 단계, 이미지 1/3 HP Windows Mixed Reality Controllers TPC-Q044 Joystick Switch Replacement: 6 단계, 이미지 2/3 HP Windows Mixed Reality Controllers TPC-Q044 Joystick Switch Replacement: 6 단계, 이미지 3/3
    • Remove the orange flat cable by pulling the orange tab parallel to the circuit board.

    • Release the blue flat cable by lifting up the white latch with a spudger.

    Any idea if I can buy a replacement ribbion cable

    Randy Pellerin - 답글

  7. HP Windows Mixed Reality Controllers TPC-Q044 Joystick Switch Replacement, Joystick Switch: 7 단계, 이미지 1/2 HP Windows Mixed Reality Controllers TPC-Q044 Joystick Switch Replacement, Joystick Switch: 7 단계, 이미지 2/2
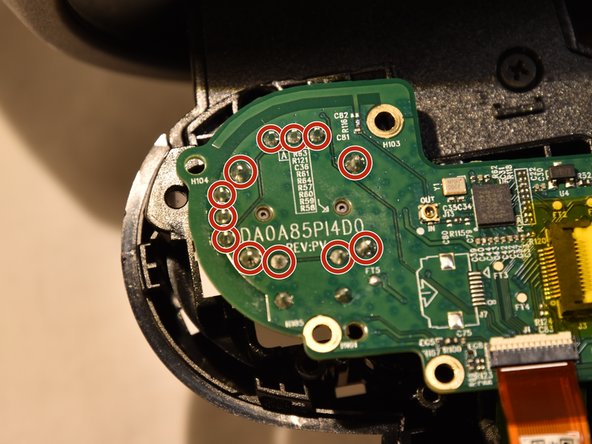
    • The joystick controller is soldered directly to the circuit board. You can find instructions for removing soldered components here.

    • The joystick controller is secured by 12 solder connections. Once these have been desoldered, the controller can be removed.

결론

To reassemble your device, follow these instructions in reverse order.

다른 3명이 해당 안내서를 완성하였습니다.

Clement Cheung

회원 가입일: 01/24/19

643 평판

안내서 5개 작성하였습니다

Cal Poly, Team S18-G5, White Winter 2019 Cal Poly, Team S18-G5, White Winter 2019 회원

CPSU-WHITE-W19S18G5

2 회원들

안내서 14개 작성하였습니다

댓글 2개

You can solder replacement Xbox One analog sticks right? I have some stick drift and can’t test this until my university reopens, but when it does I want to try fixing it.

Edit: I have the Dell controllers but they seem identical to the HP ones in this guide.

Vincent - 답글

I think this might be the stick: https://www.mouser.com/ProductDetail/Alp...

Alps RKJXV 23 degree 10K ohm multi-directional switches

I haven’t soldered it yet so do not take my word as fact, it just looks right.

Vincent - 답글

댓글 쓰기

조회 통계:

24 시간 전: 0

7일 전: 3

30일 전: 7

전체 시간: 1,201