주요 콘텐츠로 건너뛰기

HTC Desire 826 Screen Replacement

필요한 것

  1. HTC Desire 826 Screen Replacement, Battery: 1 단계, 이미지 1/3 HTC Desire 826 Screen Replacement, Battery: 1 단계, 이미지 2/3 HTC Desire 826 Screen Replacement, Battery: 1 단계, 이미지 3/3
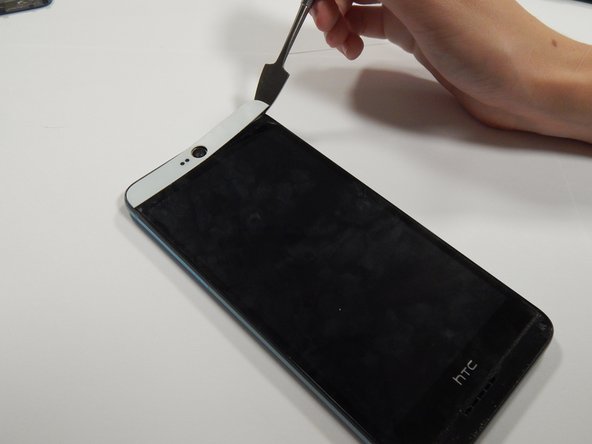
    • Find a seam in the back of the device.

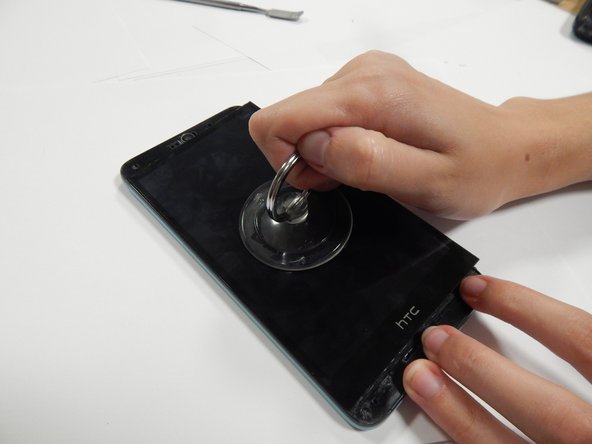
    • Insert the plastic spudger into the seam and pry off the back panel.

    • There will be glue, so keep prying until it comes off or you may need to heat up the edges of the device to loosen the adhesive with the iOpener.

  2. HTC Desire 826 Screen Replacement: 2 단계, 이미지 1/3 HTC Desire 826 Screen Replacement: 2 단계, 이미지 2/3 HTC Desire 826 Screen Replacement: 2 단계, 이미지 3/3
    이 단계에 사용된 도구:
    Tweezers
    $4.99
    구매
    • Remove the 4.0 mm screw above the battery with a T5 Torx screwdriver.

    • Remove the metal bracket with the tweezers.

  3. HTC Desire 826 Screen Replacement: 3 단계, 이미지 1/1
    • Disconnect the battery cable from the motherboard with the tweezers.

  4. HTC Desire 826 Screen Replacement: 4 단계, 이미지 1/2 HTC Desire 826 Screen Replacement: 4 단계, 이미지 2/2
    • Lift the battery with a plastic spudger and remove it from the device.

  5. HTC Desire 826 Screen Replacement, Screen: 5 단계, 이미지 1/2 HTC Desire 826 Screen Replacement, Screen: 5 단계, 이미지 2/2
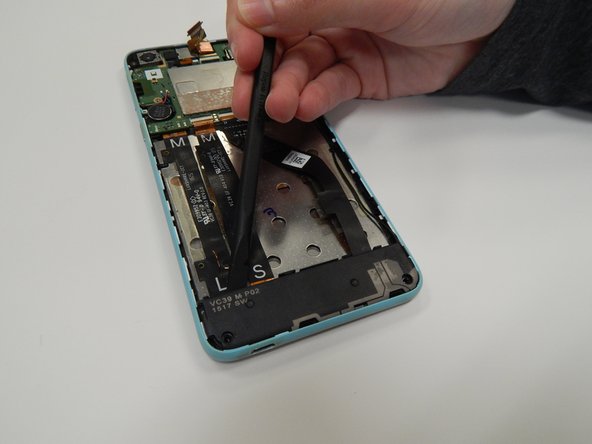
    • Remove the two 4.0 mm screws attaching the bottom plastic panel using a T5 screwdriver.

    • Remove the black plastic cover using a plastic spudger

  6. HTC Desire 826 Screen Replacement: 6 단계, 이미지 1/1
    이 단계에 사용된 도구:
    Tweezers
    $4.99
    구매
    • Use tweezers to pry the wire up from the battery bed

    • Detach the ribbon cable by pulling with the tweezers where circled in blue

    • Flip the phone over so the screen side is facing up for the next step

  7. HTC Desire 826 Screen Replacement: 7 단계, 이미지 1/2 HTC Desire 826 Screen Replacement: 7 단계, 이미지 2/2
    • Use the metal spudger to pry up the plastic cover pieces from the front of the phone

  8. HTC Desire 826 Screen Replacement: 8 단계, 이미지 1/2 HTC Desire 826 Screen Replacement: 8 단계, 이미지 2/2
    • Pry up the edges of the screen using the metal spudger

    • Then use the suction cup to remove the screen from your device

    • There will likely be glue holding your screen in place, so keep prying but be cautious not to break the screen. You may want to use the iOpener to loosen the adhesive prior to removal.

결론

To reassemble your device, follow these instructions in reverse order.

Julia Zimmerman

회원 가입일: 09/04/19

109 평판

안내서 1개 작성함

University of Alabama, Team S1-G2, Bedsole Fall 2019 University of Alabama, Team S1-G2, Bedsole Fall 2019 회원

UA-BEDSOLE-F19S1G2

4 회원들

안내서 10개 작성하였습니다

댓글 한 개

Après avoir fait le démontage de l'écran , le digital est devenu très dur et ne réagi pas automatiquement au toucher . Que dois-je faire ?

Japhet piergy Bassa - 답글

댓글 쓰기

조회 통계:

24 시간 전: 0

7일 전: 1

30일 전: 10

전체 시간: 351