주요 콘텐츠로 건너뛰기

How to Hook up Front Panel Connectors to an ATX Motherboard

필요한 것

  1. How to Hook up Front Panel Connectors to an ATX Motherboard, How to Hook up Front Panel Connectors to an ATX Motherboard: 1 단계, 이미지 1/3 How to Hook up Front Panel Connectors to an ATX Motherboard, How to Hook up Front Panel Connectors to an ATX Motherboard: 1 단계, 이미지 2/3 How to Hook up Front Panel Connectors to an ATX Motherboard, How to Hook up Front Panel Connectors to an ATX Motherboard: 1 단계, 이미지 3/3
    • Lay your PC on its side and unscrew the side panel thumb screws. (Open your PC case)

    • For some computer cases you may need a screw driver to remove actual screws.

  2. How to Hook up Front Panel Connectors to an ATX Motherboard: 2 단계, 이미지 1/2 How to Hook up Front Panel Connectors to an ATX Motherboard: 2 단계, 이미지 2/2
    • Once the screws are removed lift off the side panel to expose the motherboard and internal cables.

    • Locate where the front panel pins are.

  3. How to Hook up Front Panel Connectors to an ATX Motherboard: 3 단계, 이미지 1/3 How to Hook up Front Panel Connectors to an ATX Motherboard: 3 단계, 이미지 2/3 How to Hook up Front Panel Connectors to an ATX Motherboard: 3 단계, 이미지 3/3
    • Plug the cable marked Reset SW into the motherboard. This will allow your reset button to actually work.

  4. How to Hook up Front Panel Connectors to an ATX Motherboard: 4 단계, 이미지 1/3 How to Hook up Front Panel Connectors to an ATX Motherboard: 4 단계, 이미지 2/3 How to Hook up Front Panel Connectors to an ATX Motherboard: 4 단계, 이미지 3/3
    • Plug the Power SW cable in above the Reset SW on the motherboard. This will allow you to turn on your computer with the power button on the front of your PC case.

  5. How to Hook up Front Panel Connectors to an ATX Motherboard: 5 단계, 이미지 1/3 How to Hook up Front Panel Connectors to an ATX Motherboard: 5 단계, 이미지 2/3 How to Hook up Front Panel Connectors to an ATX Motherboard: 5 단계, 이미지 3/3
    • Plug the Power Led + into the top left prong. Positive goes on the left prong.

  6. How to Hook up Front Panel Connectors to an ATX Motherboard: 6 단계, 이미지 1/3 How to Hook up Front Panel Connectors to an ATX Motherboard: 6 단계, 이미지 2/3 How to Hook up Front Panel Connectors to an ATX Motherboard: 6 단계, 이미지 3/3
    • Connect the Power Led - cable to the prong on the right.

    • This is the final cable structure.

  7. How to Hook up Front Panel Connectors to an ATX Motherboard: 7 단계, 이미지 1/1
    • Power LED

    • Power Switch

    • Reset Switch

결론

To reassemble your device, follow the instructions, steps 1 and 2, in reverse order.

다른 8명이 해당 안내서를 완성하였습니다.

Nathan Carini

회원 가입일: 03/26/21

297 평판

안내서 1개 작성함

UMass Dartmouth, Team S1-G5, O'Connell Spring 2021 UMass Dartmouth, Team S1-G5, O'Connell Spring 2021 회원

UMASSD-O'CONNELL-S21S1G5

1 회원

안내서 6개 작성하였습니다

댓글 한 개

Petite précision :

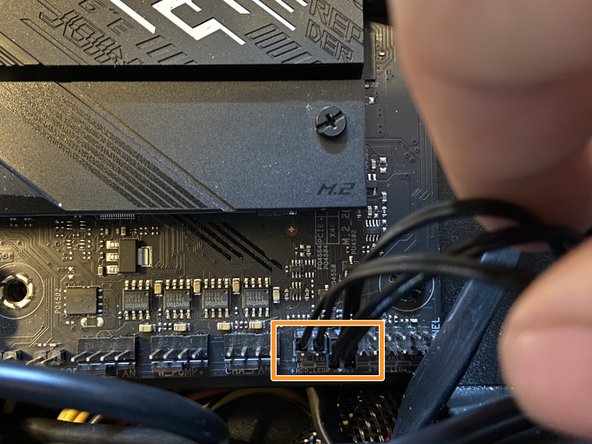
Les broches sur lesquels il faut brancher les connecteurs des différents éléments du boitier sont indiquées dans la notice de la carte mère (button power, LEDs, etc.). L’emplacement et l’ordre de branchement des différents éléments du boitier est susceptible de varier selon le modèle de la carte mère.

Cela concerne aussi le buzzer si vous en avez un.

Brendan - 답글

댓글 쓰기

조회 통계:

24 시간 전: 98

7일 전: 812

30일 전: 3,372

전체 시간: 71,785