주요 콘텐츠로 건너뛰기

Huawei P9 Battery Replacement

필요한 것

  1. Huawei P9 Battery Replacement, Back Cover: 1 단계, 이미지 1/3 Huawei P9 Battery Replacement, Back Cover: 1 단계, 이미지 2/3 Huawei P9 Battery Replacement, Back Cover: 1 단계, 이미지 3/3
    • First switch off your phone and remove the SIM card tray.

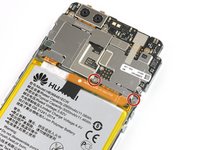
    • Unscrew the two Pentalobe P2 screws located at the bottom next to the device's USB C port.

    • If the screen is cracked you might want to use some tape to protect your eyes from glass shreds and get a better grip to open the phone.

  2. Huawei P9 Battery Replacement: 2 단계, 이미지 1/2 Huawei P9 Battery Replacement: 2 단계, 이미지 2/2
    • Avoid to lift only the display instead of the whole phone assembly as doing so may cause damage to the screen.

    • Use an iSclack or a suction handle to separate the phone assembly from the rear panel.

    • In case you can‘t manage to lift the phone assembly out of the rear panel you can insert the pointed end of a spudger in the headphone jack opening and press the phone assembly upwards until you create a gap between assembly and rear panel. Then use the spudger to lever the phone assembly out of the panel.

    • Don't remove the rear panel completely yet. There is a cable connected to it! It is running from the finger print sensor to the display unit.

  3. Huawei P9 Battery Replacement, Fingerprint sensor: 3 단계, 이미지 1/2 Huawei P9 Battery Replacement, Fingerprint sensor: 3 단계, 이미지 2/2
    • Disconnect the fingerprint sensor using a spudger.

  4. Huawei P9 Battery Replacement, Battery: 4 단계, 이미지 1/3 Huawei P9 Battery Replacement, Battery: 4 단계, 이미지 2/3 Huawei P9 Battery Replacement, Battery: 4 단계, 이미지 3/3
    • Unplug the antenna cable.

    • Remove the sticker that sits on top of the screw.

  5. Huawei P9 Battery Replacement: 5 단계, 이미지 1/3 Huawei P9 Battery Replacement: 5 단계, 이미지 2/3 Huawei P9 Battery Replacement: 5 단계, 이미지 3/3
    • Unscrew the two Phillips #00 screws that hold the metal plate in place.

    • The plate, which is covering the battery connector, has two little hooks on each side. Use a tweezer to free them and unhinge the plate by carefully moving it upwards.

  6. Huawei P9 Battery Replacement: 6 단계, 이미지 1/2 Huawei P9 Battery Replacement: 6 단계, 이미지 2/2
    • Now you can unplug the battery connector and bend it aside.

    • The EVA-L09 model has an NFC antenna adhered onto the battery.

    • If you are just removing the battery to get to the display, you can leave the NFC on the battery.

    • Mark its place on the battery with a felt pen for reassembly. Carefully peel it off and make sure not to rip or crease the antenna.

    • For reassembly, place the NFC antenna on the battery where it was before so its contacts align with their counterparts.

  7. Huawei P9 Battery Replacement: 7 단계, 이미지 1/2 Huawei P9 Battery Replacement: 7 단계, 이미지 2/2
    • Free the ends of the adhesive pull tabs to get a good grip on them.

  8. Huawei P9 Battery Replacement: 8 단계, 이미지 1/3 Huawei P9 Battery Replacement: 8 단계, 이미지 2/3 Huawei P9 Battery Replacement: 8 단계, 이미지 3/3
    이 단계에 사용된 도구:
    Tesa 61395 Tape
    $5.99
    구매
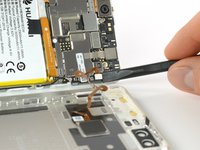
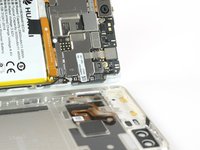
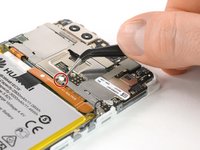
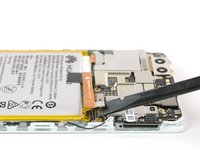
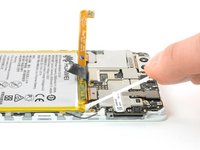
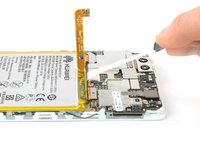
    • The battery is secured with three pieces of adhesive, a removable pull-tab in the center, and on the SIM tray side. A third piece of adhesive on the button side has no pull-tab.

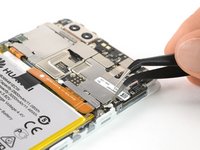
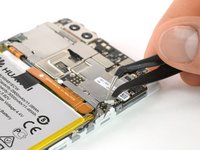
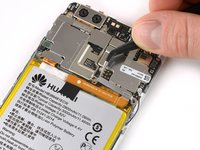
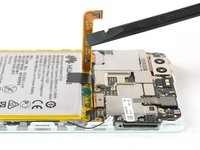
    • Pull the adhesive tabs in a slow constant movement to free the battery.

    • Should those adhesive tabs snap, you might want to use an iOpener to heat and soften them a little bit so you can pry out the battery with a spudger.

    • There are two cables running directly underneath the battery. Take care not to damage them when prying with a spudger! You can see their position in the last picture.

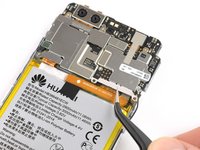
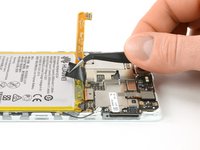
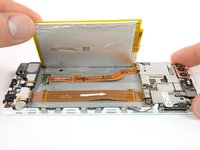
    • Slowly lift the battery toward the button side and free it from the remaining hidden piece of adhesive.

    • When reassembling your phone, replace old adhesive with stretch release adhesive strips, double-sided tape, or pre-cut adhesive strips.

결론

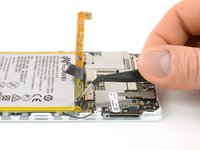
To reassemble your device, follow these instructions in reverse order.

다른 90명이 해당 안내서를 완성하였습니다.

Tobias Isakeit

회원 가입일: 03/31/14

119,540 평판

안내서 189개 작성하였습니다

Tobias Isakeit - Repairability Engineer Tobias Isakeit - Repairability Engineer 회원

Business

1 회원

안내서 1,093개 작성하였습니다

댓글 28개

Just FYI, My replacement battery from Huawei doesn’t fit. The cable doesn’t reach the connector. Soldering Required!

https://imgur.com/gallery/vTsX8

dallebull - 답글

Bonjour j es effectué cette opération.J es changé le connecteur de chargeur complet suite à un dysfonctionnement. Et la batterie aussi.Et mon soucis reste le même. Le téléphone s allumé mais pas de voyant de charge.merci de me renseigner.

Berhault - 답글

Bonjour,

J’ai le même problème , avez-vous trouvé une solution ?

Amenis -

Bonjour suite à une panne avec mon huawei p9 j es changé le connecteur de chargeur et la batterie et mon problèmereste toujours le même. Il charge toujours pas.merci de me

Berhault - 답글

Dalebull what the !&&* have you done to the batteries in the pictures

Justinas Vaiciunas - 답글

댓글 쓰기

조회 통계:

24 시간 전: 6

7일 전: 49

30일 전: 181

전체 시간: 125,766