주요 콘텐츠로 건너뛰기

Infinity v2 10.1 Motherboard Replacement

필요한 것

  1. Infinity v2 10.1 Motherboard Replacement, Back Case: 1 단계, 이미지 1/3 Infinity v2 10.1 Motherboard Replacement, Back Case: 1 단계, 이미지 2/3 Infinity v2 10.1 Motherboard Replacement, Back Case: 1 단계, 이미지 3/3
    • Slightly pry open one corner of the device by using your finger nail to separate the screen from the back case.

    • Use an opening tool to carefully detach the back case from the tablet. Start by inserting the tool where your fingernail opened a gap, and work around all four sides of the device.

    • There will be a slight click noise as you free each tab.

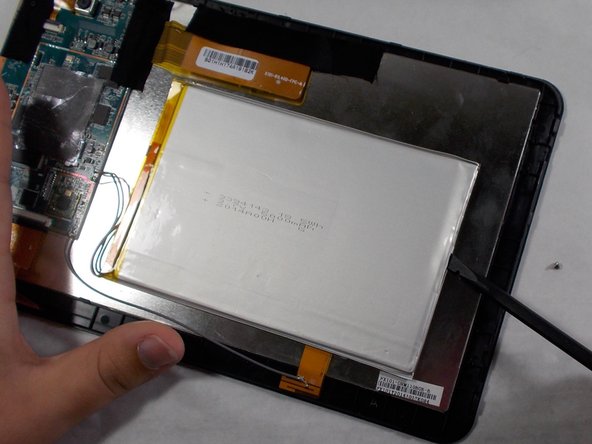
    • Once the case is completely free, carefully lift it and place it face up on the workstation, being cautious not to damage the speaker wires connecting the two halves.

  2. Infinity v2 10.1 Motherboard Replacement: 2 단계, 이미지 1/2 Infinity v2 10.1 Motherboard Replacement: 2 단계, 이미지 2/2
    • Remove the speakers from the case by gently lifting them up and out of their slots.

  3. Infinity v2 10.1 Motherboard Replacement, Battery: 3 단계, 이미지 1/3 Infinity v2 10.1 Motherboard Replacement, Battery: 3 단계, 이미지 2/3 Infinity v2 10.1 Motherboard Replacement, Battery: 3 단계, 이미지 3/3
    • Pry beneath each side of the battery using a spudger.

    • The adhesive may be too strong to manually remove, so heat can be applied using the iOpener. This evenly heats the adhesive and allows the battery to be lifted away easier. Do not place the iOpener directly on the battery; always apply heat on the opposite side of the device.

    • You may use a blow-dryer on a cool setting. Keep the dryer moving and at least 6 inches from the battery to prevent dangerous bubbling of the battery due to excess heat.

  4. Infinity v2 10.1 Motherboard Replacement: 4 단계, 이미지 1/2 Infinity v2 10.1 Motherboard Replacement: 4 단계, 이미지 2/2
    • Desolder the red and black wires connecting the battery to the motherboard.

    • Once the solder is melted, use tweezers to remove both wires from the motherboard.

    • The solder and iron will be extremely hot. Use tweezers to grab the wire to avoid burning your fingers from accidental contact with the iron.

  5. Infinity v2 10.1 Motherboard Replacement, Speakers: 5 단계, 이미지 1/1
    • Turn on your soldering iron and allow it to heat up. Once it is hot, press the tip of the iron to the both of the solder points that attach the wires to the motherboard until the solder is melted.

    • Once the solder is melted, use tweezers to remove the wires from the motherboard.

    • The solder and iron will be extremely hot. You can use tweezers to grab the wire to avoid burning your fingers from accidental contact with the iron.

  6. Infinity v2 10.1 Motherboard Replacement, Camera: 6 단계, 이미지 1/1
    • Use your thumb or opening tool to lift the black connector holding in the ribbon cable.

  7. Infinity v2 10.1 Motherboard Replacement: 7 단계, 이미지 1/1
    • Remove the camera by gently picking it up and pulling it free from the connector.

    • Avoid touching the lens of either camera.

  8. Infinity v2 10.1 Motherboard Replacement, Motherboard: 8 단계, 이미지 1/2 Infinity v2 10.1 Motherboard Replacement, Motherboard: 8 단계, 이미지 2/2
    • Remove the camera from the device by using your thumb or prying tool to lift the black connector holding in the ribbon cable.

    • Remove the camera by gently picking it up and pulling it free from the connector. Avoid touching the lens of either camera.

  9. Infinity v2 10.1 Motherboard Replacement: 9 단계, 이미지 1/1
    • Use your finger to lift the black connectors on each ribbon cable. Remove both ribbon cables that connect the two screens to the motherboard by pulling them out of the connectors.

  10. Infinity v2 10.1 Motherboard Replacement: 10 단계, 이미지 1/3 Infinity v2 10.1 Motherboard Replacement: 10 단계, 이미지 2/3 Infinity v2 10.1 Motherboard Replacement: 10 단계, 이미지 3/3
    • Remove three JIS #0 screws that hold the motherboard to the screen.

  11. Infinity v2 10.1 Motherboard Replacement: 11 단계, 이미지 1/1
    • Remove the motherboard by simply lifting it up off the LCD.

결론

To reassemble your device, follow these instructions in reverse order.

다른 한 분이 해당 안내서를 완성하였습니다.

sammytarbokas

회원 가입일: 10/31/19

193 평판

안내서 2개 작성하였습니다

UMass Dartmouth, Team S2-G4, Barthe Fall 2019 UMass Dartmouth, Team S2-G4, Barthe Fall 2019 회원

UMASSD-BARTHE-F19S2G4

3 회원들

안내서 6개 작성하였습니다

댓글 0개

댓글 쓰기

조회 통계:

24 시간 전: 2

7일 전: 5

30일 전: 29

전체 시간: 1,007