주요 콘텐츠로 건너뛰기

JBL Boombox Subwoofer / Speaker Replacement

필요한 것

  1. JBL Boombox Subwoofer / Speaker Replacement, Remove the Rings: 1 단계, 이미지 1/2 JBL Boombox Subwoofer / Speaker Replacement, Remove the Rings: 1 단계, 이미지 2/2
    • There rubbery rings on either end are only held in with friction.

    • Stand the speaker up and push down hard, and you can use a counter-clockwise motion to remove the ring.

    • Please note that you have to push down HARD to get the amount of torque needed. Probably harder than you think at first.

  2. JBL Boombox Subwoofer / Speaker Replacement, Unscrew the Handle: 2 단계, 이미지 1/2 JBL Boombox Subwoofer / Speaker Replacement, Unscrew the Handle: 2 단계, 이미지 2/2
    • Using your Phillips #2 screwdriver, remove the six screws from each side.

    • That is 12 total screws.

    • Keep these screws separate, as they do not match screws used in other steps.

  3. JBL Boombox Subwoofer / Speaker Replacement, Remove the Handle: 3 단계, 이미지 1/2 JBL Boombox Subwoofer / Speaker Replacement, Remove the Handle: 3 단계, 이미지 2/2
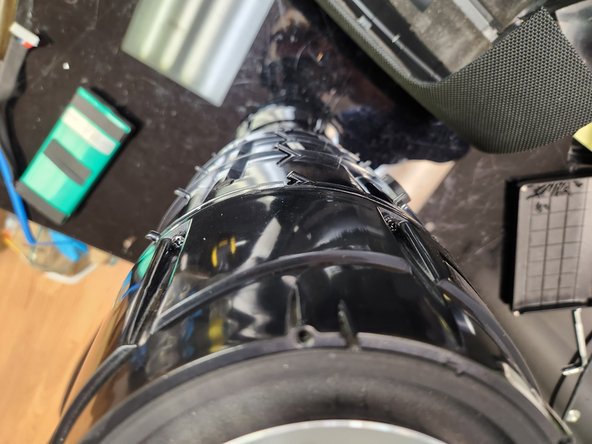
    • Using a steady and firm pressure, pry the handle on one side and it will pull away from the body on the bottom.

    • Once you've flexed the handle far enough, lift it upwards to slip it over the end on one side.

    • With one side removed, the handle should come off with no issue or hesitation.

  4. JBL Boombox Subwoofer / Speaker Replacement, Alignment for Reassembly: 4 단계, 이미지 1/2 JBL Boombox Subwoofer / Speaker Replacement, Alignment for Reassembly: 4 단계, 이미지 2/2
    • On each side of the handle, there is only one space that has two holes next to eachother.

    • On each side of the body, there is only one screwhole that has a plastic post next to it.

    • These must be lined up properly. The handle can physically fit in either direction, but if you line it up incorrectly the screws will not line up properly and it will not be secure to put back together.

    • Attempting to screw it in on the wrong side or with the plastic alignment post in the wrong position can cause damage to the body of the device.

  5. JBL Boombox Subwoofer / Speaker Replacement, Loosen the Mesh Cover: 5 단계, 이미지 1/2 JBL Boombox Subwoofer / Speaker Replacement, Loosen the Mesh Cover: 5 단계, 이미지 2/2
    • Using your opening tool, pry into the seam in the mesh cover on the bottom, lifting up the back side.

    • In the absence of an opening tool, a flathead screwdriver, a butter knife, or anything else capable of gentle prying will suffice.

    • Using your Phillips #1 screwdriver, remove these four screws.

    • Keep these screws separate, as they do not match screws used in other steps.

  6. JBL Boombox Subwoofer / Speaker Replacement, Remove the Mesh Cover - Rear: 6 단계, 이미지 1/2 JBL Boombox Subwoofer / Speaker Replacement, Remove the Mesh Cover - Rear: 6 단계, 이미지 2/2
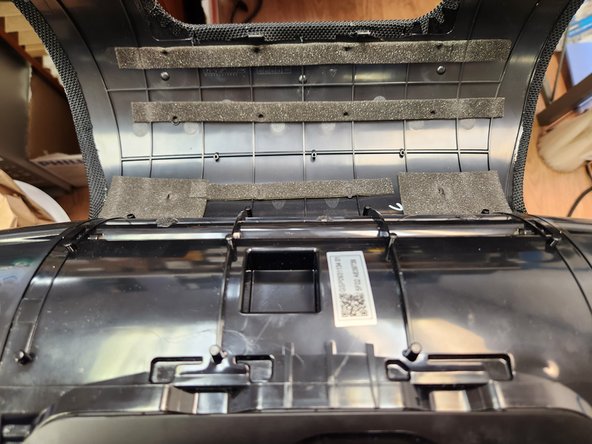
    • Using your opening tool, pry into the back of the mesh cover where indicated to release the two catches.

    • When both catches are released, the back cover should hinge completely backwards and be completely open.

    • When reassembling, make sure these catches line up properly. Attempting to force them closed if not lined up properly can result in breakage and a loose mesh cover.

  7. JBL Boombox Subwoofer / Speaker Replacement, Remove the Mesh Cover - Front: 7 단계, 이미지 1/2 JBL Boombox Subwoofer / Speaker Replacement, Remove the Mesh Cover - Front: 7 단계, 이미지 2/2
    • Using your opening tool, pry into the front of the mesh cover where indicated to release the two catches.

    • When both catches are released, the front cover should hinge completely backwards and be completely open.

    • When reassembling, make sure these catches line up properly. Attempting to force them closed if not lined up properly can result in breakage and a loose mesh cover.

    • With both the back and front released, the mesh cover should easily lift away.

    • When reassembling, make sure these posts line up properly, as well. These posts are only on the front and ensure the mesh cover does not physically touch the speakers.

    • Attempting to force them closed if not lined up properly can result in distorted sound or damage to the speakers.

  8. JBL Boombox Subwoofer / Speaker Replacement, Remove the Tweeter Housing: 8 단계, 이미지 1/2 JBL Boombox Subwoofer / Speaker Replacement, Remove the Tweeter Housing: 8 단계, 이미지 2/2
    • There are six screws surrounding each side of the tweeter housing.

    • Unfortunately, due to the angles involved, it is impossible to take a photo that shows all six. Just know they are relatively evenly spaced out.

    • Remove all six screws from each side, twelve total.

    • Keep these screws separate, as they do not match screws used in other steps.

    • Once the screws are removed, be careful not to pull the housing away. The tweeter speakers are still physically connected to the motherboard, and pulling the housings away can damage these connections or the motherboard.

  9. JBL Boombox Subwoofer / Speaker Replacement, Disconnect the Tweeters: 9 단계, 이미지 1/2 JBL Boombox Subwoofer / Speaker Replacement, Disconnect the Tweeters: 9 단계, 이미지 2/2
    • After separating the tweeter housing, carefully disconnect the tweeters.

    • The left side has only one connection to disconnect.

    • The right side has two connections to disconnect.

    • There may be some adhesive such as hot glue securing these connections. If so, remove it before disconnecting to avoid damaging the wires.

    • Once both sides are disconnected, you are finished removing the tweeters.

  10. JBL Boombox Subwoofer / Speaker Replacement, Disconnect the Speakers: 10 단계, 이미지 1/2 JBL Boombox Subwoofer / Speaker Replacement, Disconnect the Speakers: 10 단계, 이미지 2/2
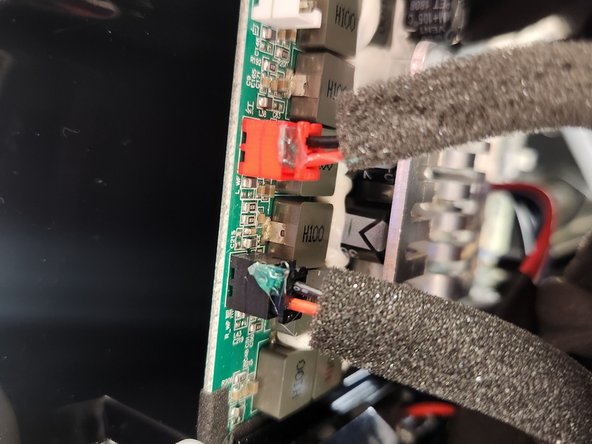
    • Once the tweeters are removed, disconnect the two subwoofer / speakers from the motherboard.

    • There may be some adhesive such as hot glue securing these connections. If so, remove it before disconnecting to avoid damaging the wires.

    • The left speaker is marked in red.

    • The right speaker is marked in black.

    • Make sure during reassembly to get these correct as they will not connect properly if mixed up.

    • If for some reason your speakers are not color coded the same, use the photos in the guide to ensure the plugs are in the correct order and remember that the left speaker has a shorter cable and the right speaker has a longer cable.

  11. JBL Boombox Subwoofer / Speaker Replacement, Unscrew the Speakers: 11 단계, 이미지 1/2 JBL Boombox Subwoofer / Speaker Replacement, Unscrew the Speakers: 11 단계, 이미지 2/2
    • Using your Phillips #2 screwdriver, remove the 16 screws holding in the speakers.

    • Each speaker has 8 screws holding it in.

    • Keep these screws separate, as they do not match screws used in other steps.

    • Pay attention to the alignment posts only on the top side. These ensure your speakers are oriented correctly when reassembling.

  12. JBL Boombox Subwoofer / Speaker Replacement, Remove the Speakers: 12 단계, 이미지 1/1
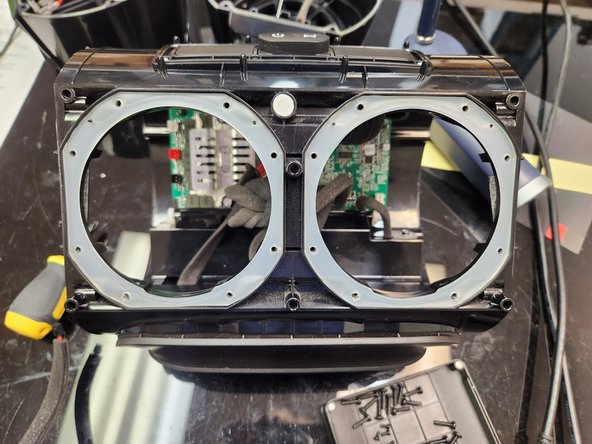
    • With the speakers disconnected and unscrewed, insert a hand in from the side where you removed the tweeter housing and gently push up from inside.

    • Using one hand to hold and lift the speakers, use your second hand inside the body of the Boombox to carefully guide the cable out of the hole, ensuring that it does not get caught and damaged on anything inside as it is removed.

    • Remember, the speaker with the red connection is on the left and the speaker with the black connection is on the right.

    • If for some reason your speakers are not color coded the same, use the photos in the guide to ensure the plugs are in the correct order and remember that the left speaker has a shorter cable and the right speaker has a longer cable.

  13. JBL Boombox Subwoofer / Speaker Replacement, Remove the Gaskets: 13 단계, 이미지 1/2 JBL Boombox Subwoofer / Speaker Replacement, Remove the Gaskets: 13 단계, 이미지 2/2
    • When removing the speakers, it is likely the gaskets will become dislodged from the frame and the speakers and fall somewhere in between.

    • Make sure you have both gaskets and that neither are torn or otherwise damaged.

    • If any gasket is damaged, it can impact the IP rating of the device as well as the vibration noise generated by the speakers.

    • Pay attention to the alignment posts only on the top side. These ensure your gaskets are oriented correctly when reassembling.

    • When reassembling, make sure the wires on the speaker are towards the bottom to fit smoothly into this cutout without catching and risking any damage to the wires or gaskets.

결론

To reassemble your device, follow these instructions in reverse order.

다른 한 분이 해당 안내서를 완성하였습니다.

Justin Castle

회원 가입일: 11/05/20

3,280 평판

안내서 8개 작성하였습니다

댓글 0개

댓글 쓰기

조회 통계:

24 시간 전: 1

7일 전: 13

30일 전: 46

전체 시간: 353