주요 콘텐츠로 건너뛰기

LG K30 Charging Port Replacement

필요한 것

  1. LG K30 Charging Port Replacement, Battery: 1 단계, 이미지 1/2 LG K30 Charging Port Replacement, Battery: 1 단계, 이미지 2/2
    • Before disassembling your LG K30, discharge the battery below 25%. A charged lithium-ion battery can catch fire and/or explode if accidentally punctured.

    • Power off your Phone before beginning disassembly.

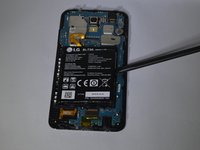
    • Use the 'Jimmy' and 'Metal Spudger' to slowly pry open the outsides of the back case.

  2. LG K30 Charging Port Replacement: 2 단계, 이미지 1/1
    • Remove the thirteen 3.4 mm Phillips #00 screws securing the midframe to the display assembly.

  3. LG K30 Charging Port Replacement: 3 단계, 이미지 1/1
    • Use a metal spudger or plastic opening tool to pry open the outer cover.

  4. LG K30 Charging Port Replacement: 4 단계, 이미지 1/1
    • Use the flat end of a spudger to detach the battery connector from the logic board.

  5. LG K30 Charging Port Replacement: 5 단계, 이미지 1/2 LG K30 Charging Port Replacement: 5 단계, 이미지 2/2
    • Use a spudger to pry the battery from the phone.

    • There may be an adhesive on the back of the battery and the phone. Pry the battery gently to prevent puncture or damage.

    • Do not bend or puncture the battery.

  6. LG K30 Charging Port Replacement, Motherboard: 6 단계, 이미지 1/1
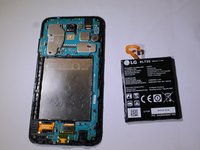
    • Use a spudger to carefully disconnect the front camera connector.

    • Use a spudger to disconnect the display cable connector.

  7. LG K30 Charging Port Replacement: 7 단계, 이미지 1/2 LG K30 Charging Port Replacement: 7 단계, 이미지 2/2
    • Remove the motherboard assembly from the display assembly with the a spudger or hand.

  8. LG K30 Charging Port Replacement, Charging Port: 8 단계, 이미지 1/3 LG K30 Charging Port Replacement, Charging Port: 8 단계, 이미지 2/3 LG K30 Charging Port Replacement, Charging Port: 8 단계, 이미지 3/3
    • For a guide on how to solder and unsolder components; please refer to: How To Solder and Desolder Connections

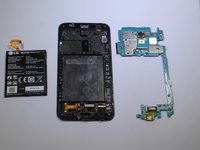
    • Peel back gold plastic protective film on motherboard to reveal 4 solder points which need to be desoldered with the desoldering wick.

    • Use extreme caution: soldering iron can become extremely hot and cause burns.

  9. LG K30 Charging Port Replacement: 9 단계, 이미지 1/2 LG K30 Charging Port Replacement: 9 단계, 이미지 2/2
    • Flip the motherboard over to the backside and use soldering iron to melt the solder on the charging port terminals; use the desoldering wick to remove the solder.

결론

To reassemble your device, follow these instructions in reverse order.

Alisha Lee

회원 가입일: 09/19/19

277 평판

안내서 3개 작성하였습니다

댓글 한 개

Is the K30 the same inside as the K40?

Daisey Flowerr - 답글

댓글 쓰기

조회 통계:

24 시간 전: 1

7일 전: 3

30일 전: 10

전체 시간: 2,158