주요 콘텐츠로 건너뛰기

Lenovo ThinkPad T580 Hard Drive Replacement

필요한 것

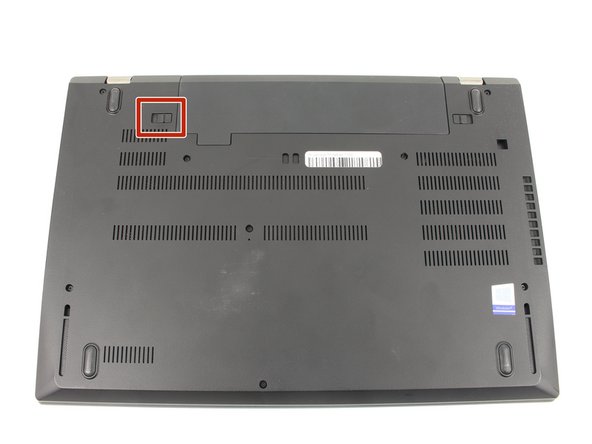
  1. Lenovo ThinkPad T580 Hard Drive Replacement, External Battery: 1 단계, 이미지 1/3 Lenovo ThinkPad T580 Hard Drive Replacement, External Battery: 1 단계, 이미지 2/3 Lenovo ThinkPad T580 Hard Drive Replacement, External Battery: 1 단계, 이미지 3/3
    • Slide the switch on the left side of the battery to the left.

  2. Lenovo ThinkPad T580 Hard Drive Replacement: 2 단계, 이미지 1/3 Lenovo ThinkPad T580 Hard Drive Replacement: 2 단계, 이미지 2/3 Lenovo ThinkPad T580 Hard Drive Replacement: 2 단계, 이미지 3/3
    • Slide the switch on the right side of the battery to the right while applying upward pressure on the battery.

  3. Lenovo ThinkPad T580 Hard Drive Replacement: 3 단계, 이미지 1/3 Lenovo ThinkPad T580 Hard Drive Replacement: 3 단계, 이미지 2/3 Lenovo ThinkPad T580 Hard Drive Replacement: 3 단계, 이미지 3/3
    • Pull the battery directly out of the socket

  4. Lenovo ThinkPad T580 Hard Drive Replacement, Bottom Case: 4 단계, 이미지 1/2 Lenovo ThinkPad T580 Hard Drive Replacement, Bottom Case: 4 단계, 이미지 2/2
    • Using a Phillips #00 screwdriver, unscrew the eight 3.3 mm captive screws on the bottom of the laptop.

    • The "captive" screws will not come out of the case.

  5. Lenovo ThinkPad T580 Hard Drive Replacement: 5 단계, 이미지 1/3 Lenovo ThinkPad T580 Hard Drive Replacement: 5 단계, 이미지 2/3 Lenovo ThinkPad T580 Hard Drive Replacement: 5 단계, 이미지 3/3
    • Run a Jimmy along the crease of the computer all the way around, twisting it periodically to disengage the clips.

  6. Lenovo ThinkPad T580 Hard Drive Replacement: 6 단계, 이미지 1/3 Lenovo ThinkPad T580 Hard Drive Replacement: 6 단계, 이미지 2/3 Lenovo ThinkPad T580 Hard Drive Replacement: 6 단계, 이미지 3/3
    • Once all the clips are released, remove the bottom cover.

    • You may need to jiggle the case slightly to release the clips around the external battery bay.

  7. Lenovo ThinkPad T580 Hard Drive Replacement, Hard Drive: 7 단계, 이미지 1/2 Lenovo ThinkPad T580 Hard Drive Replacement, Hard Drive: 7 단계, 이미지 2/2
    • Using a spudger, flip up the locking black tab of the hard drive ZIF connector.

    • Pull the hard drive cable out from the connector on the motherboard.

  8. Lenovo ThinkPad T580 Hard Drive Replacement: 8 단계, 이미지 1/1
    • Pull the hard drive case out of the slot using the tab.

결론

To reassemble your device, follow these instructions in reverse order.

다른 2명이 해당 안내서를 완성하였습니다.
Ben Elkayam

회원 가입일: 01/23/20

954 평판

안내서 8개 작성하였습니다

Cal Poly, Team S18-G6, White Winter 2020 Cal Poly, Team S18-G6, White Winter 2020 회원

CPSU-WHITE-W20S18G6

4 회원들

안내서 24개 작성하였습니다

댓글 한 개

Before any of this go into the bios setup and disable the internal battery.

Roger Elder - 답글

댓글 쓰기

조회 통계:

24 시간 전: 9

7일 전: 45

30일 전: 215

전체 시간: 8,309