주요 콘텐츠로 건너뛰기

Lenovo ThinkPad x120e LCD Screen Replacement

필요한 것

  1. Lenovo ThinkPad x120e LCD Screen Replacement, Battery: 1 단계, 이미지 1/2 Lenovo ThinkPad x120e LCD Screen Replacement, Battery: 1 단계, 이미지 2/2
    • Flip the laptop upside down and locate the battery latches under the battery.

    • Place your thumbs on both latches and push the latch inwards.

    • With your thumbs still on the latches, slide the battery out of the laptop.

    • To install a new battery, simply slide the battery back in the slot. Then, check if both battery latches are locked

  2. Lenovo ThinkPad x120e LCD Screen Replacement, Back Cover: 2 단계, 이미지 1/3 Lenovo ThinkPad x120e LCD Screen Replacement, Back Cover: 2 단계, 이미지 2/3 Lenovo ThinkPad x120e LCD Screen Replacement, Back Cover: 2 단계, 이미지 3/3
    • Using the Phillips #0 screwdriver, remove the three 4 mm screws that are securing the bottom cover.

    • Remove the backplate carefully, making sure not to bend the cover.

  3. Lenovo ThinkPad x120e LCD Screen Replacement, Keyboard: 3 단계, 이미지 1/2 Lenovo ThinkPad x120e LCD Screen Replacement, Keyboard: 3 단계, 이미지 2/2
    • Using the Phillips #0 screwdriver, remove the two 4 mm retaining screws located on the battery slot.

  4. Lenovo ThinkPad x120e LCD Screen Replacement: 4 단계, 이미지 1/3 Lenovo ThinkPad x120e LCD Screen Replacement: 4 단계, 이미지 2/3 Lenovo ThinkPad x120e LCD Screen Replacement: 4 단계, 이미지 3/3
    • Flip the laptop back over, showing the keyboard.

    • Using an opening tool, pry open the keyboard starting from the top left. Work your way around until you are able to loosely lift the keyboard.

    • You should see two ribbon wires located beneath the keyboard once you are done.

  5. Lenovo ThinkPad x120e LCD Screen Replacement: 5 단계, 이미지 1/2 Lenovo ThinkPad x120e LCD Screen Replacement: 5 단계, 이미지 2/2
    이 단계에 사용된 도구:
    Tweezers
    $4.99
    구매
    • Pull on the black tabs above both ribbon wires using tweezers upwards.

    • For more information on Zero Insertion Force (ZIF) connectors, please visit this guide.

    • Remove both ribbon wires.

    • Remove the keyboard from the laptop.

  6. Lenovo ThinkPad x120e LCD Screen Replacement, LCD Screen: 6 단계, 이미지 1/2 Lenovo ThinkPad x120e LCD Screen Replacement, LCD Screen: 6 단계, 이미지 2/2
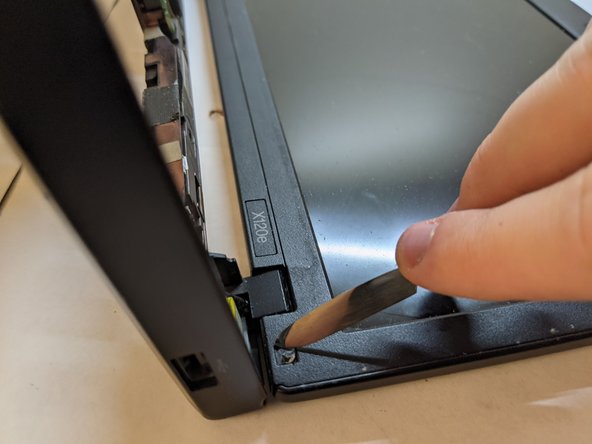
    • Remove the screw covers that are located on both sides of the display using a spudger.

    • Start from the corners of the screw covers to remove it more easily.

  7. Lenovo ThinkPad x120e LCD Screen Replacement: 7 단계, 이미지 1/1
    • Using the Phillips #1 screwdriver, remove the two 4 mm screws.

  8. Lenovo ThinkPad x120e LCD Screen Replacement: 8 단계, 이미지 1/1
    • Pry open the frame of the laptop screen using a spudger.

    • Do not try to pry it open from the inside edge of the frame. You may accidentaly damage the screen.

  9. Lenovo ThinkPad x120e LCD Screen Replacement: 9 단계, 이미지 1/1
    • Using the Phillips #1 screwdriver, remove six screws securing the screen to the device.

  10. Lenovo ThinkPad x120e LCD Screen Replacement: 10 단계, 이미지 1/2 Lenovo ThinkPad x120e LCD Screen Replacement: 10 단계, 이미지 2/2
    • Lift up the screen from the top. You should now notice the metal frame.

    • Using the same Phillips #1 screwdriver, remove four screws, two on each edge of the metal frame.

    • The second picture is rotated 90 degrees.

  11. Lenovo ThinkPad x120e LCD Screen Replacement: 11 단계, 이미지 1/1
    • Remove the connector on top of the webcam by simply pulling it out.

  12. Lenovo ThinkPad x120e LCD Screen Replacement: 12 단계, 이미지 1/2 Lenovo ThinkPad x120e LCD Screen Replacement: 12 단계, 이미지 2/2
    • Flip the screen over.

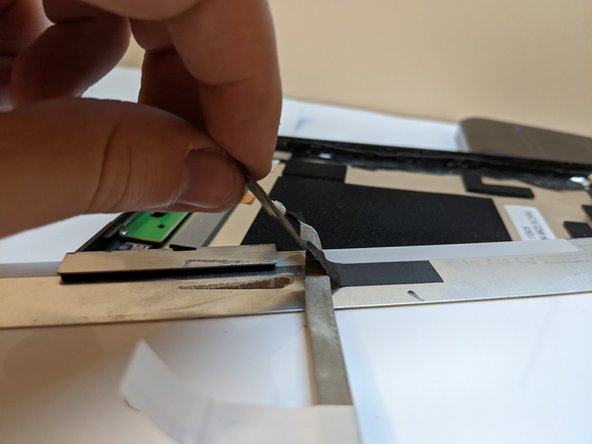
    • Peel the black tape first, then peel the gray tape down to the base of the screen.

  13. Lenovo ThinkPad x120e LCD Screen Replacement: 13 단계, 이미지 1/1
    • At the base of the screen, there is a transparent tape holding a connector. Peel the tape off.

  14. Lenovo ThinkPad x120e LCD Screen Replacement: 14 단계, 이미지 1/1
    • Remove the connector underneath where the tape was using a spudger tool.

    • Pull out the connector.

    • Make sure to not damage any of the wires.

  15. Lenovo ThinkPad x120e LCD Screen Replacement: 15 단계, 이미지 1/1
    • Remove the gray tape fully.

    • Flip over the device, and remove the LCD screen fully.

결론

To reassemble your device, follow these instructions in reverse order.

Jacob Fronzaglia

회원 가입일: 10/25/21

787 평판

안내서 6개 작성하였습니다

UMass Dartmouth, Team 3-4, Sinclaire Fall 2021 UMass Dartmouth, Team 3-4, Sinclaire Fall 2021 회원

UMASSD-SINCLAIRE-F21S3G4

3 회원들

안내서 6개 작성하였습니다

댓글 0개

댓글 쓰기

조회 통계:

24 시간 전: 1

7일 전: 4

30일 전: 18

전체 시간: 232