주요 콘텐츠로 건너뛰기

Lenovo Yoga C930-13IKB Motherboard Replacement

필요한 것

  1. Lenovo Yoga C930-13IKB Motherboard Replacement, Back Cover: 1 단계, 이미지 1개 중 1개
    • Flip the device over so that the underside is facing up.

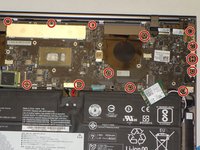
    • Remove the six 3.5 mm T5 Torx screws.

  2. Lenovo Yoga C930-13IKB Motherboard Replacement: 2 단계, 이미지 2개 중 1개 Lenovo Yoga C930-13IKB Motherboard Replacement: 2 단계, 이미지 2개 중 2개
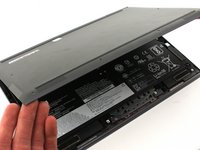
    • Pry off the back cover using the plastic opening tool.

    • Loosen the back cover in multiple spots using the opening tool, then remove the whole back.

    • You may have to run the plastic tool along the edges until you find a small gap to separate the back cover from the laptop.

    • Do not use a metal tool when working with your device.

    The gap is so small that I wasn’t able to insert anything to pry the cover up. The suction cup tool lifted the cover off easily.

    Thomas Capobianco - 답글

    There is a very convenient spot to begin the prying process. Up by the hinge, where the metal back turns in perpendicular to the edge to get around the hinge mechanism, there is a gap between the cover and the rest of the laptop where it can be pried up easily. From there it is easy to run a tool and widen the gap all the way around.

    Alex Yantis - 답글

    I tried Thomas's suggestion first, and it worked like a charm: the suction cup took it right off.
    Instead of pushing the cup against the laptop I "pulled it flat" and placed it against the back, so it'd just suck onto it. (Didn't want to deform the laptop cover)

    Panopticon - 답글

  3. Lenovo Yoga C930-13IKB Motherboard Replacement: 3 단계, 이미지 2개 중 1개 Lenovo Yoga C930-13IKB Motherboard Replacement: 3 단계, 이미지 2개 중 2개
    • Carefully lift the cover off with your hands.

  4. Lenovo Yoga C930-13IKB Motherboard Replacement, SSD: 4 단계, 이미지 1개 중 1개
    • Remove the screw ( 2 mm with a 5 mm head) that connect the SSD to the motherboard using a Phillips #00 screwdriver.

  5. Lenovo Yoga C930-13IKB Motherboard Replacement: 5 단계, 이미지 1개 중 1개
    • Pinch the left side of the SSD card.

    • Pull gently to the left, horizontal to the laptop.

  6. Lenovo Yoga C930-13IKB Motherboard Replacement, Wi-Fi Card: 6 단계, 이미지 2개 중 1개 Lenovo Yoga C930-13IKB Motherboard Replacement, Wi-Fi Card: 6 단계, 이미지 2개 중 2개
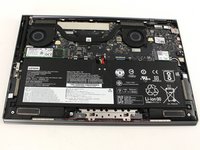
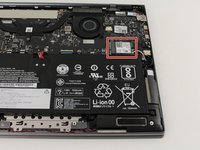
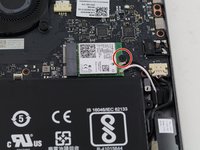
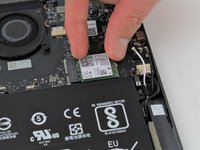
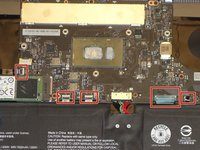
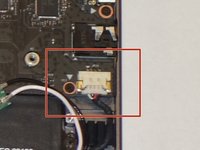
    • Find the Wi-Fi card located on the right just above the battery. It is a green chip with a white label that says "Intel 9260" somewhere on it.

  7. Lenovo Yoga C930-13IKB Motherboard Replacement: 7 단계, 이미지 2개 중 1개 Lenovo Yoga C930-13IKB Motherboard Replacement: 7 단계, 이미지 2개 중 2개
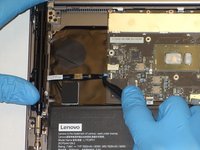
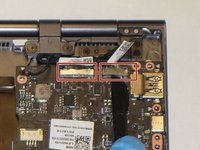
    • Use a Phillips #00 screwdriver to remove the single 2 mm screw that attaches the card to the motherboard.

    This step is not needed unless you are transferring the card, the post that it is attached to is fixed to the main board not the case.

    imark7777777 - 답글

  8. Lenovo Yoga C930-13IKB Motherboard Replacement: 8 단계, 이미지 3개 중 1개 Lenovo Yoga C930-13IKB Motherboard Replacement: 8 단계, 이미지 3개 중 2개 Lenovo Yoga C930-13IKB Motherboard Replacement: 8 단계, 이미지 3개 중 3개
    이 단계에 사용된 도구:
    iFixit Opening Tool
    $1.99
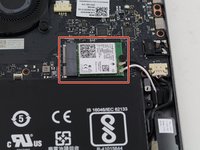
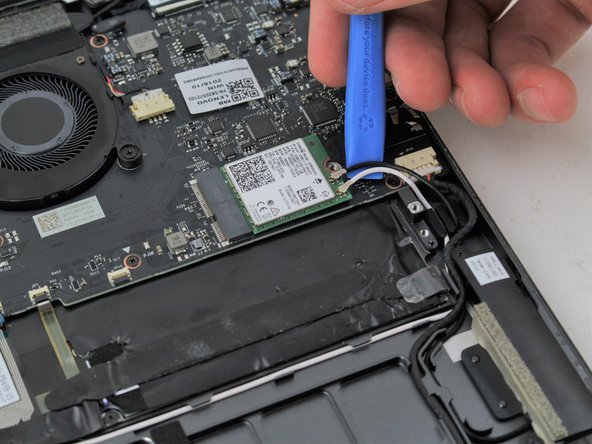
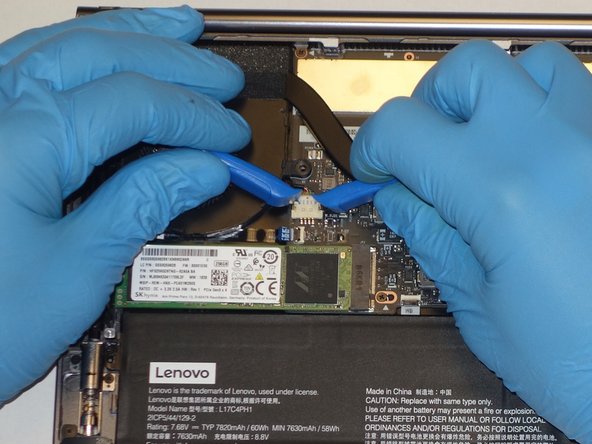
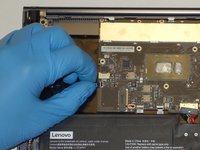
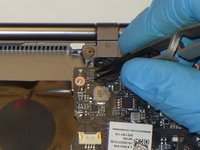
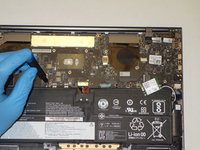
    • Gently pull or use the iFixit opening tool to detach the black and white wires from the card.

    • When reassembling, these wires are difficult to reattach, so be patient. Line the wires up with your fingers and press down on the connections with the opening tool.

  9. Lenovo Yoga C930-13IKB Motherboard Replacement: 9 단계, 이미지 2개 중 1개 Lenovo Yoga C930-13IKB Motherboard Replacement: 9 단계, 이미지 2개 중 2개
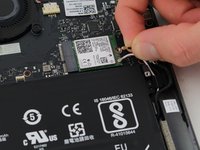
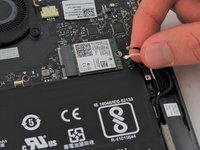
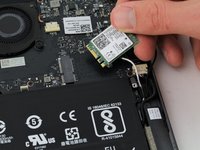
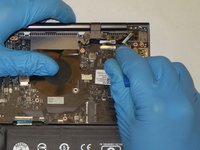
    • Pinch the card on either side and pull to the right to unplug it from the motherboard.

    Again unless you are transferring the card it does not need to be removed as it is fixed to the main board.

    imark7777777 - 답글

  10. Lenovo Yoga C930-13IKB Motherboard Replacement, Coolant Fans: 10 단계, 이미지 1개 중 1개
    • Remove the four 3 mm Phillips #0 screws from the fan assembly.

  11. Lenovo Yoga C930-13IKB Motherboard Replacement: 11 단계, 이미지 1개 중 1개
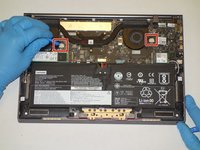
    • Remove the four 2 mm Phillips #00 screws from the fans themselves.

    This is another redundant step since this is only to secure the fans to the heat pipe fan housing. And really tiny screws to lose.

    imark7777777 - 답글

  12. Lenovo Yoga C930-13IKB Motherboard Replacement: 12 단계, 이미지 1개 중 1개
    • Unscrew the three 3 mm Phillips #0 screws on the heatsink.

  13. Lenovo Yoga C930-13IKB Motherboard Replacement: 13 단계, 이미지 2개 중 1개 Lenovo Yoga C930-13IKB Motherboard Replacement: 13 단계, 이미지 2개 중 2개
    • Use a plastic opening tool to remove the two small, white power cable connectors for each of the two fans.

  14. Lenovo Yoga C930-13IKB Motherboard Replacement: 14 단계, 이미지 1개 중 1개
    • Gently lift the fan assembly out of the laptop.

    • Be sure to clean and reapply thermal paste to the heatsink during reassembly.

  15. Lenovo Yoga C930-13IKB Motherboard Replacement, Motherboard: 15 단계, 이미지 3개 중 1개 Lenovo Yoga C930-13IKB Motherboard Replacement, Motherboard: 15 단계, 이미지 3개 중 2개 Lenovo Yoga C930-13IKB Motherboard Replacement, Motherboard: 15 단계, 이미지 3개 중 3개
    이 단계에 사용된 도구:
    Halberd Spudger
    $2.99
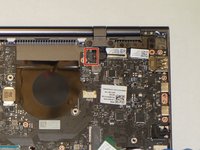
    • Using the Halberd Spudger, gently lift the black tab on top of each of the five ZIF connectors for the ribbon cables. Then pull the cables out from the connectors.

  16. Lenovo Yoga C930-13IKB Motherboard Replacement: 16 단계, 이미지 2개 중 1개 Lenovo Yoga C930-13IKB Motherboard Replacement: 16 단계, 이미지 2개 중 2개
    이 단계에 사용된 도구:
    Tweezers
    $4.99
    • Using the reverse tweezers, gently pull out the small black cable towards the top right of the motherboard.

  17. Lenovo Yoga C930-13IKB Motherboard Replacement: 17 단계, 이미지 2개 중 1개 Lenovo Yoga C930-13IKB Motherboard Replacement: 17 단계, 이미지 2개 중 2개
    • Using two plastic opening tools gently unplug the white speaker cable connector from the bottom left of the motherboard.

  18. Lenovo Yoga C930-13IKB Motherboard Replacement: 18 단계, 이미지 2개 중 1개 Lenovo Yoga C930-13IKB Motherboard Replacement: 18 단계, 이미지 2개 중 2개
    • Using the plastic opening tool, gently pry up on the metal tabs of the two display cables to remove the cables from the top right corner of the motherboard.

  19. Lenovo Yoga C930-13IKB Motherboard Replacement: 19 단계, 이미지 2개 중 1개 Lenovo Yoga C930-13IKB Motherboard Replacement: 19 단계, 이미지 2개 중 2개
    • Remove the fourteen 3 mm Phillips #00 screws that hold in the motherboard.

  20. Lenovo Yoga C930-13IKB Motherboard Replacement: 20 단계, 이미지 1개 중 1개
    • While gently grasping each side of the motherboard, carefully lift the assembly out.

결론

To reassemble your device, follow these instructions in reverse order.

다른 3명이 해당 안내서를 완성하였습니다.

댓글 2개

This is a great step-by-step walk-through. I went into replace a keyboard with all the wrong tools with me and I found out the client ordered the wrong keyboard thankfully no liquid damage inside. I found a few steps that were not required unless you were doing a parts swap to another system. I managed to instead clean out the keys without breaking the key caps and somehow the wrong keyboard had the right donor parts to fix the arrow key.

Can I really say I completed this when I ended up not replacing the keyboard?

FYI keep your liquids away from your computer!

I do have to say this system is pretty serviceable, cough if the manufacturer has parts.

imark7777777 - 답글

Thank you for this step by step. It worked a treat!

Anne Carpenter - 답글

댓글 쓰기

조회 통계:

지난 24시간: 1

지난 7일: 5

지난 30일: 41

전체 시간: 2,390