주요 콘텐츠로 건너뛰기

Logitech G915 TKL Keyswitch Replacement

필요한 것

  1. Logitech G915 TKL Keyswitch Replacement, Keyswitch: 1 단계, 이미지 1/2 Logitech G915 TKL Keyswitch Replacement, Keyswitch: 1 단계, 이미지 2/2
    • Remove all of the keycaps on the keyboard.

    • Unscrew the 2mm #00 Phillips screws circled in the picture provided.

  2. Logitech G915 TKL Keyswitch Replacement: 2 단계, 이미지 1/2 Logitech G915 TKL Keyswitch Replacement: 2 단계, 이미지 2/2
    • Turn the keyboard around and peel back the Logitech sticker near the top center of the keyboard, as well as the plastic layer underneath.

    • Unscrew the two 2.5mm #0 Phillips screws circled in the picture provided.

    • Remove the backplate by grabbing the notch to the right and pulling up.

  3. Logitech G915 TKL Keyswitch Replacement: 3 단계, 이미지 1/2 Logitech G915 TKL Keyswitch Replacement: 3 단계, 이미지 2/2
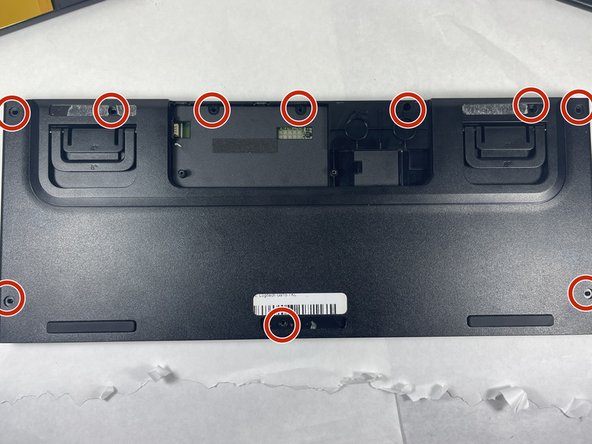
    • Remove the foam strips shown in the picture provided.

    • Unscrew all the 2mm #00 Phillips screws on the back of the keyboard circled in the picture provided.

  4. Logitech G915 TKL Keyswitch Replacement: 4 단계, 이미지 1/1
    • Remove the casing on the keyboard to reveal the motherboard.

  5. Logitech G915 TKL Keyswitch Replacement: 5 단계, 이미지 1/1
    • Find the corresponding soldering point for the keyswitch you wish to replace.

  6. Logitech G915 TKL Keyswitch Replacement: 6 단계, 이미지 1/1
    • Carefully heat the soldering wire.

    • Place the wire near the keyswitch's solder points so that it can be desoldered by the wire.

    • Insert your new keyswitch in place of the old one.

    • Solder the new keyswitch into place.

결론

To reassemble your device, follow these instructions in reverse order.

Ethan Bedard

회원 가입일: 03/13/23

485 평판

안내서 3개 작성하였습니다

UMass Dartmouth, Team 3-6, Petersen Spring 2023 UMass Dartmouth, Team 3-6, Petersen Spring 2023 회원

UMASSD-PETERSEN-S23S3G6

4 회원들

안내서 14개 작성하였습니다

댓글 0개

댓글 쓰기

조회 통계:

24 시간 전: 28

7일 전: 206

30일 전: 995

전체 시간: 11,900