주요 콘텐츠로 건너뛰기

Mac mini Mid 2011 PRAM Battery Replacement

필요한 것

  1. Mac mini Mid 2011 PRAM Battery Replacement, Bottom Cover: 1 단계, 이미지 1/2 Mac mini Mid 2011 PRAM Battery Replacement, Bottom Cover: 1 단계, 이미지 2/2
    • Place your thumbs in the depressions cut into the bottom cover.

    • Rotate the bottom cover counter-clockwise until the white dot painted on the bottom cover is aligned with the ring inscribed on the outer case.

    • You do not need to apply much downward pressure while turning.

  2. Mac mini Mid 2011 PRAM Battery Replacement: 2 단계, 이미지 1/1
    • Tilt the mini enough to allow the bottom cover to fall away from the outer case.

    • Remove the bottom cover and set it aside.

  3. Mac mini Mid 2011 PRAM Battery Replacement, Fan: 3 단계, 이미지 1/1
    • Remove the two 11.3 mm T6 Torx screws securing the fan to the logic board near the antenna plate.

  4. Mac mini Mid 2011 PRAM Battery Replacement: 4 단계, 이미지 1/1
    • Lift the ear of the fan nearest the RAM up off the standoff secured to the outer case.

    • Removing the standoff screw is not necessary to remove the fan. You need only raise the fan enough to lift it off the standoff screw.

  5. Mac mini Mid 2011 PRAM Battery Replacement: 5 단계, 이미지 1/3 Mac mini Mid 2011 PRAM Battery Replacement: 5 단계, 이미지 2/3 Mac mini Mid 2011 PRAM Battery Replacement: 5 단계, 이미지 3/3
    • Lift the fan out of the mini for enough clearance to access its connector.

    • Grab all the wires at once and gently pull straight up to disconnect the fan from the logic board.

    • Do not pry at the socket, or you may rip it from the logic board.

    • Remove the fan.

  6. Mac mini Mid 2011 PRAM Battery Replacement, Cowling: 6 단계, 이미지 1/1
    • Remove the single 3.5 mm T6 Torx screw securing the cowling to the heat sink.

  7. Mac mini Mid 2011 PRAM Battery Replacement: 7 단계, 이미지 1/1
    • Lift the cowling from the end nearest the antenna plate.

    • Rotate the cowling away from the outer case and remove it from the mini.

  8. Mac mini Mid 2011 PRAM Battery Replacement, Antenna Plate: 8 단계, 이미지 1/1
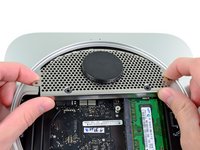
    • Remove the following screws securing the antenna plate to the mini:

    • Two 6.6 mm T8 Torx screws

    • Two 5.0 mm T8 Torx or 2.0 mm Hex screws (either screwdriver will work)

    • When putting back together:

    • It can be difficult to get the hard drive seated correctly such that the antenna plate fits in place correctly. If the screw holes don't line up with those on the hard drive, make sure that the two pins that are in the back of the hard drive are properly seated in the holes at the back of the case, above the housing for the second hard drive.

    • The antenna attaches directly to the hard drive (red markers), therefore attaching the antenna can move the hard drive around and loosen the connection of the hard drive cable to the logic board.

  9. Mac mini Mid 2011 PRAM Battery Replacement: 9 단계, 이미지 1/2 Mac mini Mid 2011 PRAM Battery Replacement: 9 단계, 이미지 2/2
    • Slightly lift the antenna plate from the end closest to the RAM.

    • Carefully pull the antenna plate away from the circular rim of the outer case.

    • Do not remove the antenna plate yet. It is still attached to the AirPort/ Bluetooth board.

  10. Mac mini Mid 2011 PRAM Battery Replacement: 10 단계, 이미지 1/1
    • Use the tip of a spudger to carefully pry the antenna connector up from its socket on the AirPort/Bluetooth board.

  11. Mac mini Mid 2011 PRAM Battery Replacement: 11 단계, 이미지 1/1
    • Remove the antenna plate from the mini.

  12. Mac mini Mid 2011 PRAM Battery Replacement, Logic Board: 12 단계, 이미지 1/2 Mac mini Mid 2011 PRAM Battery Replacement, Logic Board: 12 단계, 이미지 2/2
    • Use the flat end of a spudger to pry the hard drive connector up from its socket on the logic board.

  13. Mac mini Mid 2011 PRAM Battery Replacement: 13 단계, 이미지 1/1
    • Use the tip of a spudger to lift the IR sensor connector up and out of its socket on the logic board.

    • Make sure to pry up from beneath the wires and not underneath the socket.

  14. Mac mini Mid 2011 PRAM Battery Replacement: 14 단계, 이미지 1/1
    • Remove the following three screws:

    • One 5.0 mm T8 Torx or 2.0 mm Hex screw (either screwdriver will work)

    • One 16.2 mm T6 Torx screw

    • One 26 mm T6 Torx standoff

  15. Mac mini Mid 2011 PRAM Battery Replacement: 15 단계, 이미지 1/3 Mac mini Mid 2011 PRAM Battery Replacement: 15 단계, 이미지 2/3 Mac mini Mid 2011 PRAM Battery Replacement: 15 단계, 이미지 3/3
    이 단계에 사용된 도구:
    Mac mini Logic Board Removal Tool
    $4.99
    구매
    • To remove the logic board, the two cylindrical rods of the Mac mini Logic Board Removal Tool must be inserted into the holes highlighted in red. Inserting instruments into any logic board holes other than the ones highlighted in red may destroy the logic board.

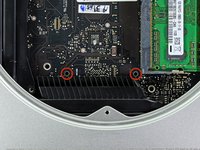
    • Insert the Mac mini Logic Board Removal Tool into the two holes highlighted in red. Be sure it makes contact with the top side of outer case below the logic board before proceeding.

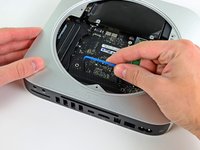
    • Carefully pull the tool toward the I/O board. The logic board and I/O board assembly should slightly slide out of the outer case.

    • Cease prying when the I/O board is visibly separated from the outer case.

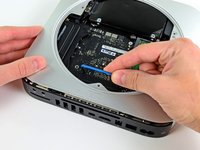
    • Remove the Mac mini Logic Board Removal tool.

  16. Mac mini Mid 2011 PRAM Battery Replacement: 16 단계, 이미지 1/1
    • Pull the I/O board/logic board assembly out of the outer case enough to access the power connector.

    • Use your fingers to disconnect the DC-In cable from the logic board.

    • Pull the power cable connector toward the front side of the mini.

  17. Mac mini Mid 2011 PRAM Battery Replacement: 17 단계, 이미지 1/1
    • Carefully slide the logic board assembly out of the mini, minding any cables that may get caught.

  18. Mac mini Mid 2011 PRAM Battery Replacement, PRAM Battery: 18 단계, 이미지 1/1
    • The PRAM battery is located on the top side of the logic board.

    • Use the tip of a spudger to carefully pry the PRAM battery up and out of its holder on the logic board.

  19. Mac mini Mid 2011 PRAM Battery Replacement: 19 단계, 이미지 1/1
    • Remove the PRAM battery from the logic board.

    • The PRAM battery is a commonly available BR2032 coin-cell.

결론

To reassemble your device, follow these instructions in reverse order.

다른 24명이 해당 안내서를 완성하였습니다.

Walter Galan

693,920 평판

안내서 1,203개 작성하였습니다

댓글 5개

Great directions. Unfortunately it’s the logic board. But thanks.

Craig Wallace - 답글

Second time I have used this guide. Thorough and NO fluff…i.e. When the guide says “gently" or “can be difficult" those words are there for a reason. This one is direct and to the point without a head in the clouds. Leave that to me!

John Heins - 답글

The PRAM battery is a commonly available BR2032 coin-cell.

By mail order only and from China for me, Ordered two BR2032 coin cells 12 days ago and still waiting. I doubt if you would find this exact type anywhere locally in a store. You could go with a CR2032 which is found more easily but after what I found online it does make a difference.

The main difference between these two types resides in their electrode.

While similar, the BR2032 uses carbon monofluoride as the positive electrode.

The CR2032 uses manganese dioxide for the positive electrode

David Bell - 답글

There is a difference between CR2032 and BR2032. While the dimensions are the same, the chemistries are different. The BR2032 are preferred for maintaining computer PRAM or BIOS because at temperatures above 60c (140f) the CR type battery decays faster and has more voltage sag. It is not unusual for the inside of your computer to reach these temperatures. In relatively speaking higher drain applications -like many consumer use applications, the chemistry of the CR type battery is advantageous as it provides more steady voltage under higher drains at temperatures under 60c. In short, after 3 or 4 years in a system the CR chemistry battery might not be providing close enough to the 3v for the system clock to maintain the purest accuracy. But can you use either?- yes. But what does Apple put as factory original? - the BR chemistry.

David Bell - 답글

Why is a fan listed as a part? Is it expected to be destroyed in removal? That seems unlikely.

William R. Dickson - 답글

댓글 쓰기

조회 통계:

24 시간 전: 5

7일 전: 38

30일 전: 189

전체 시간: 35,092