주요 콘텐츠로 건너뛰기

MacBook Air 11" Late 2010 Logic Board Replacement

필요한 것

  1. MacBook Air 11" Late 2010 Logic Board Replacement, Lower Case: 1 단계, 이미지 1/1
    이 단계에 사용된 도구:
    P5 Pentalobe Screwdriver Retina MacBook Pro and Air
    $5.99
    구매
    • Before proceeding, close your computer and lay it on a soft surface top-side down.

    • Remove the following ten screws:

    • Two 8 mm 5-point Pentalobe screws

    • Eight 2.5 mm 5-point Pentalobe screws

    • The special screwdriver needed to remove the eight 5-point Pentalobe screws can be found here.

  2. MacBook Air 11" Late 2010 Logic Board Replacement: 2 단계, 이미지 1/1
    • Wedge your fingers between the display and the lower case and pull upward to pop the lower case off the Air.

    • Remove the lower case and set it aside.

  3. MacBook Air 11" Late 2010 Logic Board Replacement, Battery: 3 단계, 이미지 1/2 MacBook Air 11" Late 2010 Logic Board Replacement, Battery: 3 단계, 이미지 2/2
    • In this step you will disconnect the battery to help avoid shorting out any components during service.

    • Use the flat end of a spudger to pry both short sides of the battery connector upward to disconnect it from its socket on the logic board.

    • Bend the battery cable slightly away from the logic board so the connector will not accidentally contact its socket.

  4. MacBook Air 11" Late 2010 Logic Board Replacement, Solid-State Drive: 4 단계, 이미지 1/1
    • Remove the single 2.9 mm T5 Torx screw securing the SSD to the logic board.

  5. MacBook Air 11" Late 2010 Logic Board Replacement: 5 단계, 이미지 1/2 MacBook Air 11" Late 2010 Logic Board Replacement: 5 단계, 이미지 2/2
    • Use a spudger to help lift the free end of the SSD just enough to grab it with your other hand.

    • Do not lift the end of the SSD excessively.

    • Pull the drive straight out of its socket and remove it from the logic board.

    • When reinstalling the SSD, be sure it is properly seated before reinstalling its retaining screw.

  6. MacBook Air 11" Late 2010 Logic Board Replacement, I/O Board Cable: 6 단계, 이미지 1/1
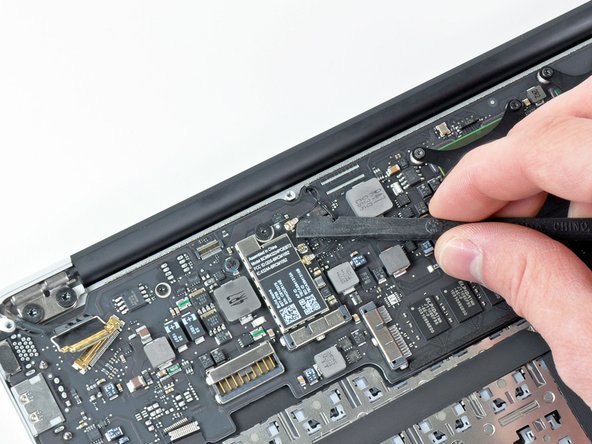
    • Use the flat end of a spudger to pry the I/O board cable connector upward out of its socket on the I/O board.

  7. MacBook Air 11" Late 2010 Logic Board Replacement: 7 단계, 이미지 1/1
    • The following connector has an especially deep socket. Use care when disconnecting it.

    • While gently pulling the I/O board cable upward near its connection to the logic board, use the tip of a spudger to pry upward on alternating sides of the connector to help "walk" it out of its socket.

    • Remove the I/O board cable.

  8. MacBook Air 11" Late 2010 Logic Board Replacement, Fan: 8 단계, 이미지 1/1
    • Use the tip of a spudger to carefully flip up the retaining flap on the fan cable ZIF socket.

    • Be sure you are prying up on the hinged retaining flap, not the socket itself.

  9. MacBook Air 11" Late 2010 Logic Board Replacement: 9 단계, 이미지 1/1
    • Remove the following three screws securing the fan to the upper case:

    • Two 5.2 mm T5 Torx screws

    • One 3.6 mm T5 Torx screw

  10. MacBook Air 11" Late 2010 Logic Board Replacement: 10 단계, 이미지 1/1
    • Lift the fan out of the upper case and carefully pull the fan ribbon cable out of its socket as you remove it from the Air.

  11. MacBook Air 11" Late 2010 Logic Board Replacement, Battery: 11 단계, 이미지 1/1
    • Remove the following five screws securing the battery to the upper case:

    • Two 5.2 mm T5 Torx screws

    • One 6 mm T5 Torx screw

    • Two 2.6 mm T5 Torx screws

  12. MacBook Air 11" Late 2010 Logic Board Replacement: 12 단계, 이미지 1/1
    • Do not touch or squeeze the six lithium polymer cells when handling the battery.

    • Lift the battery from its edge nearest the logic board and remove it from the upper case.

  13. MacBook Air 11" Late 2010 Logic Board Replacement, Logic Board: 13 단계, 이미지 1/1
    • Disconnect the I/O board by pulling the power cable away from its socket on the logic board.

    • Pull the cable parallel to the face of the logic board toward the front edge of the Air.

  14. MacBook Air 11" Late 2010 Logic Board Replacement: 14 단계, 이미지 1/2 MacBook Air 11" Late 2010 Logic Board Replacement: 14 단계, 이미지 2/2
    • Use the tip of a spudger or your fingernail to flip up the retaining flap on the trackpad ribbon cable ZIF socket.

    • Be sure you are prying up on the hinged retaining flap, not the socket itself.

    • Pull the trackpad ribbon cable straight out of its socket toward the front edge of the Air.

  15. MacBook Air 11" Late 2010 Logic Board Replacement: 15 단계, 이미지 1/1
    • Use the tip of a spudger to de-route the right speaker cable from the slot cut into the logic board.

  16. MacBook Air 11" Late 2010 Logic Board Replacement: 16 단계, 이미지 1/1
    • Use the flat end of a spudger to pry the right speaker cable connector up and out of its socket on the logic board.

    • Pry up from beneath the cables.

  17. MacBook Air 11" Late 2010 Logic Board Replacement: 17 단계, 이미지 1/3 MacBook Air 11" Late 2010 Logic Board Replacement: 17 단계, 이미지 2/3 MacBook Air 11" Late 2010 Logic Board Replacement: 17 단계, 이미지 3/3
    • Gently push the tip of a spudger under the black plastic flap stuck to the display data cable lock to make the lock pop upward and away from the socket.

    • While holding the lock away from the socket, use the tip of a spudger and your fingers to gently remove the display data cable from its socket.

    • Do not pull upward on the display data cable as you disconnect it, as its socket may break off the logic board.

  18. MacBook Air 11" Late 2010 Logic Board Replacement: 18 단계, 이미지 1/1
    • Remove the small rubber gasket from the corner of the upper case near the display data cable.

  19. MacBook Air 11" Late 2010 Logic Board Replacement: 19 단계, 이미지 1/2 MacBook Air 11" Late 2010 Logic Board Replacement: 19 단계, 이미지 2/2
    • Use the flat end of a spudger to pry both antenna cable connectors up and off their sockets on the AirPort/Bluetooth card.

  20. MacBook Air 11" Late 2010 Logic Board Replacement: 20 단계, 이미지 1/1
    • Gently de-route the antenna cables from the slot cut into the logic board.

  21. MacBook Air 11" Late 2010 Logic Board Replacement: 21 단계, 이미지 1/1
    • Remove the three 3.6 mm T5 Torx screws securing the logic board to the upper case.

  22. MacBook Air 11" Late 2010 Logic Board Replacement: 22 단계, 이미지 1/1
    • Gently lift the logic board assembly out of the upper case, minding the fragile heat sink and any cables that may get caught.

  23. MacBook Air 11" Late 2010 Logic Board Replacement, Logic Board: 23 단계, 이미지 1/1
    • Remove the single 2.9 mm T5 Torx screw securing the AirPort/Bluetooth card to the logic board.

  24. MacBook Air 11" Late 2010 Logic Board Replacement: 24 단계, 이미지 1/1
    • Slightly lift the free end of the AirPort/Bluetooth board and pull it out of its socket on the logic board.

    • Remove the AirPort/Bluetooth board from the logic board.

  25. MacBook Air 11" Late 2010 Logic Board Replacement: 25 단계, 이미지 1/1
    • Remove the eight 2.5 mm T5 Torx screws securing the heat sink to the logic board.

  26. MacBook Air 11" Late 2010 Logic Board Replacement: 26 단계, 이미지 1/1
    • If the heat sink seems to be stuck to the logic board after removing all eight screws, use a spudger to carefully separate the heat sink from the faces of the CPU and GPU.

    • Remove the heat sink from the logic board.

    • Logic board remains.

    • When reinstalling the heat sink, be sure to apply a new layer of thermal paste. If you have never applied thermal paste before, we have a guide that makes it easy.

결론

To reassemble your device, follow these instructions in reverse order.

다른 23명이 해당 안내서를 완성하였습니다.

Andrew Bookholt

585,714 평판

안내서 619개 작성하였습니다

댓글 7개

Another Great Guide by you guys! Thanks

ubenice - 답글

This Logic board is compatible with a macbook air 11inch 2011 model?

Aprimus - 답글

Just so you guys know I could successfully reaplace the A1370 Core2Duo Late 2010 board for a A1370 i7 Mid 2011 board. you are going to need the heatsink and battery from the newer model as well. the problem I am facing right now is the wifi/bluetooth antenna been too short for the new position of the airport card. as soon as I get a chance I'll try to re route the cables and try to fix it.

igorfeghali - 답글

Igorfeghali, another question: why do you need the battery too?

kautame -

Hello everybody,

I made it too: I replaced my 2GB RAM C2D-logic board in my native 11” 2011 MBA for a 2nd-hand “ i5 1,6 GHz / 4GB RAM” logic board. The same here: you will need a 2011 battery (the connector of the 2010 battery is too far left for the connector of the 2011 logic board). My logic board luckily came w/ native fan and heatsink, so my only challenge will now be to get BT and WIFI antenna cable long enough to fit the new place of the bt/wifi-card.

@igorfeghali, and others: How did you manage this problem? Any idea for an adapter-cable? Any suggestions, anybody?

Thank you, alle the best,

Chris

Chris -

댓글 쓰기

조회 통계:

24 시간 전: 0

7일 전: 5

30일 전: 40

전체 시간: 35,938