주요 콘텐츠로 건너뛰기

MacBook Air 13" Early 2015 Trackpad Replacement

필요한 것

동영상 개요

  1. MacBook Air 13" Early 2015 Trackpad Replacement, Lower Case: 1 단계, 이미지 1/1
    이 단계에 사용된 도구:
    P5 Pentalobe Screwdriver Retina MacBook Pro and Air
    $5.99
    구매
    • Before proceeding, power down your MacBook. Close the display and lay it on a soft surface, top-side down.

    • Use a P5 Pentalobe driver to remove ten screws securing the lower case, of the following lengths:

    • Two 9 mm screws

    • Eight 2.6 mm screws

  2. MacBook Air 13" Early 2015 Trackpad Replacement: 2 단계, 이미지 1/1
    • Wedge your fingers between the display and the lower case and pull upward to pop the lower case off the Air.

    • Remove the lower case and set it aside.

  3. MacBook Air 13" Early 2015 Trackpad Replacement, Battery Connector: 3 단계, 이미지 1/2 MacBook Air 13" Early 2015 Trackpad Replacement, Battery Connector: 3 단계, 이미지 2/2
    • To ensure that everything is de-energized and won't turn on while you're working, it is recommended that you disconnect the battery.

    • Grab the clear plastic pull tab attached to the battery connector and pull it parallel to the board toward the front edge of the Air.

    • Do not lift upward on the connector as you disconnect it or you risk damage to the connector socket.

  4. MacBook Air 13" Early 2015 Trackpad Replacement, Battery: 4 단계, 이미지 1/1
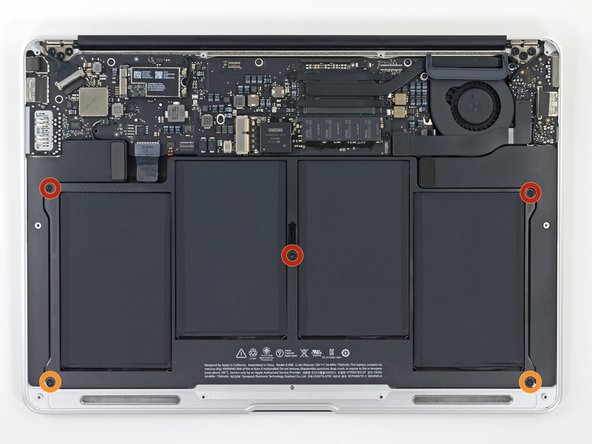
    • Remove the following five screws securing the battery to the upper case:

    • Three 6.9 mm T5 Torx screws

    • Two 3.0 mm T5 Torx screws

  5. MacBook Air 13" Early 2015 Trackpad Replacement: 5 단계, 이미지 1/1
    • When handling the battery, avoid squeezing or touching the four exposed lithium polymer cells.

    • Lift the battery from its edge nearest the logic board and remove it from the upper case.

    • Your replacement battery may arrive with a plastic film lightly adhered to the top surface. Remove this film when you install the battery. However, if the film is glued on and is difficult to remove, you should leave the film in place.

    • If you're installing a new battery, you should calibrate it after installation:

    • Charge it to 100%, and then keep charging it for at least 2 more hours. Then, unplug and use it normally to drain the battery. When you see the low battery warning, save your work, and keep your laptop on until it goes to sleep due to low battery. Wait at least 5 hours, then charge your laptop uninterrupted to 100%.

    • If you notice any unusual behavior or problems after installing your new battery, you may need to reset your MacBook's SMC.

  6. MacBook Air 13" Early 2015 Trackpad Replacement, Trackpad: 6 단계, 이미지 1/3 MacBook Air 13" Early 2015 Trackpad Replacement, Trackpad: 6 단계, 이미지 2/3 MacBook Air 13" Early 2015 Trackpad Replacement, Trackpad: 6 단계, 이미지 3/3
    • Use the tip of a spudger or your fingernail to flip up the retaining flap on the trackpad ribbon cable ZIF socket.

    • Be sure you are prying up on the hinged retaining flap, not the socket itself.

    • Pull the trackpad ribbon cable straight out of its socket toward the rear edge of the Air.

  7. MacBook Air 13" Early 2015 Trackpad Replacement: 7 단계, 이미지 1/2 MacBook Air 13" Early 2015 Trackpad Replacement: 7 단계, 이미지 2/2
    • While carefully lifting the keyboard ribbon cable with one hand, use the tip of a spudger or your fingernail to flip up the retaining flap on the keyboard ribbon cable ZIF socket.

    • Be sure you are prying up on the hinged retaining flap, not the socket itself.

    • Pull the keyboard ribbon cable straight out of its socket toward the front edge of the Air.

  8. MacBook Air 13" Early 2015 Trackpad Replacement: 8 단계, 이미지 1/1
    • Remove the following twelve screws:

    • Six 1.6 mm Phillips screws securing the trackpad to the upper case.

    • Six 1.6 mm Phillips screws securing the trackpad brackets to the trackpad.

  9. MacBook Air 13" Early 2015 Trackpad Replacement: 9 단계, 이미지 1/1
    • Remove the right and left trackpad brackets from the upper case.

  10. MacBook Air 13" Early 2015 Trackpad Replacement: 10 단계, 이미지 1/1
    • During reassembly, check the clicking action on the trackpad.

    • The 1.4 mm T5 Torx screw near the front edge of the case must be adjusted correctly.

    • If overtightened, the button will cease to click at a certain point. Adjust the set screw until the clicking side of the trackpad has minimal play.

    • It's not necessary to remove this screw in order to remove the trackpad.

  11. MacBook Air 13" Early 2015 Trackpad Replacement: 11 단계, 이미지 1/2 MacBook Air 13" Early 2015 Trackpad Replacement: 11 단계, 이미지 2/2
    • Use the flat end of a spudger to carefully lift the edge of the trackpad closest to the keyboard from its recess in the upper case by lifting it away from the brackets attached to the upper case.

    • Remove the trackpad from the upper case.

결론

To reassemble your device, follow these instructions in reverse order.

Take your e-waste to an R2 or e-Stewards certified recycler.

Repair didn’t go as planned? Try some basic troubleshooting, or ask our Answers community for help.

다른 39명이 해당 안내서를 완성하였습니다.

Sam Goldheart

회원 가입일: 10/18/12

465,119 평판

안내서 538개 작성하였습니다

iFixit iFixit 회원

Staff

135 회원들

안내서 16,476개 작성하였습니다

댓글 10개

Hi,

I have replaced the keyboard of my MacBook Air, now touchpad and keyboard stop work after login.

It does not works even in single mode nor with install drive.

Can anyone tell me why this happened?

PS. I also changed all the upper case with touch and keyboard and same issue.

It does work with external devices.

Claus - 답글

First step is to double check the keyboard and trackpad cables! See step 6 and step 7 in this guide!

Sam Goldheart -

I am in a similar situation, I recently replaced the trackpad on my MacBook Air and I am having the same problem with the trackpad and keyboard working fine during login, but it stops working after boot.

Did you find a solution? Is there a way to fix this?

Joe Walker -

Hi,

I replaced my touchpad of my macbook air 2013. Now The touchpad functions partly in the beginning. It moves nothing to bad in the beginning, but after 5 minutes it works well. I checked the cables, but they seem to be plugged in fine, especially if they seem to work after 5 minutes. What could this be?

P.S. I used the old brackets of the trackpad for the new one. I was wondering what the function was of the connection between the bracket and the small circuit board and if that could be the problem.

martijn breuls - 답글

Hello! I was able to remove the six screws securing the trackpad brackets to the trackpad. But the six screws securing the trackpad to the upper case are just stuck! No matter how much pressure I apply, they won’t give. Can someone help?

Chi A - 답글

댓글 쓰기

조회 통계:

24 시간 전: 10

7일 전: 67

30일 전: 315

전체 시간: 47,278