이 버전에는 잘못된 편집 사항이 있을 수 있습니다. 최신 확인된 스냅샷으로 전환하십시오.
필요한 것
동영상 개요
-
-
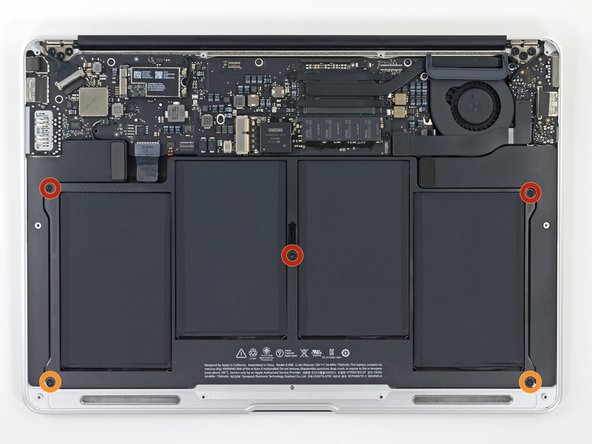
P5 펜타로브 드라이버를 사용하여 하난 케이스를 고정하는 다음 길이의 나사 10개를 풀어주세요:
-
9mm 나사 두 개
-
2.6mm 나사 여덟 개
-
-
-
-
배터리를 로직 보드에 가장 가까운 가장자리에서 들어 올려 상단 케이스에서 분리하세요.
-
배터리를 100%까지 충전한 다음 계속해서 2시간 이상 충전하세요. 그런 다음 플러그를 뽑고 정상적으로 사용하여 배터리를 방전시키세요. 배터리 부족 경고가 표시되면 작업을 저장하고 배터리 부족으로 인해 노트북이 절전 모드로 전환될 때까지 노트북을 계속 켜두세요. 5시간 이상 기다린 다음 중단 없이 노트북을 100%까지 충전하세요.
-
새 배터리를 설치한 후 비정상적인 작동이나 문제가 발견되면 MacBook의 SMC를 재설정해야 할 수 있습니다.
-
-
이 단계는 번역되지 않았습니다. 번역을 도와주십시오
-
Use the tip of a spudger or your fingernail to flip up the retaining flap on the trackpad ribbon cable ZIF socket.
-
Pull the trackpad ribbon cable straight out of its socket toward the rear edge of the Air.
-
-
이 단계는 번역되지 않았습니다. 번역을 도와주십시오
-
While carefully lifting the keyboard ribbon cable with one hand, use the tip of a spudger or your fingernail to flip up the retaining flap on the keyboard ribbon cable ZIF socket.
-
Pull the keyboard ribbon cable straight out of its socket toward the front edge of the Air.
-
-
이 단계는 번역되지 않았습니다. 번역을 도와주십시오
-
Remove the following twelve screws:
-
Six 1.6 mm Phillips screws securing the trackpad to the upper case.
-
Six 1.6 mm Phillips screws securing the trackpad brackets to the trackpad.
-
-
이 단계는 번역되지 않았습니다. 번역을 도와주십시오
-
The 1.4 mm T5 Torx screw near the front edge of the case must be adjusted correctly.
-
-
이 단계는 번역되지 않았습니다. 번역을 도와주십시오
-
Use the flat end of a spudger to carefully lift the edge of the trackpad closest to the keyboard from its recess in the upper case by lifting it away from the brackets attached to the upper case.
-
Remove the trackpad from the upper case.
-


다른 39명이 해당 안내서를 완성하였습니다.


댓글 10개
Hi,
I have replaced the keyboard of my MacBook Air, now touchpad and keyboard stop work after login.
It does not works even in single mode nor with install drive.
Can anyone tell me why this happened?
PS. I also changed all the upper case with touch and keyboard and same issue.
It does work with external devices.
I am in a similar situation, I recently replaced the trackpad on my MacBook Air and I am having the same problem with the trackpad and keyboard working fine during login, but it stops working after boot.
Did you find a solution? Is there a way to fix this?
Hi,
I replaced my touchpad of my macbook air 2013. Now The touchpad functions partly in the beginning. It moves nothing to bad in the beginning, but after 5 minutes it works well. I checked the cables, but they seem to be plugged in fine, especially if they seem to work after 5 minutes. What could this be?
P.S. I used the old brackets of the trackpad for the new one. I was wondering what the function was of the connection between the bracket and the small circuit board and if that could be the problem.