이 버전에는 잘못된 편집 사항이 있을 수 있습니다. 최신 확인된 스냅샷으로 전환하십시오.
필요한 것
-
-
MacBook이 Big Sur v11.1 이상을 사용하는 경우, 자동 부팅을 비활성화 하지 못할 수도 있습니다. 절차를 정상적으로 진행하세요, 하지만 내부로 진입하는 즉시 배터리를 분리하세요.
-
P5 드라이버를 사용하여 다음 나사들을 풀어주세요:
-
7.9mm 나사 두 개
-
7.3mm 나사 두 개
-
2.6mm 나사 여섯 개
-
-
-
디스플레이와 하단 케이스 사이에 손가락을 넣어 위로 당겨 하단 케이스를 Air에서 분리하세요.
-
하단 케이스를 분리하세요.
-
하단 케이스를 제자리에 맞추고 단단히 눌러서 아랫면에 숨겨진 클립 두 개와 맞물리세요. 그들이 제자리에 끼워지는 것을 느끼고 소리가 들려야 합니다.
-
-
-
Spudger/스퍼저의 평평한 끝을 사용하여 배터리 커넥터에 있는 금속 로킹 암을 들어 올리고 래치를 풀어주세요.
-
금속 로킹 암을 똑바로 들어 올려 배터리 커넥터를 로직 보드의 소켓에서 빼세요.
-
필요하다면 커넥터의 뒤쪽 전선 쪽을 먼저 제자리에 밀어넣은 다음 커넥터의 앞쪽을 제자리에 밀어 넣으세요.
-
-
이 단계는 번역되지 않았습니다. 번역을 도와주십시오
-
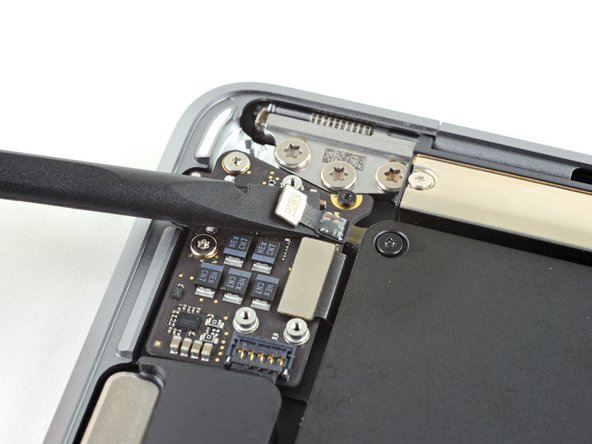
Use a T3 Torx driver to remove the three 1.4 mm screws securing the audio board connector cover.
-
-
-
이 단계는 번역되지 않았습니다. 번역을 도와주십시오
-
Slide the pointed end of a spudger underneath the speaker cable and pry straight up to disconnect it.
-
-
이 단계는 번역되지 않았습니다. 번역을 도와주십시오
-
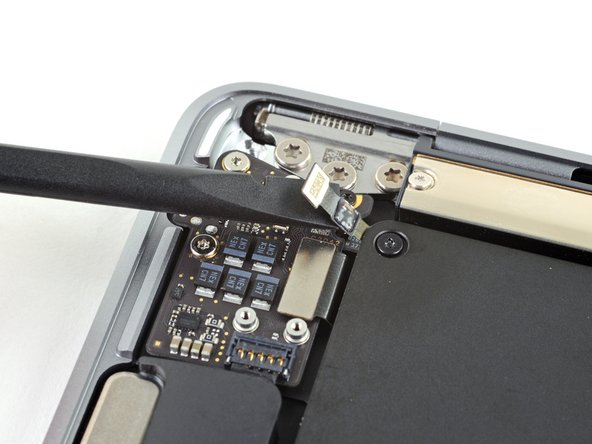
Use the flat end of a spudger to pry the Touch ID cable straight up to disconnect it from the audio board.
-
Continue to slide the spudger underneath the Touch ID cable to release it from the audio board.
-
-
이 단계는 번역되지 않았습니다. 번역을 도와주십시오
-
Use the flat end of a spudger to pry the audio board connector straight up to disconnect it from the board.
-
-
이 단계는 번역되지 않았습니다. 번역을 도와주십시오
-
Remove the three screws securing the audio board:
-
Two 4.8 mm T5 Torx screws
-
One 2.5 mm T3 Torx screw
-
-
이 단계는 번역되지 않았습니다. 번역을 도와주십시오
-
Use a spudger to pry the audio board out of the upper case until you can grip it with your fingers.
-
Remove the audio board.
-
-
이 단계는 번역되지 않았습니다. 번역을 도와주십시오
-
Use a T3 Torx driver to remove the six 1.6 mm screws securing the Touch ID sensor and its bracket.
-
-
이 단계는 번역되지 않았습니다. 번역을 도와주십시오
-
Turn the MacBook right-side up and open the display.
-
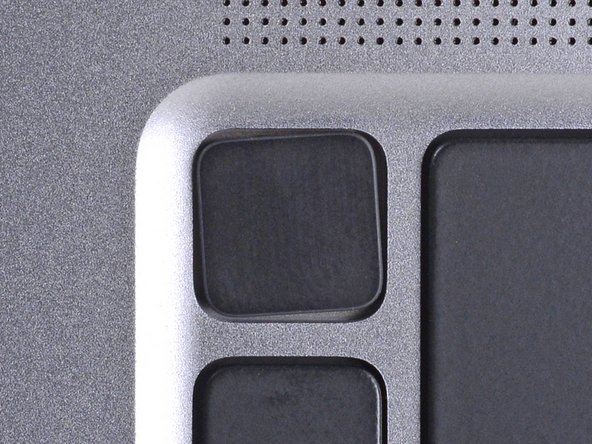
Remove the Touch ID sensor.
-


다른 9명이 해당 안내서를 완성하였습니다.


댓글 4개
Servus! Angenommen, der Stecker hat sich beim Sturz nur gelöst und man steckt ihn wieder drauf. Kann man dann Touch ID wieder nutzen? Ode muss man immer das Logicboard tauschen, sobald der Stecker abgelöst wurde? Grüße
Is it safe to remove the power button without going through the back? My touch sensor isn't working and I think something's blocking it. I simply want to remove the power key to clean... and put it right back in.
No, the 4 screws holding the bottom of the button are on the inside, so you have to follow this guide to check your issue.
Anyway to turn on my 2019 macbook pro with a broken touch id flex cable?