주요 콘텐츠로 건너뛰기

MacBook Air Models A1237 and A1304 Hard Drive Replacement

단지 전제 조건
이 안내서는 다른 가이드의 선행 작업으로 사용하기 위한 것입니다. 그 자체로는 불완전합니다.

필요한 것

  1. MacBook Air Models A1237 and A1304 Hard Drive Replacement, Hard Drive: 1 단계, 이미지 1/3 MacBook Air Models A1237 and A1304 Hard Drive Replacement, Hard Drive: 1 단계, 이미지 2/3 MacBook Air Models A1237 and A1304 Hard Drive Replacement, Hard Drive: 1 단계, 이미지 3/3
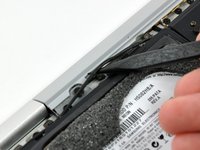
    • Disconnect the port hatch ribbon cable from the logic board by pulling it straight up by its black pull tab.

    • Pull the audio out ribbon cable off the adhesive securing it to the upper case.

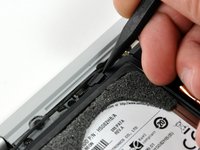
    • Use a spudger to pry the audio out ribbon cable connector board off the hard drive bracket.

  2. MacBook Air Models A1237 and A1304 Hard Drive Replacement: 2 단계, 이미지 1/1
    • Disconnect the audio out cable from its socket on the port hatch ribbon cable.

  3. MacBook Air Models A1237 and A1304 Hard Drive Replacement: 3 단계, 이미지 1/1
    • Use a spudger to pry the hard drive cable connector up off the logic board.

  4. MacBook Air Models A1237 and A1304 Hard Drive Replacement: 4 단계, 이미지 1/2 MacBook Air Models A1237 and A1304 Hard Drive Replacement: 4 단계, 이미지 2/2
    • Use the sharp end of a spudger to de-route the microphone cable from the hard drive bracket.

    • Remove the cosmetic screw cover from the adhesive securing it to the hard drive bracket.

  5. MacBook Air Models A1237 and A1304 Hard Drive Replacement: 5 단계, 이미지 1/1
    • Remove the four Phillips screws securing the hard drive assembly to the upper case:

    • Two 4.7 mm screws.

    • Two 3.9 mm screws.

  6. MacBook Air Models A1237 and A1304 Hard Drive Replacement: 6 단계, 이미지 1/1
    • Lift the hard drive assembly out of the upper case.

결론

To reassemble your device, follow these instructions in reverse order.

Walter Galan

694,573 평판

안내서 1,203개 작성하였습니다

댓글 0개

댓글 쓰기

조회 통계:

24 시간 전: 0

7일 전: 0

30일 전: 0

전체 시간: 9,672