주요 콘텐츠로 건너뛰기

MacBook Core 2 Duo Lower Case Replacement

필요한 것

  1. MacBook Core 2 Duo Lower Case Replacement, Battery: 1 단계, 이미지 1/1
    • Use a coin or spudger to rotate the battery-locking screw 90 degrees clockwise.

  2. MacBook Core 2 Duo Lower Case Replacement: 2 단계, 이미지 1/1
    • Lift the battery out of the computer.

  3. MacBook Core 2 Duo Lower Case Replacement, Memory Cover: 3 단계, 이미지 1/1
    • Unscrew the three evenly-spaced Phillips screws from along the rear wall of the battery compartment.

    • The screws are captive to the metal memory cover so you cannot lose them.

    • Using The Flexible Extension sold by iFixit will help with this step.

  4. MacBook Core 2 Duo Lower Case Replacement: 4 단계, 이미지 1/1
    • Grasp the right end of the L-shaped memory cover, then pull it towards you so it clears the battery compartment opening.

    • Lift the memory cover up and out of the computer.

  5. MacBook Core 2 Duo Lower Case Replacement, Upper Case: 5 단계, 이미지 1/1
    • Remove the following 3 screws:

    • One 11 mm Phillips#00 in the middle of the lower case. (Head: 5mm dia. x .75mm thick)

    • Two 14.5 mm Phillips #00 (Head: 5mm dia. x .75mm thick)

    • If the screws stick in the case, you can use a magnetized screwdriver to draw them out.

    • The shorter of the three screws goes in the middle of the lower case.

  6. MacBook Core 2 Duo Lower Case Replacement: 6 단계, 이미지 1/1
    • Take extra caution with these screws as they can strip easily!

    • You could use a flexible extension to minimize stripping.

    • Remove the following 3 screws from the rear wall of the battery compartment:

    • One 3 mm Phillips #0. (Head: 2.75 mm. dia.)

    • Two 4 mm Phillips #0 on the either side. (Head: 2.75mm dia.)

  7. MacBook Core 2 Duo Lower Case Replacement: 7 단계, 이미지 1/1
    • Remove the two Phillips screws from either side of the right wall of the battery compartment (not the ones closest to the battery connector).

    • Two 6.25 mm Phillips #000. (Head: 4 mm. dia. x .5mm thick)

  8. MacBook Core 2 Duo Lower Case Replacement: 8 단계, 이미지 1/1
    • Remove the four indicated Phillips screws from the front wall of the battery compartment. When working from the left, remove the 2nd, 4th, 7th and 9th screws.

    • Four 3.25 mm Phillips #000. (Head: 4 mm. dia. x 4mm thick)

  9. MacBook Core 2 Duo Lower Case Replacement: 9 단계, 이미지 1/1
    • Remove the following 4 screws from the back of the computer:

    • Two 11 mm Phillips #00, with Shank (2.2mm dia. x 2 mm len.) (Head: 3.2 mm. dia. x .5mm thick)

    • Two 7.25 mm Phillips #00, with Shank (2mm dia. x 3.75 mm len.) (Head: 3.2 mm. dia. x .5mm thick)

    • During reassembly, the two longer screws go on the inside, and the two shorter screws go on the outside.

  10. MacBook Core 2 Duo Lower Case Replacement: 10 단계, 이미지 1/1
    • Remove the two Phillips screws from the optical drive (right) side of the computer:

    • Two 5.2 mm Phillips #00, with shank (2.3mm dia. x 3.25 mm len.) (Head: 3.2 mm. dia. x .5mm thick)

    • It is not necessary to remove the similar screws on the ports (left) side of the computer.

  11. MacBook Core 2 Duo Lower Case Replacement: 11 단계, 이미지 1/1
    이 단계에 사용된 도구:
    Plastic Cards
    $2.99
    구매
    • There's a trackpad and keyboard ribbon cable connecting the upper case to the logic board, so don't pull the upper case off entirely just yet.

    • Use a plastic opening tool, an expired plastic credit, or a similarly-thick card to pry up on the upper case, starting in the upper-left corner and working around to the front of the computer.

    • The upper case is likely to stick at its connection above the front edge of the optical drive. If this happens, first free all other sides, then proceed to pull upward on the upper case from either side of the optical drive opening. Here again, inserting a plastic card, guitar pick, etc. can be useful.

    • If you stand the base of the MacBook on one end to get a better look, you may displace the four grey plastic clips that hold the right side of the upper case in place. Don't panic. They slide into slots at the top rightmost edge of the lower frame, above the front edge of the optical drive.

    • During reassembly, make sure the clips on the right side, above the optical drive, click firmly into place. They're different from the clips on the left side, and so normally they require a little firmer pressure to click into place.

  12. MacBook Core 2 Duo Lower Case Replacement: 12 단계, 이미지 1/3 MacBook Core 2 Duo Lower Case Replacement: 12 단계, 이미지 2/3 MacBook Core 2 Duo Lower Case Replacement: 12 단계, 이미지 3/3
    • While holding up the upper case, pull up the black tab on the connector end of the silver ribbon cable away from the connector's socket on the logic board.

    • If there is no black tab, you can also use a spudger to gently pry the connector out of its socket on the logic board. This connector is tall, so be sure to pry straight up.

    • If you happen to break your upper case cable when removing the upper case, we stock the cable individually and we have a guide that makes replacing it easy.

    • While you have the upper case removed, it's a good time to remove dust, hair, etc. It's best to use a can of compressed air, though if you use a brush, make sure that its bristles are made of a material (usually animal hair) that doesn't generate static electricity, which can destroy electronics.

    • Upon reassembly, there are 4 grey plastic clips installed in slots running along the top of the frame in front of the optical drive (refer to second and third pictures). These clips must be installed in their slots for their mating tabs on the underside of the right side of the upper case to snap into them.

  13. MacBook Core 2 Duo Lower Case Replacement, Optical Drive: 13 단계, 이미지 1/1
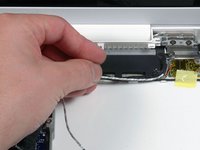
    • Grasp the white plastic tab attached to the hard drive and pull it to the left, removing the hard drive from the computer.

  14. MacBook Core 2 Duo Lower Case Replacement: 14 단계, 이미지 1/1
    • Remove the two Phillips screws from the side of the optical drive.

    • Two 3.25 mm Phillips #000 (head: 4 mm. dia. x .3 mm thick)

  15. MacBook Core 2 Duo Lower Case Replacement: 15 단계, 이미지 1/1
    • Disconnect the orange optical drive ribbon cable connector from the logic board by prying it straight up using either a finger or a spudger.

  16. MacBook Core 2 Duo Lower Case Replacement: 16 단계, 이미지 1/1
    • Disconnect the newly revealed display data cable's plug from the logic board by pulling it upward using its black pull-tab.

    • If there is no pull-tab on top of the plug, it may be helpful to use a spudger to disconnect this plug.

  17. MacBook Core 2 Duo Lower Case Replacement: 17 단계, 이미지 1/1
    • Disconnect the newly-revealed hard drive cable's plug from the logic board by pulling it upward using its black tab.

    • When reconnecting the hard drive cable's plug to the logic board, make sure the plug is routed under the cables for the right speaker and the microphone, or else the plug won't sit flush with the logic board, which will prevent the plug from fully engaging with its socket on the logic board.

  18. MacBook Core 2 Duo Lower Case Replacement: 18 단계, 이미지 1/1
    • Peel up the foil tape between the fan and the optical drive. Lift the foil tape from the fan side, leaving it attached to the optical drive.

    • During reassembly, be sure to route the cables beneath the tape before reattaching it.

    • If the adhesive on this foil tape no longer sticks, you can hold it in place using a regular piece of tape, but don't block the fan intake.

  19. MacBook Core 2 Duo Lower Case Replacement: 19 단계, 이미지 1/1
    • Pull up the display data cable from along the edge of the optical drive to reveal a silver Phillips screw.

  20. MacBook Core 2 Duo Lower Case Replacement: 20 단계, 이미지 1/1
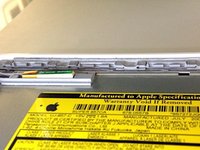
    • Remove the 2 mm Phillips #00 screw securing the rear corner of the optical drive.

    • When reinstalling this screw, make sure none of the cables nearby get caught under the screw's head.

    • The silver-jacketed Bluetooth cable may be covering the screw. If so, carefully push it aside. You may need to remove the screw holding the ground shield lugs for the two nearby cables before you can move the Bluetooth cable aside sufficiently. This screw is 7mm in earlier models, and may be 4.2mm in Santa Rosa/Penryn and 2009 models.

  21. MacBook Core 2 Duo Lower Case Replacement: 21 단계, 이미지 1/1
    • Lift the Bluetooth antenna board from the front edge of the optical drive.

  22. MacBook Core 2 Duo Lower Case Replacement: 22 단계, 이미지 1/1
    • Deroute the hard drive cable from under the clips along the near side of the optical drive.

    • During reassembly, reroute the cable under these clips.

  23. MacBook Core 2 Duo Lower Case Replacement: 23 단계, 이미지 1/1
    • Lift the side of the optical drive closest to you, then slide the drive towards you, and up and out of the computer.

    • Follow these steps to reinstall the optical drive:

    • First, slide its side nearest to the rear of the Macbook under the edge of the rear frame to the left of the hinge, while also sliding the optical drive's mounting tab at its upper left corner under the cables at this location.

    • Lower the drive partially into the lower housing. Keep the hard drive cable away from the optical drive bay.

    • Before dropping the drive fully in place, use a spudger to push forward (towards the front of the drive) on the screw hole in the drive's mounting tab.

    • Push forward the slider, which runs along the far side of the drive, to insert the end of this slider into a small channel in the lower case's frame. This helps hold the drive in place.

    • When you push the slider forward, if the screw hole in the drive's mounting tab doesn't line up over its threaded brass insert in the lower case, the front end of the slider hasn't fully inserted into its channel in the frame. Keep trying, but if the slider won't move further to the right, remove the drive to see if the end of the slider is bent.

    • If the front end of the slider isn't bent, it may be slightly too long. Use a pair of fine cutters to clip off the narrower portion of the end of the slider. The optical drive will still remain firmly in place.

  24. MacBook Core 2 Duo Lower Case Replacement, C-Channel: 24 단계, 이미지 1/1
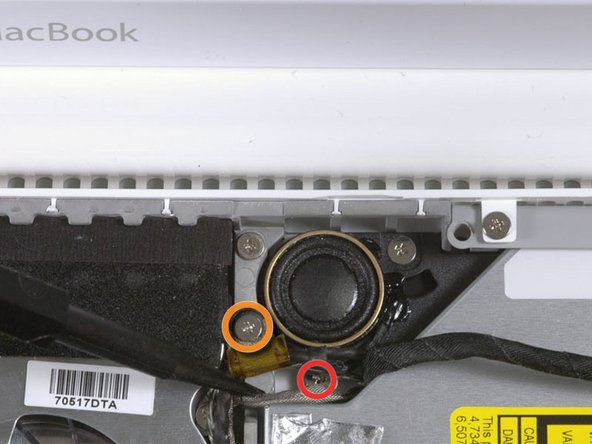
    • For original Macbook Core Duo and Core 2 Duo models, remove these 3 screws:

    • Two 3 mm Phillips near the right speaker.

    • One 6 mm Phillips threaded through a hole in a plastic finger above the subwoofer.

    • When reinstalling the screw above the subwoofer, be careful not to over-tighten it or the subwoofer's plastic could crack.

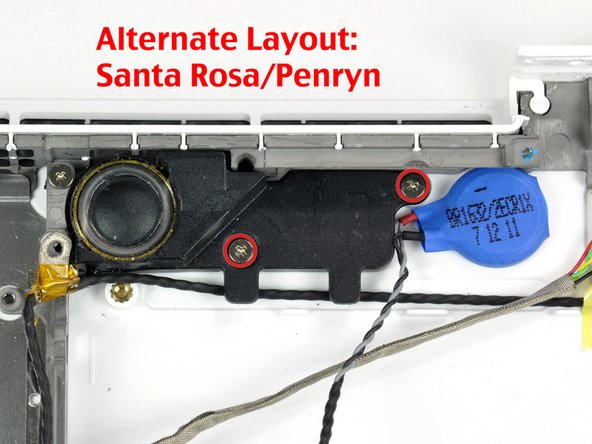
    • For Santa Rosa/Penryn and 2009 models, which don't have a c-channel:

    • Remove only the single 3 mm Phillips screw from the right speaker, and skip step 26.

  25. MacBook Core 2 Duo Lower Case Replacement: 25 단계, 이미지 1/1
    • Lift the right speaker out of its housing and set it to the side.

  26. MacBook Core 2 Duo Lower Case Replacement: 26 단계, 이미지 1/1
    • If you have a Santa Rosa/Penryn or 2009 model, skip this step.

    • Using a spudger, gently pry up the white plastic slot and slide the metal c-channel to the right and away from the display.

  27. MacBook Core 2 Duo Lower Case Replacement, Display: 27 단계, 이미지 1/1
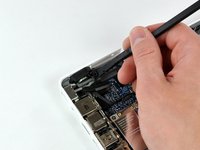
    • Use a spudger to carefully disconnect the microphone cable from the logic board. You'll want to work from side to side, and slowly wiggle the plug back and out of its socket.

    • Pulling on this plug vertically will break its socket off the logic board. This connector is removed only horizontally by gently pulling the microphone cable toward the screen while working a spudger between the connector and the socket.

  28. MacBook Core 2 Duo Lower Case Replacement: 28 단계, 이미지 1/1
    • Lift up on the black right speaker cable with one hand, and deroute the microphone cable from the silver metal clip just above the right RAM slot.

    • This metal clip may not be present in all models. Be sure that the cable is free from any hold downs around this area before proceeding.

  29. MacBook Core 2 Duo Lower Case Replacement: 29 단계, 이미지 1/1
    • If you didn't remove the ground lug retaining screw in step 20 above, remove it now. It's a 7mm (may be 4mm or 3mm in Santa Rosa/Penryn and 2009 models) Phillips screw securing the ground lugs on the right speaker cable and microphone cable to the metal frame.

  30. MacBook Core 2 Duo Lower Case Replacement: 30 단계, 이미지 1/2 MacBook Core 2 Duo Lower Case Replacement: 30 단계, 이미지 2/2
    • Deroute the microphone cable and the black display data cable from the tabs at the bottom of the subwoofer.

    • During reassembly, while there may seem to be more than one way to route the cables, the best way is as shown in photo 2. Click on the photo for a larger view.

  31. MacBook Core 2 Duo Lower Case Replacement: 31 단계, 이미지 1/1
    • Remove the single 3 mm Phillips screw securing the ground lug in the display data cable located just above the Bluetooth board. This screw may also be securing a ground lug in the speaker cable.

  32. MacBook Core 2 Duo Lower Case Replacement: 32 단계, 이미지 1/2 MacBook Core 2 Duo Lower Case Replacement: 32 단계, 이미지 2/2
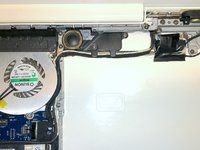
    • Disconnect the antenna cables from the Airport card:

    • If you have an original MacBook Core Duo or Core 2 Duo model, see the first picture, which shows that there are three antenna cables.

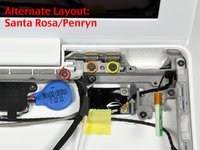
    • If you have a MacBook Core 2 Duo Santa Rosa/Penryn or 2009 model, there are only two antenna cables, and the plug/socket for the black inverter cable is in a different location. There may be a square foam piece over the plug/socket for the inverter board connector.

    • Disconnect the inverter cable from its socket by inserting a spudger between the right or left ends of the plug and the socket, and prying gently vertically. Do NOT pry up on the socket--you must pull up on the plug alone, vertically out of the socket. Do not pull in the direction of the cable wires or you will tear the socket off the logic board.

  33. MacBook Core 2 Duo Lower Case Replacement: 33 단계, 이미지 1/2 MacBook Core 2 Duo Lower Case Replacement: 33 단계, 이미지 2/2
    • For original Macbook Core Duo and Core 2 Duo models, see first picture and remove the following 2 screws from the right hinge mount:

    • One 6 mm Phillips on the left side of the hinge mount.

    • One 10 mm Phillips on the right side of the hinge mount.

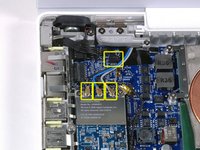
    • For Santa Rosa/Penryn and 2009 models, see second picture and remove the following 3 screws from the right hinge mount:

    • One 3 mm smalller diameter Phillips on the far left.

    • One 5.2 mm larger diameter, 4.2 mm head Phillips in the middle.

    • One 10 mm larger diameter, 4.2mm head Phillips from the far right.

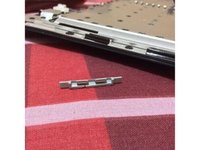
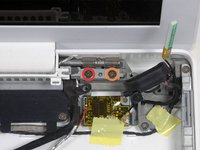
    • Before removing the right hinge mount, take care to see how its pieces fit together, including the small white plastic piece. Knowing how the mount pieces fit together will help with reassembly. Lift the right hinge mount with the small white plastic piece out of the computer.

  34. MacBook Core 2 Duo Lower Case Replacement: 34 단계, 이미지 1/1
    • Hold the display with one hand while removing the following 3 screws from the left hinge mount:

    • One 7.2 mm smaller diameter Phillips from the right side.

    • One 5.2 mm larger diameter Phillips from the middle.

    • One larger diameter 10 mm Phillips from the left side.

    • Before removing the left hinge mount, take care to see how its pieces fit together, including the small white plastic piece. Knowing how the mount pieces fit together will help with reassembly.

    • In 2009 models, the shape of the left hinge mount may be different than shown in the photo, but the locations and sizes of its screws are the same.

    • Lift the left hinge mount with white plastic piece out of the computer.

    • Check that the cables coming out of the right end of the left hinge are not trapped under other cables.

  35. MacBook Core 2 Duo Lower Case Replacement: 35 단계, 이미지 1/1
    • Grasp the display assembly on either side and lift it up and out of the computer, taking care that the cables attached to the display don't snag on parts in the lower case.

  36. MacBook Core 2 Duo Lower Case Replacement, Lower Case: 36 단계, 이미지 1/1
    • Peel up the small black rubber cover from the right side of the heat sink.

    • This cover may not be present on Santa Rosa/Penryn models.

  37. MacBook Core 2 Duo Lower Case Replacement: 37 단계, 이미지 1/2 MacBook Core 2 Duo Lower Case Replacement: 37 단계, 이미지 2/2
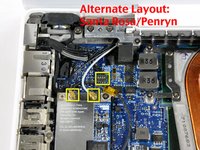
    • Core Duo and original Core 2 Duo models (photo 1):Disconnect the two newly-revealed temperature sensor connectors and the fan connector from the logic board. These connectors move up vertically off of the logic board, NOT pulled towards the rear of the case, and can be lifted with gentle pressure from under the cable.

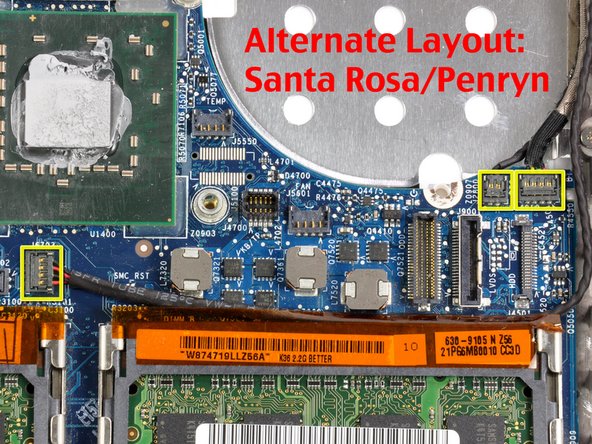
    • Santa Rosa/Penryn models (photo 2): There is only one temperature sensor connector containing all four wire leads.

    • Early and Mid 2009 models don't have a separate temperature sensor attached to the heat sink, and thus no cable for it, so nothing is plugged into the temperature sensor connector.

  38. MacBook Core 2 Duo Lower Case Replacement: 38 단계, 이미지 1/3 MacBook Core 2 Duo Lower Case Replacement: 38 단계, 이미지 2/3 MacBook Core 2 Duo Lower Case Replacement: 38 단계, 이미지 3/3
    • Remove the following 6 screws:

    • One 3 mm Phillips on the right side of the fan.

    • One 6 mm or 7mm Phillips on the left side of the fan.

    • Four 8mm or 9 mm Phillips securing the heat sink to the lower case.

    • On Santa Rosa/Penryn models (photo 2), the heat sink has a slightly different screw pattern.

    • On Early and Mid 2009 models (photo 3), the heat sink has yet another slightly different screw pattern.

  39. MacBook Core 2 Duo Lower Case Replacement: 39 단계, 이미지 1/1
    • Hold the heat sink with one hand and the fan with your other hand, and lift the heat sink and fan assembly out of the computer. The fan is attached to the heat sink only with a strip of black felt tape, so be sure to remove both parts as a unit.

    • If you need to mount the heat sink back into the laptop, we have a thermal paste guide that makes replacing the thermal compound easy.

    • While the fan is removed, hinge the heat sink's fin section upward (leaving it taped to the fan, if possible) so you can look for and remove dust inside the fan's exhaust port, where it can collect and block airflow.

  40. MacBook Core 2 Duo Lower Case Replacement: 40 단계, 이미지 1/1
    • Remove the following two screws:

    • One 3mm screw securing the MagSafe board to the lower case.

    • One 7.5mm screw securing the left speaker to the lower case.

  41. MacBook Core 2 Duo Lower Case Replacement: 41 단계, 이미지 1/1
    • De-route the left speaker cable from the two clips on the left I/O frame.

  42. MacBook Core 2 Duo Lower Case Replacement: 42 단계, 이미지 1/2 MacBook Core 2 Duo Lower Case Replacement: 42 단계, 이미지 2/2
    • Use a spudger to lift the left speaker out of its housing. Grasp it with your fingers and set it aside.

    • The left speaker cable is still connected to the logic board.

    • Disconnect the MagSafe board connector plug from the logic board, by grasping its cable and pulling it to the right.

  43. MacBook Core 2 Duo Lower Case Replacement: 44 단계, 이미지 1/1
    • Use your left hand to move the MagSafe board cable enough to uncover the screw at the top end of the left I/O frame.

    • Remove the 7.5 mm Phillips screw from the top end of the left I/O frame.

  44. MacBook Core 2 Duo Lower Case Replacement: 45 단계, 이미지 1/1
    • Remove the following 2 screws:

    • One 7.5 mm Phillips from the bottom end of the left I/O frame.

    • One 8 or 9 mm Phillips from the middle of the left I/O frame.

    • If present, remove the black plastic spacer at the bottom of the left I/O frame.

  45. MacBook Core 2 Duo Lower Case Replacement: 46 단계, 이미지 1/1
    • Lift the left I/O frame up and out of the computer. Pay attention to the thin metal EMI fingers, as they may catch as you remove the left I/O frame, especially the two fingers, above the Firewire and headphone ports, which have hooks that engage with holes in the second EMI metal shield, which runs along the front of the I/O ports.

  46. MacBook Core 2 Duo Lower Case Replacement: 47 단계, 이미지 1/2 MacBook Core 2 Duo Lower Case Replacement: 47 단계, 이미지 2/2
    • The MagSafe board is now free of all connections and can be detached freely from the logic board.

    • Using your fingers, pull out the MagSafe board.

    • Note that the MagSafe board may have a small EMI shield that fits onto the rear of the MagSafe housing; this shield may come loose as you remove the MagSafe board, but remember to reinstall it during reassembly.

  47. MacBook Core 2 Duo Lower Case Replacement: 48 단계, 이미지 1/1
    • Remove the two 4 mm Phillips shoulder screws attaching the battery connector to the lower case.

  48. MacBook Core 2 Duo Lower Case Replacement: 49 단계, 이미지 1/1
    • Remove the single 6.5mm Phillips screw in the upper right corner of the Airport card. This screw will have a thicker/taller cylindrical head.

    • When reinstalling this screw, make sure to insert it through the hole in the ground lug for the left speaker cable.

  49. MacBook Core 2 Duo Lower Case Replacement: 50 단계, 이미지 1/2 MacBook Core 2 Duo Lower Case Replacement: 50 단계, 이미지 2/2
    • Use a spudger to disconnect the right speaker connector and the Bluetooth connector from the logic board. Both of these connector plugs are removed by prying them gently upward, NOT by pulling them horizontally.

    • On some Santa Rosa/Penryn models, the PRAM battery connector must also be removed. See second picture.

  50. MacBook Core 2 Duo Lower Case Replacement: 51 단계, 이미지 1/1
    • Remove the three 3 mm Phillips screws securing the logic board to the lower case.

  51. MacBook Core 2 Duo Lower Case Replacement: 52 단계, 이미지 1/1
    • Lift the logic board up from its right side, slide it to the right slightly, and then up and out of the lower case. If the I/O ports don't easily release from the left side of the housing, gently pull up the lower left corner of the logic board by pulling up on the battery connector cable.

    • Be careful that the cables for the right speaker, MagSafe board, and battery connector don't catch on the lower case.

  52. MacBook Core 2 Duo Lower Case Replacement: 53 단계, 이미지 1/2 MacBook Core 2 Duo Lower Case Replacement: 53 단계, 이미지 2/2
    • Remove the two 3.5mm Phillips screws securing the subwoofer to the lower case.

    • On the Santa Rosa/Penryn models, the screw pattern is slightly different. See second picture.

  53. MacBook Core 2 Duo Lower Case Replacement: 54 단계, 이미지 1/1
    • Deroute the right speaker and Bluetooth antenna cables from their slots in the lower case.

  54. MacBook Core 2 Duo Lower Case Replacement: 55 단계, 이미지 1/1
    • Pry the Bluetooth board up from the lower case.

    • Lift the subwoofer, right speaker, Bluetooth board, and attached cables out of the computer.

  55. MacBook Core 2 Duo Lower Case Replacement: 56 단계, 이미지 1/1
    • On Santa Rosa/Penryn models, use a spudger to pry up the PRAM battery and remove it from the lower case.

    • If you are not disassembling a Santa Rosa/Penryn, skip this step.

  56. MacBook Core 2 Duo Lower Case Replacement: 57 단계, 이미지 1/2 MacBook Core 2 Duo Lower Case Replacement: 57 단계, 이미지 2/2
    • Remove the two 6 mm Phillips shoulder screws securing the hard drive connector to the lower case.

  57. MacBook Core 2 Duo Lower Case Replacement: 58 단계, 이미지 1/1
    • Carefully lift the hard drive connector out of the case slightly, and turn it over to reveal the IR sensor's ribbon cable connector beneath. Use a spudger to flip up the tiny locking bar holding the end of the cable in place.

    • Slide the orange IR sensor cable out of its connector, and lift the hard drive connector out of the computer. The IR sensor, its ribbon cable, and its small circuit board remain in place on the lower case.

  58. MacBook Core 2 Duo Lower Case Replacement: 59 단계, 이미지 1/1
    • Lower case remains.

결론

To reassemble your device, follow these instructions in reverse order.

다른 48명이 해당 안내서를 완성하였습니다.

iRobot

회원 가입일: 09/24/09

1 평판

안내서 636개 작성하였습니다

댓글 0개

댓글 쓰기

조회 통계:

24 시간 전: 0

7일 전: 4

30일 전: 35

전체 시간: 74,262