주요 콘텐츠로 건너뛰기

MacBook Pro 13" Touch Bar 2018 Screen Replacement

필요한 것

  1. MacBook Pro 13" Touch Bar 2018 Screen Replacement, Disable Auto Boot: 1 단계, 이미지 1/3 MacBook Pro 13" Touch Bar 2018 Screen Replacement, Disable Auto Boot: 1 단계, 이미지 2/3 MacBook Pro 13" Touch Bar 2018 Screen Replacement, Disable Auto Boot: 1 단계, 이미지 3/3
    • Before starting this procedure, you must disable your Mac's Auto Boot feature. Auto Boot powers on your Mac when you open the lid, and may be accidentally triggered during disassembly. Use this guide or follow the abbreviated instructions below to disable Auto Boot. This command may not work on all Macs.

    • Power on your Mac and launch Terminal.

    • Copy and paste the following command (or type it exactly) into Terminal:

    • sudo nvram AutoBoot=%00

    • Press [return]. If prompted, enter your administrator password and press [return] again. Note: Your return key may also be labeled ⏎ or "enter."

    • You can now safely power down your Mac and open the bottom case, without it accidentally powering on.

    • When your repair is complete and your Mac is successfully reassembled, re-enable Auto Boot with the following command:

    • sudo nvram AutoBoot=%03

  2. MacBook Pro 13" Touch Bar 2018 Screen Replacement, Remove the pentalobe screws: 2 단계, 이미지 1/1
    이 단계에 사용된 도구:
    Magnetic Project Mat
    $19.95
    구매
    • Before proceeding, unplug and power down your MacBook. Close the display and lay it on a soft surface, top-side down.

    • Use a P5 Pentalobe driver to remove the six screws securing the lower case:

    • Two 6.2 mm screws

    • Four 3.4 mm screws

    • Throughout this repair, keep track of each screw and make sure it goes back exactly where it came from to avoid damaging your device.

  3. MacBook Pro 13" Touch Bar 2018 Screen Replacement, Open a gap using a suction cup: 3 단계, 이미지 1/2 MacBook Pro 13" Touch Bar 2018 Screen Replacement, Open a gap using a suction cup: 3 단계, 이미지 2/2
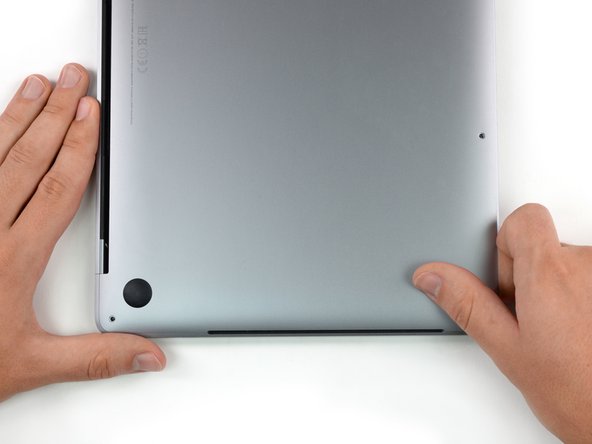
    • Apply a suction handle to the lower case near the front-center area of the MacBook Pro.

    • Lift the suction handle to create a slight gap between the lower case and the chassis.

  4. MacBook Pro 13" Touch Bar 2018 Screen Replacement, Separate the clips: 4 단계, 이미지 1/3 MacBook Pro 13" Touch Bar 2018 Screen Replacement, Separate the clips: 4 단계, 이미지 2/3 MacBook Pro 13" Touch Bar 2018 Screen Replacement, Separate the clips: 4 단계, 이미지 3/3
    • Insert one corner of an opening pick into the space between the lower case and the chassis.

    • Slide the opening pick around the nearest corner and halfway up the side of the case.

    • This releases the first of the hidden clips securing the lower case to the chassis. You should feel and hear the clip pop free.

  5. MacBook Pro 13" Touch Bar 2018 Screen Replacement: 5 단계, 이미지 1/3 MacBook Pro 13" Touch Bar 2018 Screen Replacement: 5 단계, 이미지 2/3 MacBook Pro 13" Touch Bar 2018 Screen Replacement: 5 단계, 이미지 3/3
    • Repeat the previous step on the opposite side, sliding your opening pick under the lower case and up the side to pop the second clip free.

  6. MacBook Pro 13" Touch Bar 2018 Screen Replacement: 6 단계, 이미지 1/3 MacBook Pro 13" Touch Bar 2018 Screen Replacement: 6 단계, 이미지 2/3 MacBook Pro 13" Touch Bar 2018 Screen Replacement: 6 단계, 이미지 3/3
    • Insert your opening pick once again under the front edge of the lower case, near one of the two centermost screw holes.

    • Give the pick a firm twist to pop free the third clip securing the lower case to the chassis.

    • Repeat this procedure near the other of the two centermost screw holes, popping the fourth clip free.

  7. MacBook Pro 13" Touch Bar 2018 Screen Replacement: 7 단계, 이미지 1/3 MacBook Pro 13" Touch Bar 2018 Screen Replacement: 7 단계, 이미지 2/3 MacBook Pro 13" Touch Bar 2018 Screen Replacement: 7 단계, 이미지 3/3
    • Pull the lower case firmly towards the front of the MacBook (away from the hinge area) to separate the last of the clips securing the lower case.

    • Pull first at one corner, then the other.

    • Pull to the side—not up.

    • This can require a lot of force.

  8. MacBook Pro 13" Touch Bar 2018 Screen Replacement, Remove the lower case: 8 단계, 이미지 1/3 MacBook Pro 13" Touch Bar 2018 Screen Replacement, Remove the lower case: 8 단계, 이미지 2/3 MacBook Pro 13" Touch Bar 2018 Screen Replacement, Remove the lower case: 8 단계, 이미지 3/3
    • Remove the lower case.

    • To reinstall the lower case:

    • Set it in place and align the sliding clips near the display hinge. Press down and slide the cover toward the hinge. It should stop sliding as the clips engage.

    • When the sliding clips are fully engaged and the lower case looks correctly aligned, press down firmly on the lower case to engage the four hidden clips underneath. You should feel and hear them snap into place.

  9. MacBook Pro 13" Touch Bar 2018 Screen Replacement, Uncover the battery connector: 9 단계, 이미지 1/2 MacBook Pro 13" Touch Bar 2018 Screen Replacement, Uncover the battery connector: 9 단계, 이미지 2/2
    • Carefully peel up the large piece of tape covering the battery connector, on the edge of the logic board nearest the battery.

    • Remove the tape.

  10. MacBook Pro 13" Touch Bar 2018 Screen Replacement: 10 단계, 이미지 1/2 MacBook Pro 13" Touch Bar 2018 Screen Replacement: 10 단계, 이미지 2/2
    • Gently peel back the small piece of tape covering the battery board data cable connector.

    • The tape is integrated into the ribbon cable and will not detach completely. Simply peel it back enough to access the connector.

  11. MacBook Pro 13" Touch Bar 2018 Screen Replacement: 11 단계, 이미지 1/2 MacBook Pro 13" Touch Bar 2018 Screen Replacement: 11 단계, 이미지 2/2
    • Use the tip of a spudger to flip up the small black locking tab securing the cable in its connector.

  12. MacBook Pro 13" Touch Bar 2018 Screen Replacement: 12 단계, 이미지 1/2 MacBook Pro 13" Touch Bar 2018 Screen Replacement: 12 단계, 이미지 2/2
    • Disconnect the battery board data cable by sliding it out from its socket.

    • Slide parallel to the logic board, in the direction of the cable.

  13. MacBook Pro 13" Touch Bar 2018 Screen Replacement: 13 단계, 이미지 1/2 MacBook Pro 13" Touch Bar 2018 Screen Replacement: 13 단계, 이미지 2/2
    • Fold the battery board data cable to the side and out of the way.

  14. MacBook Pro 13" Touch Bar 2018 Screen Replacement: 14 단계, 이미지 1/1
    • Use a T5 Torx driver to remove the 3.7 mm pancake screw securing the battery power connector.

  15. MacBook Pro 13" Touch Bar 2018 Screen Replacement, Disconnect the battery: 15 단계, 이미지 1/2 MacBook Pro 13" Touch Bar 2018 Screen Replacement, Disconnect the battery: 15 단계, 이미지 2/2
    • Use a spudger to gently lift the battery power connector, disconnecting the battery.

    • Lift the connector high enough so that it stays separated from its socket. If it accidentally makes contact during the course of your repair, it could damage your MacBook Pro.

  16. MacBook Pro 13" Touch Bar 2018 Screen Replacement, Remove the hinge covers: 16 단계, 이미지 1/3 MacBook Pro 13" Touch Bar 2018 Screen Replacement, Remove the hinge covers: 16 단계, 이미지 2/3 MacBook Pro 13" Touch Bar 2018 Screen Replacement, Remove the hinge covers: 16 단계, 이미지 3/3
    • Remove the four 1.9 mm T3 Torx screws securing the plastic covers on top of the display hinges.

    • Remove both plastic hinge covers.

  17. MacBook Pro 13" Touch Bar 2018 Screen Replacement, Disconnect the main display cable: 17 단계, 이미지 1/2 MacBook Pro 13" Touch Bar 2018 Screen Replacement, Disconnect the main display cable: 17 단계, 이미지 2/2
    • Remove the two 2.9 mm T3 Torx screws securing the aluminum cover on top of the main display cable.

    • Remove the cover.

  18. MacBook Pro 13" Touch Bar 2018 Screen Replacement: 18 단계, 이미지 1/2 MacBook Pro 13" Touch Bar 2018 Screen Replacement: 18 단계, 이미지 2/2
    • Remove the two 1.7 mm T3 Torx screws securing the aluminum cover on top of the display cable flex connector.

    • Remove the cover.

  19. MacBook Pro 13" Touch Bar 2018 Screen Replacement: 19 단계, 이미지 1/2 MacBook Pro 13" Touch Bar 2018 Screen Replacement: 19 단계, 이미지 2/2
    • Pry the display board flex cable straight up from its socket to disconnect it from the display board.

  20. MacBook Pro 13" Touch Bar 2018 Screen Replacement, Unscrew the antenna cable assembly: 20 단계, 이미지 1/3 MacBook Pro 13" Touch Bar 2018 Screen Replacement, Unscrew the antenna cable assembly: 20 단계, 이미지 2/3 MacBook Pro 13" Touch Bar 2018 Screen Replacement, Unscrew the antenna cable assembly: 20 단계, 이미지 3/3
    • Remove the four 1.5 mm T3 Torx screws securing the two aluminum covers on top of the two display board cables.

    • Use a pair of tweezers to remove the two aluminum covers.

  21. MacBook Pro 13" Touch Bar 2018 Screen Replacement: 21 단계, 이미지 1/2 MacBook Pro 13" Touch Bar 2018 Screen Replacement: 21 단계, 이미지 2/2
    • Remove the four 3.9 mm T5 Torx screws (two from each side) securing the antenna cable assembly.

    • Also remove the twelve 1.1 mm P2 pentalobe screws (six from each side).

  22. MacBook Pro 13" Touch Bar 2018 Screen Replacement, Disconnect the antenna cables: 22 단계, 이미지 1/3 MacBook Pro 13" Touch Bar 2018 Screen Replacement, Disconnect the antenna cables: 22 단계, 이미지 2/3 MacBook Pro 13" Touch Bar 2018 Screen Replacement, Disconnect the antenna cables: 22 단계, 이미지 3/3
    • Carefully disconnect the three antenna coax cables by prying them straight up from the logic board.

    • Slide your tweezers or the pointed end of your spudger underneath each cable until it's near the socket, and then gently twist or pry up to disconnect it.

    • To reconnect each cable, align the connector directly over its socket, and then press down so it snaps into place.

  23. MacBook Pro 13" Touch Bar 2018 Screen Replacement: 23 단계, 이미지 1/1
    • Remove the 2.8 mm T5 Torx screw securing the three antenna coax cables to the main board.

  24. MacBook Pro 13" Touch Bar 2018 Screen Replacement, Pry up the antenna cable assembly: 24 단계, 이미지 1/3 MacBook Pro 13" Touch Bar 2018 Screen Replacement, Pry up the antenna cable assembly: 24 단계, 이미지 2/3 MacBook Pro 13" Touch Bar 2018 Screen Replacement, Pry up the antenna cable assembly: 24 단계, 이미지 3/3
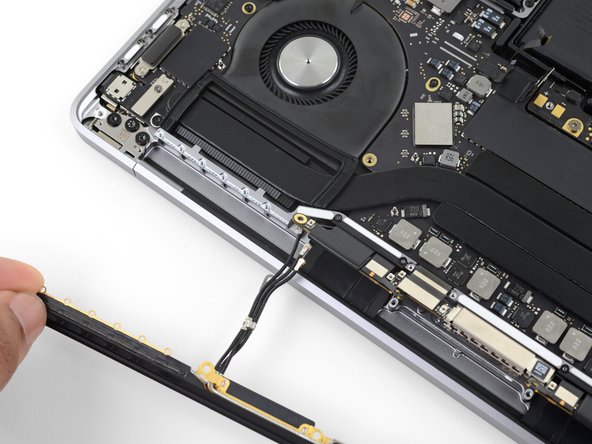
    • Use an opening pick to lever out the antenna cable assembly in the areas shown.

    • Don't slide the opening pick from side to side, as there are two display cables that could be damaged in the way.

  25. MacBook Pro 13" Touch Bar 2018 Screen Replacement, Remove the antenna assembly: 25 단계, 이미지 1/3 MacBook Pro 13" Touch Bar 2018 Screen Replacement, Remove the antenna assembly: 25 단계, 이미지 2/3 MacBook Pro 13" Touch Bar 2018 Screen Replacement, Remove the antenna assembly: 25 단계, 이미지 3/3
    • Carefully remove the antenna assembly, while simultaneously feeding the antenna cable bundle out from underneath the heat pipe.

  26. MacBook Pro 13" Touch Bar 2018 Screen Replacement: 26 단계, 이미지 1/1
    • Remove the antenna cable assembly.

    • During reassembly, gently pinch the cable bundle together and guide it under the heat pipe into the correct position on the board. If needed, use your tools to help guide it through, but don't force it.

  27. MacBook Pro 13" Touch Bar 2018 Screen Replacement, Unscrew the display cable assembly: 27 단계, 이미지 1/1
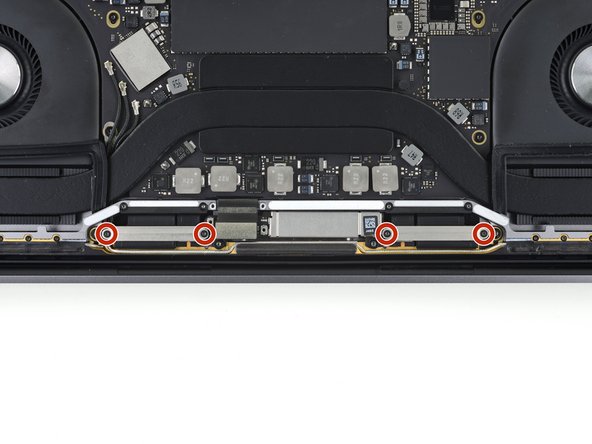
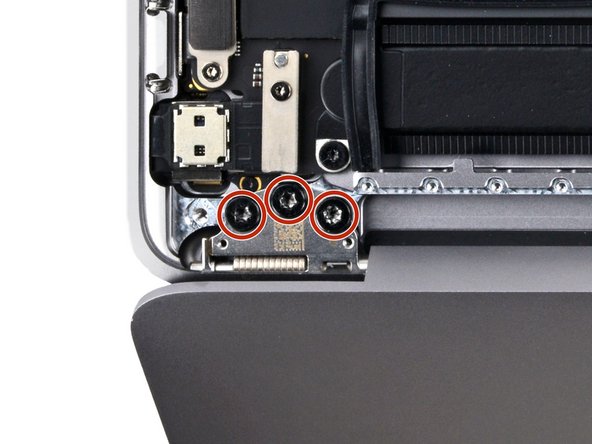
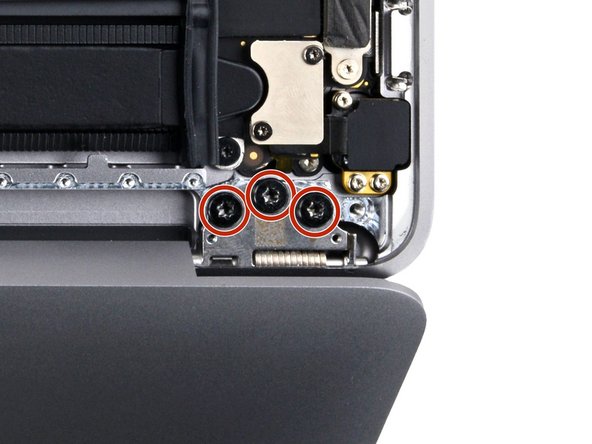
    • Remove the four 3.9 mm T3 Torx screws securing the two display cable cover springs.

    • During reassembly, if the cover springs aren't reaching their screw holes open the screen and pull them out until they reach.

  28. MacBook Pro 13" Touch Bar 2018 Screen Replacement, Remove the display cable assembly: 28 단계, 이미지 1/3 MacBook Pro 13" Touch Bar 2018 Screen Replacement, Remove the display cable assembly: 28 단계, 이미지 2/3 MacBook Pro 13" Touch Bar 2018 Screen Replacement, Remove the display cable assembly: 28 단계, 이미지 3/3
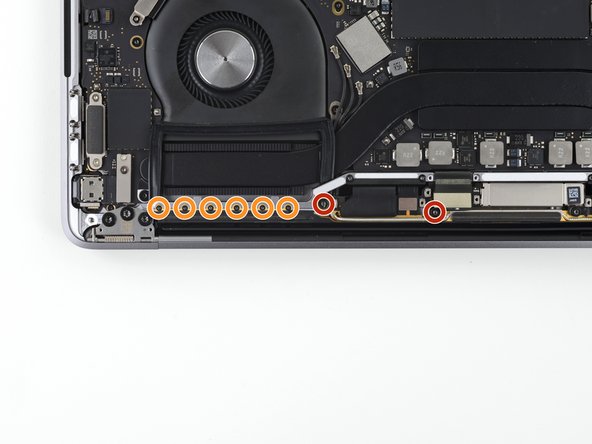
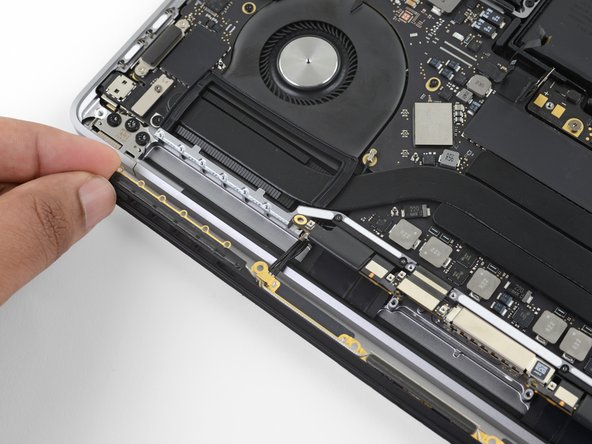
    • Grab the left side of the display cable assembly and pull it towards the bottom end of the MacBook and away from the cover spring.

    • Use a pair of tweezers to pull the cover spring of the display cable out of its recess.

    • Repeat this step with the right cover spring of the display cable assembly.
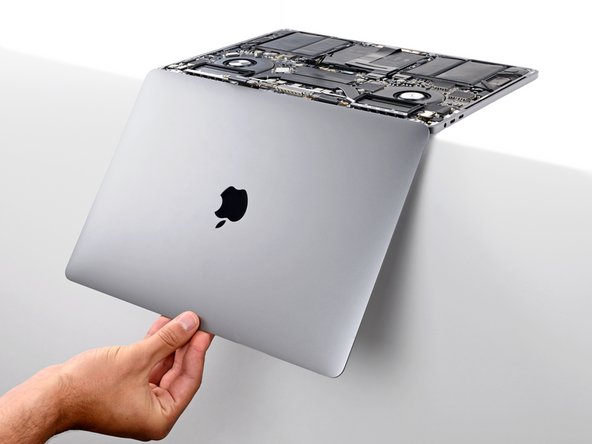
  29. MacBook Pro 13" Touch Bar 2018 Screen Replacement, Open your MacBook: 29 단계, 이미지 1/1
    • Open your MacBook to a 90-degree angle.

  30. MacBook Pro 13" Touch Bar 2018 Screen Replacement, Set your laptop down: 30 단계, 이미지 1/1
    • Gently place your laptop keyboard-side-down over the edge of a table so the screen hangs straight down.

  31. MacBook Pro 13" Touch Bar 2018 Screen Replacement, Loosen the hinge screws: 31 단계, 이미지 1/3 MacBook Pro 13" Touch Bar 2018 Screen Replacement, Loosen the hinge screws: 31 단계, 이미지 2/3 MacBook Pro 13" Touch Bar 2018 Screen Replacement, Loosen the hinge screws: 31 단계, 이미지 3/3
    • Keep your MacBook secured with your free hand while loosening the hinge screws so it doesn't fall off of the table.

    • Loosen, but don't remove, the six T8 Torx screws securing the hinges.

  32. MacBook Pro 13" Touch Bar 2018 Screen Replacement, Fully open the screen: 32 단계, 이미지 1/2 MacBook Pro 13" Touch Bar 2018 Screen Replacement, Fully open the screen: 32 단계, 이미지 2/2
    • Keep the main body secured against the table and open the screen all the way.

  33. MacBook Pro 13" Touch Bar 2018 Screen Replacement, Remove the hinge screws: 33 단계, 이미지 1/3 MacBook Pro 13" Touch Bar 2018 Screen Replacement, Remove the hinge screws: 33 단계, 이미지 2/3 MacBook Pro 13" Touch Bar 2018 Screen Replacement, Remove the hinge screws: 33 단계, 이미지 3/3
    • Support the screen with one hand and use your free hand to remove the six T8 Torx screws securing the hinges.

    • Don't let the screen fall on its own as you remove the screws.

  34. MacBook Pro 13" Touch Bar 2018 Screen Replacement, Lower the screen: 34 단계, 이미지 1/2 MacBook Pro 13" Touch Bar 2018 Screen Replacement, Lower the screen: 34 단계, 이미지 2/2
    • Lower the screen.

  35. MacBook Pro 13" Touch Bar 2018 Screen Replacement, Free the left hinge: 35 단계, 이미지 1/3 MacBook Pro 13" Touch Bar 2018 Screen Replacement, Free the left hinge: 35 단계, 이미지 2/3 MacBook Pro 13" Touch Bar 2018 Screen Replacement, Free the left hinge: 35 단계, 이미지 3/3
    • Keep the screen supported constantly during the next two steps.

    • Firmly secure the main body of your MacBook with one hand.

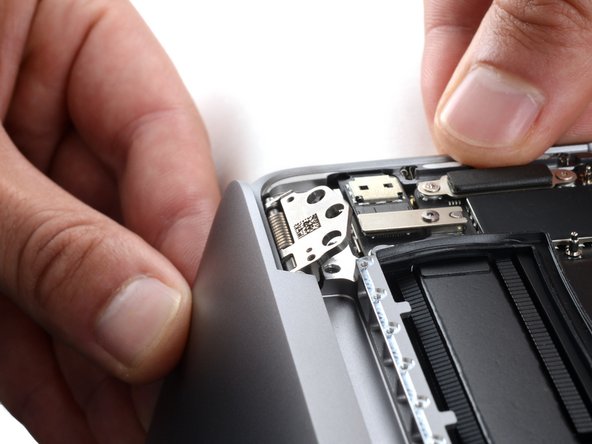
    • With your free hand, push the left side of the screen up and towards the bottom of your laptop to free the left hinge.

    • Be very careful not to damage the Touch Bar connector when moving the left hinge. It can be easily crushed, resulting in an inoperable Touch Bar.

  36. MacBook Pro 13" Touch Bar 2018 Screen Replacement, Remove the screen: 36 단계, 이미지 1/3 MacBook Pro 13" Touch Bar 2018 Screen Replacement, Remove the screen: 36 단계, 이미지 2/3 MacBook Pro 13" Touch Bar 2018 Screen Replacement, Remove the screen: 36 단계, 이미지 3/3
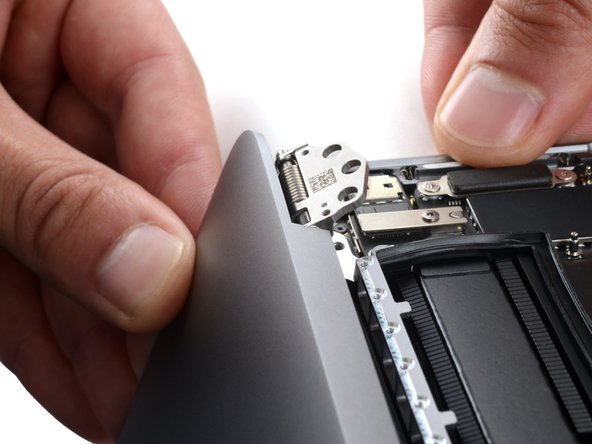
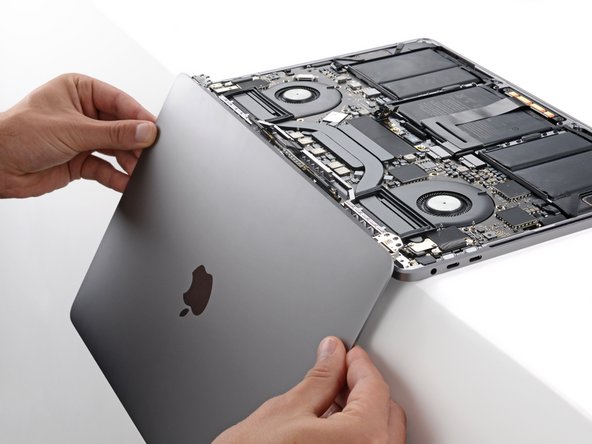
    • Free the right hinge and remove the screen.

결론

Compare your new replacement part to the original part—you may need to transfer remaining components or remove adhesive backings from the new part before installing.

To reassemble your device, follow the above steps in reverse order.

Take your e-waste to an R2 or e-Stewards certified recycler.

Repair didn’t go as planned? Try some basic troubleshooting or search our Answers community for help.

다른 28명이 해당 안내서를 완성하였습니다.

Tarun Thiruma

회원 가입일: 11/20/19

35,219 평판

안내서 134개 작성하였습니다

댓글 25개

I followed all the steps and my new screen is working properly (•̀ᴗ•́)و. I realized however that my Touch Bar isn’t lighting up anymore… Did I forget to connect something?

Guy - 답글

Where did you buy a replacement screen for your Mac? I can seem to find any for the A1989 Model that seems legit and I’m not sure how much I trust eBay listings.

Daniel Ramos -

Did you ever find an answer to this because I have had the same thing happen and I cannot for the life of me figure out why it has happened, what did you do to fix the problem or did you just give up and go to apple?

jack -

Unfortunately, my Touch Bar is still not working. I did some research back in 2020 and couldn’t find anything that would help fix this issue. And since my laptop is connected to an external screen and keyboard most of the time, it never really bothered me. But I should take it to Apple to see if it can be fixed and how much it’ll cost…

Guy -

I mean you may as well because what if it is just some simple calibration issue or some silly little thing that their diagnostic software can fix in less than a minute? If they try to charge too much money then you can always just deny, I believe that I will end up doing that soon to get a quote on just how much it will cost me to get both the display and Touch Bar repaired and see if it is worth it or not.

jack -

댓글 쓰기

조회 통계:

24 시간 전: 33

7일 전: 212

30일 전: 1,223

전체 시간: 49,771