이 버전에는 잘못된 편집 사항이 있을 수 있습니다. 최신 확인된 스냅샷으로 전환하십시오.
필요한 것
-
-
하단 케이스를 MacBook Pro 13" Unibody에 고정하는 다음 나사 열 개를 풀어주세요:
-
3mm 십자 나사 일곱 개
-
13.5mm 십자 나사 세 개.
-
-
이 단계는 번역되지 않았습니다. 번역을 도와주십시오
-
Use the flat end of a spudger to lift the battery connector up out of its socket on the logic board.
-
-
이 단계는 번역되지 않았습니다. 번역을 도와주십시오
-
Remove two Phillips screws securing the hard drive bracket to the upper case.
-
-
-
이 단계는 번역되지 않았습니다. 번역을 도와주십시오
-
Lift the hard drive by its pull tab and pull it out of the chassis, minding the cable attaching it to the computer.
-
-
이 단계는 번역되지 않았습니다. 번역을 도와주십시오
-
Remove the hard drive cable by pulling its connector straight away from the hard drive.
-
-
이 단계는 번역되지 않았습니다. 번역을 도와주십시오
-
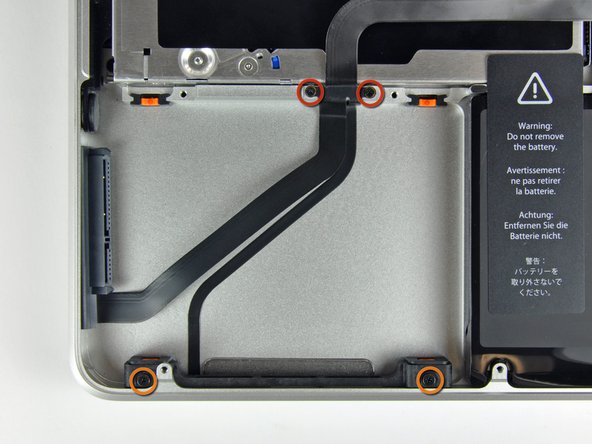
Remove the following four screws securing the hard drive and IR sensor cable to the upper case:
-
Two 1.5 mm Phillips screws.
-
Two 9.5 mm Phillips screws.
-
-
이 단계는 번역되지 않았습니다. 번역을 도와주십시오
-
Slide the hard drive and IR sensor bracket away from the edge of the upper case.
-
Carefully peel the hard drive and IR sensor cable from the upper case.
-
-
이 단계는 번역되지 않았습니다. 번역을 도와주십시오
-
Use the flat end of a spudger to pry the hard drive cable connector up off the logic board.
-


다른 292명이 해당 안내서를 완성하였습니다.

댓글 7개
Used a Phillips #00 and a creditcard. It's an easy job, takes about 10 minutes. :)
sjoerdstra - 답글
In step #8 the two small screws were very tight in my computer. The Phillips #00 was too large and damaging the screws. I changed to a Phillips #000 applied substantial pressure and voila, the screws came off.
Reassembly: placing the IR sensor cable (the one you"peeled off" in step #9) is a bit tricky. Start from the side opposite the IR sensor (the side with the two small screws of step 8) and press first along the short vertical side and then across towards the IR section. There should be a little left for a vertical section at the IR sensor end.
bgrinstein - 답글
if i change the HDD cable and get the same results what could be the the real problem , because the original problem as we all know was the we were getting the question mark on the white screen .