주요 콘텐츠로 건너뛰기

MacBook Pro 13" Unibody Mid 2010 Subwoofer & Right Speaker Replacement

필요한 것

  1. MacBook Pro 13" Unibody Mid 2010 Subwoofer & Right Speaker Replacement, Remove the lower case screws: 1 단계, 이미지 1/1
    • Remove the following 10 screws securing the lower case to the MacBook Pro 13" Unibody:

    • Seven 3 mm Phillips screws.

    • Three 13.5 mm Phillips screws.

  2. MacBook Pro 13" Unibody Mid 2010 Subwoofer & Right Speaker Replacement, Lift the lower case away: 2 단계, 이미지 1/1
    • Slightly lift the lower case and push it toward the rear of the computer to free the mounting tabs.

  3. MacBook Pro 13" Unibody Mid 2010 Subwoofer & Right Speaker Replacement, Battery: 3 단계, 이미지 1/1
    • For precautionary purposes, we advise that you disconnect the battery connector from the logic board to avoid any electrical discharge.

    • Use the flat end of a spudger to lift the battery connector up out of its socket on the logic board.

  4. MacBook Pro 13" Unibody Mid 2010 Subwoofer & Right Speaker Replacement, Optical Drive: 4 단계, 이미지 1/1
    • For precautionary purposes, we advise that you disconnect the subwoofer connector from the logic board to avoid any electrical discharge. This step is optional and is not required.

    • Remove the soft padding that may be on top and gently pull the connector up out of its socket on the logic board.

  5. MacBook Pro 13" Unibody Mid 2010 Subwoofer & Right Speaker Replacement: 5 단계, 이미지 1/1
    • It will be necessary to slide the small clear plastic cable retainer (boxed in red) glued to the logic board out of the way before disconnecting the camera cable. Be careful not to break any components off the board as you slide it away from the camera cable connector.

    • Pull the camera cable connector toward the optical drive to disconnect it from the logic board.

    • This socket is metal and can be easily bent. Be sure to align the connector with its socket on the logic board before mating the two pieces.

  6. MacBook Pro 13" Unibody Mid 2010 Subwoofer & Right Speaker Replacement: 6 단계, 이미지 1/1
    • Use the flat end of a spudger to pry the optical drive connector straight up off the logic board.

  7. MacBook Pro 13" Unibody Mid 2010 Subwoofer & Right Speaker Replacement: 7 단계, 이미지 1/1
    • Use the flat end of a spudger to pry the hard drive connector straight up off the logic board.

  8. MacBook Pro 13" Unibody Mid 2010 Subwoofer & Right Speaker Replacement: 8 단계, 이미지 1/1
    • Remove the following screws securing the subwoofer to the upper case:

    • One 3.8 mm Phillips screw

    • One 5 mm Phillips screw

  9. MacBook Pro 13" Unibody Mid 2010 Subwoofer & Right Speaker Replacement: 9 단계, 이미지 1/2 MacBook Pro 13" Unibody Mid 2010 Subwoofer & Right Speaker Replacement: 9 단계, 이미지 2/2
    • The subwoofer is still connected to the right speaker, so don't completely remove it just yet.

    • Lift the subwoofer off the optical drive, and set it above the computer.

  10. MacBook Pro 13" Unibody Mid 2010 Subwoofer & Right Speaker Replacement: 10 단계, 이미지 1/2 MacBook Pro 13" Unibody Mid 2010 Subwoofer & Right Speaker Replacement: 10 단계, 이미지 2/2
    • Remove the two 10 mm Phillips screws securing the camera cable bracket to the upper case.

    • The leftmost screw may remain captive in the camera cable.

    • Lift the camera cable bracket out of the upper case.

  11. MacBook Pro 13" Unibody Mid 2010 Subwoofer & Right Speaker Replacement: 11 단계, 이미지 1/2 MacBook Pro 13" Unibody Mid 2010 Subwoofer & Right Speaker Replacement: 11 단계, 이미지 2/2
    • Remove the three 2.5 mm Phillips screws securing the optical drive to the upper case.

    • Lift the optical drive from its right edge and pull it out of the computer.

  12. MacBook Pro 13" Unibody Mid 2010 Subwoofer & Right Speaker Replacement, Subwoofer & Right Speaker: 12 단계, 이미지 1/1
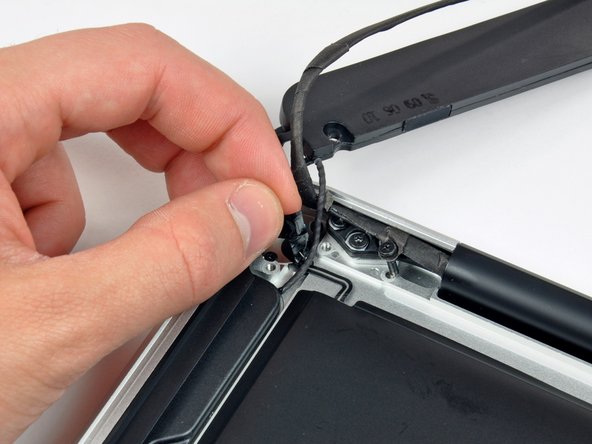
    • Peel back the small piece of black tape covering the right speaker cable.

    • Be careful, as the power button ribbon cable is directly under this piece of tape.

  13. MacBook Pro 13" Unibody Mid 2010 Subwoofer & Right Speaker Replacement: 13 단계, 이미지 1/1
    • Use the tip of a spudger to pry the right speaker up off the adhesive securing it to the upper case.

  14. MacBook Pro 13" Unibody Mid 2010 Subwoofer & Right Speaker Replacement: 14 단계, 이미지 1/1
    • Lift the subwoofer and right speaker assembly out of the upper case.

결론

To reassemble your device, follow these instructions in reverse order.

다른 52명이 해당 안내서를 완성하였습니다.

Walter Galan

693,936 평판

안내서 1,203개 작성하였습니다

댓글 3개

Oh yeaAAHHH! Right speaker & subwoofer fixed. Thank you!

eepmon - 답글

The replacement subwoofer connector (step 4, which disconnection is required, not optional)was just a bit shorter, and just barely fit, so it was ‘iffy’ whether I’d get it to stay, but it did. Yea! No more sound distortion!!! Such an easy thing to fix!

wyrra - 답글

Hello, I've just brought a MacBook Pro 8,1 to life with an SSD. It works great but unfortunately no sound. There is no output listed in sound window. I tried cmd+opt+P+R without success. Would replacing the speaker assembly solve the problem or is this a hardware problem? Thanx

PS- I also restarted cord...something in processes that didn't work either.

edwood - 답글

댓글 쓰기

조회 통계:

24 시간 전: 5

7일 전: 35

30일 전: 147

전체 시간: 61,335