소개
이 안내서를 사용하여 죽은 하드 드라이브를 교체하세요.
새 하드 드라이브 속도가 느리거나 올바르게 작동하지 않으면 하드 드라이브 케이블을 교체해보세요. 케이블은 하드 드라이브와의 데이터 전송 속도를 저하하거나 방해하는 일반 문제 발생 지점입니다. 이는 빠른 읽기/쓰기 속도로 인한 일반적인 SSD 문제로 알려져 있습니다.
필요한 것
동영상 개요
-
-
다음 나사 열 개를 풀어주세요:
-
14.4mm Phillips/십자 #00 나사 세 개
-
3.5mm Phillips/십자 #00 나사 세 개
-
3.5mm shouldered Phillips/어깨 십자 #00 나사 네 개
-
-
-
-
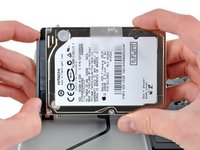
하드 드라이브 측면에서 6.0mm T6 Torx/톡스 하드 드라이브 고정 포스트 네 개를 풀어주세요.
-
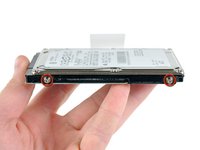
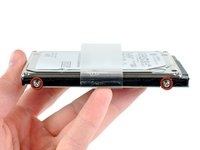
하드 드라이브 고정 포스트들을 새 하드 드라이브로 옯기세요.
-


MacBook Pro 13" Unibody Mid 2012 하드 드라이브를 교체하세요.
다른 853명이 해당 안내서를 완성하였습니다.
다음 번역가들에게 특별히 감사 드립니다:
100%

Christian Kim님은 저희가 세상을 수리하는데 동참하신 분입니다! 기여하시겠습니까?
번역 시작하기 ›

47가이드 댓글
In case you need to install/reinstall your OS, the new MBPs no longer come with an install disc. To install your OS you will need to hold down CMD + R while booting up until it chimes. It will then walk you through the process.
After holding command + R during start up I ran into a problem using Time Machine trying to restore all the files in my system. Apparently the Samsung solid state SSD 859 EVO drive I put in first needs to be formatted before Time Machine can even recognize it! No error message appeared, but no destination disk could be located. Apparently that's what happens with an unformatted hard drive. The solution is to select Disk Utilities in the first window seen after pressing command +R. Then In the left sidebar I could see all the drives including the external hard drive with my Time Machine back up and also the Samsung solid state hard drive I installed. With the newly installed hard drive selected, use the default erase and re-formating options and click on ERASE (this will also format the erased drive). This operation was very quick. I then returned to Time Machine and voila, the hard drive was locatable as a destination disk.
To the people that this still doesn’t work, try pressing cmd+alt+R, after connecting to WiFi go to Disk Utilities, format the new hard drive, and then you can proceed to restore or clean install iOS.
I needed to install the OS X in the new HD using a USB (manual in applesfera), then I was surprised when after do all this guide I see a message "Can't verified the copy...." I fixed reinstalling my old HD, and run the old OS, changed the date and time, I change again the HD, but (this is the important) don't pull off the battery connector. If you disconnect the battery, the system lost the date and time and yo can't install the OS X with and USB. I don't test the cmd + R option.