주요 콘텐츠로 건너뛰기

MacBook Pro 13" Unibody Mid 2012 Hard Drive Cable Replacement

필요한 것

  1. MacBook Pro 13" Unibody Mid 2012 Hard Drive Cable Replacement, Lower Case: 1 단계, 이미지 1/1
    • Remove the following ten screws:

    • Three 14.4 mm Phillips #00 screws

    • Three 3.5 mm Phillips #00 screws

    • Four 3.5 mm shouldered Phillips #00 screws

    • When replacing the small screws, align them perpendicular to the slight curvature of the case (they don't go straight down).

  2. MacBook Pro 13" Unibody Mid 2012 Hard Drive Cable Replacement: 2 단계, 이미지 1/2 MacBook Pro 13" Unibody Mid 2012 Hard Drive Cable Replacement: 2 단계, 이미지 2/2
    • Use your fingers to pry the lower case away from the body of the MacBook near the vent.

    • Remove the lower case.

  3. MacBook Pro 13" Unibody Mid 2012 Hard Drive Cable Replacement, Battery Connection: 3 단계, 이미지 1/2 MacBook Pro 13" Unibody Mid 2012 Hard Drive Cable Replacement, Battery Connection: 3 단계, 이미지 2/2
    • Use the edge of a spudger to pry the battery connector upwards from its socket on the logic board.

    • It is useful to pry upward on both short sides of the connector to "walk" it out of its socket. Be careful with the corners of the connectors, they can be easily broken off.

  4. MacBook Pro 13" Unibody Mid 2012 Hard Drive Cable Replacement: 4 단계, 이미지 1/1
    • Bend the battery cable slightly away from its socket on the logic board so it does not accidentally connect itself while you work.

  5. MacBook Pro 13" Unibody Mid 2012 Hard Drive Cable Replacement, Hard Drive: 5 단계, 이미지 1/1
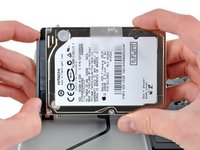
    • Remove the two Phillips screws securing the hard drive bracket to the upper case.

    • These screws will remain attached to the hard drive bracket.

  6. MacBook Pro 13" Unibody Mid 2012 Hard Drive Cable Replacement: 6 단계, 이미지 1/1
    • Remove the hard drive bracket.

    • The hard drive bracket may be firmly seated against the upper case.

  7. MacBook Pro 13" Unibody Mid 2012 Hard Drive Cable Replacement: 7 단계, 이미지 1/1
    • Use the attached pull tab to lift the hard drive out of the upper case.

    • Don't try to completely remove the hard drive just yet. It is still attached to the hard drive cable.

  8. MacBook Pro 13" Unibody Mid 2012 Hard Drive Cable Replacement: 8 단계, 이미지 1/2 MacBook Pro 13" Unibody Mid 2012 Hard Drive Cable Replacement: 8 단계, 이미지 2/2
    • Pull the hard drive cable away from the body of the hard drive.

    • Remove the hard drive.

  9. MacBook Pro 13" Unibody Mid 2012 Hard Drive Cable Replacement, Hard Drive Cable: 9 단계, 이미지 1/1
    • Use the flat end of a spudger to pry the hard drive cable connector up from its socket on the logic board.

  10. MacBook Pro 13" Unibody Mid 2012 Hard Drive Cable Replacement: 10 단계, 이미지 1/1
    • Remove the following four screws:

    • Two 3 mm Phillips screws

    • Two 9.7 mm Phillips screws

  11. MacBook Pro 13" Unibody Mid 2012 Hard Drive Cable Replacement: 11 단계, 이미지 1/1
    • Carefully peel up the thin IR sensor/sleep LED ribbon cable from the adhesive securing it to the upper case.

  12. MacBook Pro 13" Unibody Mid 2012 Hard Drive Cable Replacement: 12 단계, 이미지 1/1
    • Pull the front hard drive bracket containing the IR sensor/sleep LED away from the front edge of the upper case.

  13. MacBook Pro 13" Unibody Mid 2012 Hard Drive Cable Replacement: 13 단계, 이미지 1/1
    • Remove the hard drive cable.

    • Your replacement part may come with several adhesive foam bumpers. These are to ensure a snug fit of both bracket and hard drive. Apply only as needed.

  14. MacBook Pro 13" Unibody Mid 2012 Hard Drive Cable Replacement: 14 단계, 이미지 1/3 MacBook Pro 13" Unibody Mid 2012 Hard Drive Cable Replacement: 14 단계, 이미지 2/3 MacBook Pro 13" Unibody Mid 2012 Hard Drive Cable Replacement: 14 단계, 이미지 3/3
    • Your replacement part may or may not come with the front (sensor) bracket. If it does not, you'll need to transfer it to your new cable.

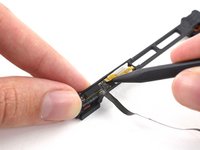
    • Use the tip of a spudger to flip the "lever" of the ZIF connector (left side in first photo) on the hard drive cable. The connector does not come off, see next instruction.

    • Gently pull the yellow sensor bracket cable out of the ZIF connector (to the right, in the second photo).

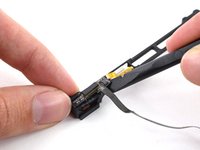
    • Use the flat end of a spudger to pry the hard drive cable up off the sensor bracket to which it is adhered.

    • Remove the adhesive backing from your new hard drive cable, stick it onto the sensor bracket, and connect the sensor bracket cable.

    • Many fixers cover the length of the thicker cable in the pair with sections of electrical tape on both sides because it can rub the tiny ridges inside the aluminum case causing a short to the case itself or simply breaking the connection.

결론

To reassemble your device, follow these instructions in reverse order.

다른 633명이 해당 안내서를 완성하였습니다.

Andrew Optimus Goldheart

회원 가입일: 10/17/09

502,106 평판

안내서 407개 작성하였습니다

iFixit iFixit 회원

Staff

135 회원들

안내서 16,475개 작성하였습니다

댓글 52개

Thank you Ifixit and Andrew "Optimus" Goldberg, the parts and tools arrived today i went to the shop to buy lunch when i had returned (15 mins later) my Husband had replaced the part (hdd cable) and my Macbook pro is super speedy again. Nice repair guide thank you i doubt i can say thank you enough.

carynturner - 답글

After many hours of trying to get my SSD drive to work, I read elsewhere that other users had issues with the HD cable that came with the laptop. From when I opened the envelope until my SSD booted was less than 30 minutes. If you have the right tools this is an easy fix. Just keep in mind that there is adhesive on the cable that goes to the bracket -- don't forget to peel off the paper backing and line it up correctly.

mbj - 답글

Hello, I have a mid 2009 Macbook pro 13. I have bought a hard disk cable that looks almost the same as the original one except for greater width and shorter length. I guess that this new cable fits the 2012 model, SO YOU MAY HAVE TO UPDATE THE GUIDE accordingly.

Electrically the wider cable also works on the mid 2009 model (at least for disk access) though it does not fit mechanically.

My friends be careful when you buy this part.

palbarede - 답글

thanks, Ifixit! Like many, my laptop developed the flashing question mark with startup even though when I removed the drive and put in external enclosure it worked perfectly, and putting in a different HD with a good system install on it also failed. thankfully I found out about the ribbon cable issue with a web search. The part fit perfectly and was easy to install, took about 10 minutes and I was up and running again.

Larry Schwartz

1schwartzmd - 답글

Thank you so much for this guide! My MacBook pro works! I had the folder of death on my screen so I just swapped out the ribbon and now it turns on. Easy fix and saved a lot of money. EASY TO DO!!!!

Landon - 답글

댓글 쓰기

조회 통계:

24 시간 전: 13

7일 전: 162

30일 전: 710

전체 시간: 450,386