주요 콘텐츠로 건너뛰기

MacBook Pro 14" Late 2023 (M3) Lower Case Replacement

필요한 것

  1. MacBook Pro 14" Late 2023 (M3) Lower Case Replacement, Unfasten the lower case: 1 단계, 이미지 1/1
    이 단계에 사용된 도구:
    FixMat
    $36.95
    구매
    • Throughout this repair, keep track of each screw and make sure it goes back exactly where it came from.

    • Use a P5 pentalobe driver to remove the eight screws securing the lower case:

    • Four 9.2 mm-long screws along the back edge (near the screen hinge)

    • Four 5 mm-long screws along the front edge (near the trackpad)

  2. MacBook Pro 14" Late 2023 (M3) Lower Case Replacement, Release the sliding clips: 2 단계, 이미지 1/3 MacBook Pro 14" Late 2023 (M3) Lower Case Replacement, Release the sliding clips: 2 단계, 이미지 2/3 MacBook Pro 14" Late 2023 (M3) Lower Case Replacement, Release the sliding clips: 2 단계, 이미지 3/3
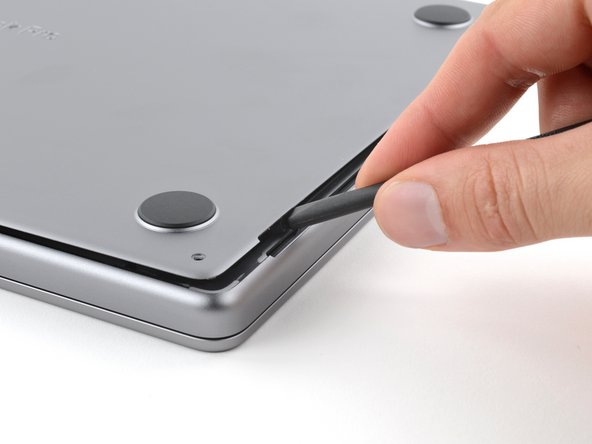
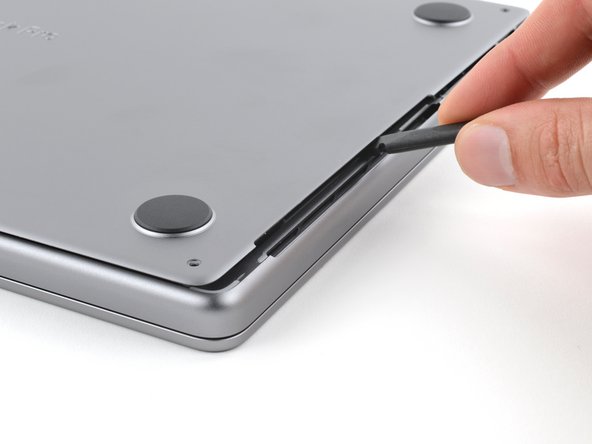
    • Sliding clips along the back edge of the MacBook secure the lower case. In this step, you'll shift the lower case away from the hinges to free it from these clips.

    • Insert the flat end of a spudger between the lower case and the right screen hinge.

    • Lever your spudger against the hinge to push the lower case away from it.

    • Repeat for the left hinge.

  3. MacBook Pro 14" Late 2023 (M3) Lower Case Replacement, Lower case information: 3 단계, 이미지 1/1
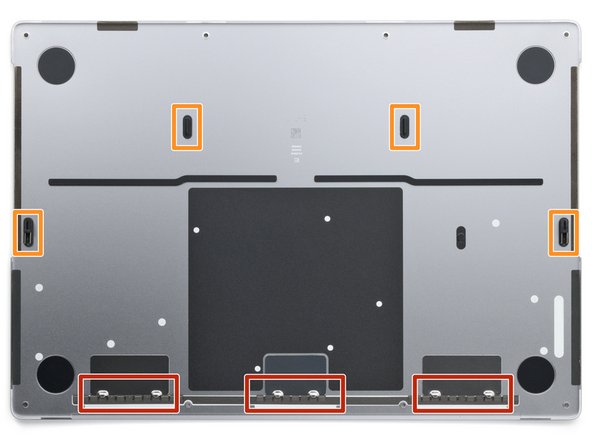
    • After you've released the sliding clips along the back edge, four remaining clips secure the lower case to the frame:

    • Two clips near the cutouts in the frame

    • Two clips near the middle of the lower case

    • As you release the lower case from the frame, you'll hear and feel a distinct "pop" as each of these four clips release.

  4. MacBook Pro 14" Late 2023 (M3) Lower Case Replacement, Release the right clips: 4 단계, 이미지 1/3 MacBook Pro 14" Late 2023 (M3) Lower Case Replacement, Release the right clips: 4 단계, 이미지 2/3 MacBook Pro 14" Late 2023 (M3) Lower Case Replacement, Release the right clips: 4 단계, 이미지 3/3
    • Don't insert your tool deeper than 1 cm (a little less than half an inch) near the front of the speaker cutouts to avoid damaging the speakers.

    • Insert the flat end of your spudger into the front of the cutout in the right side of the frame.

    • Slide your spudger toward the back of the cutout and pry up to release the two right-side clips.

    • Repeat for the left-side speaker cutout to release the two left-side clips.

  5. MacBook Pro 14" Late 2023 (M3) Lower Case Replacement, Remove the lower case: 5 단계, 이미지 1/3 MacBook Pro 14" Late 2023 (M3) Lower Case Replacement, Remove the lower case: 5 단계, 이미지 2/3 MacBook Pro 14" Late 2023 (M3) Lower Case Replacement, Remove the lower case: 5 단계, 이미지 3/3
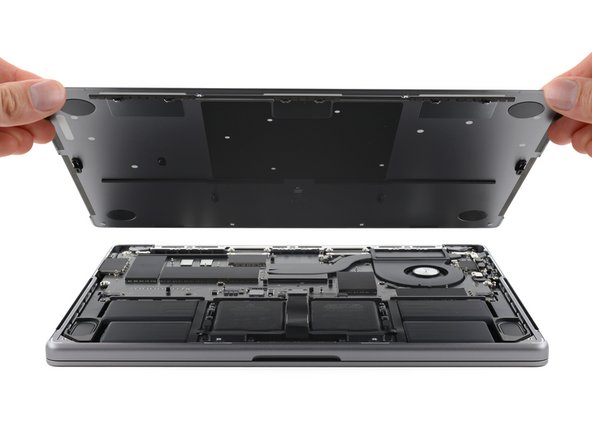
    • Remove the lower case.

    • To reinstall the lower case:

    • Lay it down and align the sliding clips with the back edge of the MacBook. Press down on the lower case and slide it toward the back edge to engage the clips.

    • When one side is engaged, it may push the other out of alignment. Check both sides as you push.

    • Once the back corners of the lower case are secured and flush with the frame, press down along the middle of the lower case to engage the four remaining clips.

    • You'll hear and feel each clip snap into place.

결론

To reassemble your device, follow these instructions in reverse order.

Repair didn’t go as planned? Try some basic troubleshooting, or ask our Answers community for help.

Clay Eickemeyer

회원 가입일: 09/19/22

67,203 평판

안내서 453개 작성하였습니다

iFixit iFixit 회원

Staff

136 회원들

안내서 17,410개 작성하였습니다

댓글 한 개

Will the M2 A2779 back cover fit the M3 A2992 laptop?

Drew Pham - 답글

댓글 쓰기

조회 통계:

24 시간 전: 1

7일 전: 19

30일 전: 99

전체 시간: 498