주요 콘텐츠로 건너뛰기

MacBook Pro 15" Retina Display Early 2013 Heat Sink Replacement

필요한 것

  1. MacBook Pro 15" Retina Display Early 2013 Heat Sink Replacement, Lower Case: 1 단계, 이미지 1/1
    • Remove the following P5 pentalobe screws securing the lower case to the MacBook Pro:

    • Eight 3.0 mm

    • Two 2.3 mm

  2. MacBook Pro 15" Retina Display Early 2013 Heat Sink Replacement: 2 단계, 이미지 1/1
    • Lifting from the edge nearest the clutch cover, lift the lower case off the MacBook Pro.

    • Set the lower case aside.

  3. MacBook Pro 15" Retina Display Early 2013 Heat Sink Replacement, Battery Connector: 3 단계, 이미지 1/1
    • Peel back the warning label covering the battery connector.

  4. MacBook Pro 15" Retina Display Early 2013 Heat Sink Replacement: 4 단계, 이미지 1/2 MacBook Pro 15" Retina Display Early 2013 Heat Sink Replacement: 4 단계, 이미지 2/2
    • Using the flat end of a spudger, gently pry the battery connector straight up out of its socket on the logic board.

    • Bend the battery cables back and out of the way, ensuring that the battery connector doesn't accidentally make contact with the logic board.

  5. MacBook Pro 15" Retina Display Early 2013 Heat Sink Replacement, Heat Sink: 5 단계, 이미지 1/3 MacBook Pro 15" Retina Display Early 2013 Heat Sink Replacement, Heat Sink: 5 단계, 이미지 2/3 MacBook Pro 15" Retina Display Early 2013 Heat Sink Replacement, Heat Sink: 5 단계, 이미지 3/3
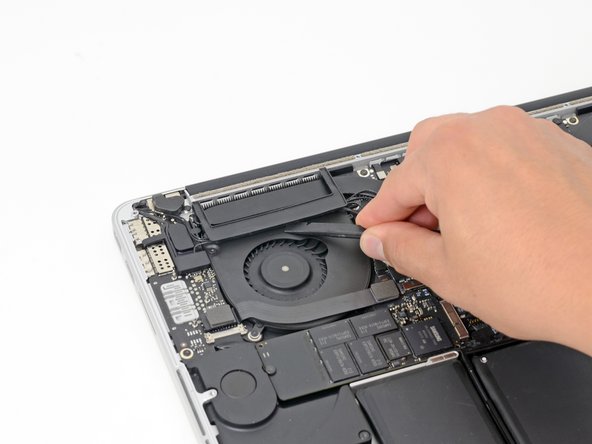
    • Insert the flat end of a spudger underneath the rubber heat sink cover on the right fan.

    • Slide the spudger underneath the length of the cover, releasing the adhesive.

    • Lift the cover and rotate it off of the heat sink.

  6. MacBook Pro 15" Retina Display Early 2013 Heat Sink Replacement: 6 단계, 이미지 1/3 MacBook Pro 15" Retina Display Early 2013 Heat Sink Replacement: 6 단계, 이미지 2/3 MacBook Pro 15" Retina Display Early 2013 Heat Sink Replacement: 6 단계, 이미지 3/3
    • In the same manner described above, release the adhesive and flip back the heat sink cover on the left fan.

  7. MacBook Pro 15" Retina Display Early 2013 Heat Sink Replacement: 7 단계, 이미지 1/1
    • Remove the following ten screws securing the heat sink to the logic board:

    • Two 2.4 mm T5 Torx screws

    • Six 3.4 mm T5 Torx screws

    • One 5.2 mm Raised Head T5 Torx screw

    • One 3.5 mm T5 Torx screw

  8. MacBook Pro 15" Retina Display Early 2013 Heat Sink Replacement: 8 단계, 이미지 1/1
    • Grasping the heat sink from one side, lift the heat sink off of the MacBook Pro, pulling it free from the computer.

    • The thermal paste may make it difficult to remove the heat sink. Pull the heat sink off gently but forcefully to avoid damaging any components on the logic board.

    • When installing the new heat sink, do not forget to replace the thermal paste underneath the heat sink. See our Applying Thermal Paste guide for further instructions.

결론

To reassemble your device, follow these instructions in reverse order.

다른 20명이 해당 안내서를 완성하였습니다.

Sam Goldheart

회원 가입일: 10/18/12

465,854 평판

안내서 538개 작성하였습니다

iFixit iFixit 회원

Staff

135 회원들

안내서 17,198개 작성하였습니다

댓글 0개

댓글 쓰기

조회 통계:

24 시간 전: 1

7일 전: 24

30일 전: 60

전체 시간: 15,817